

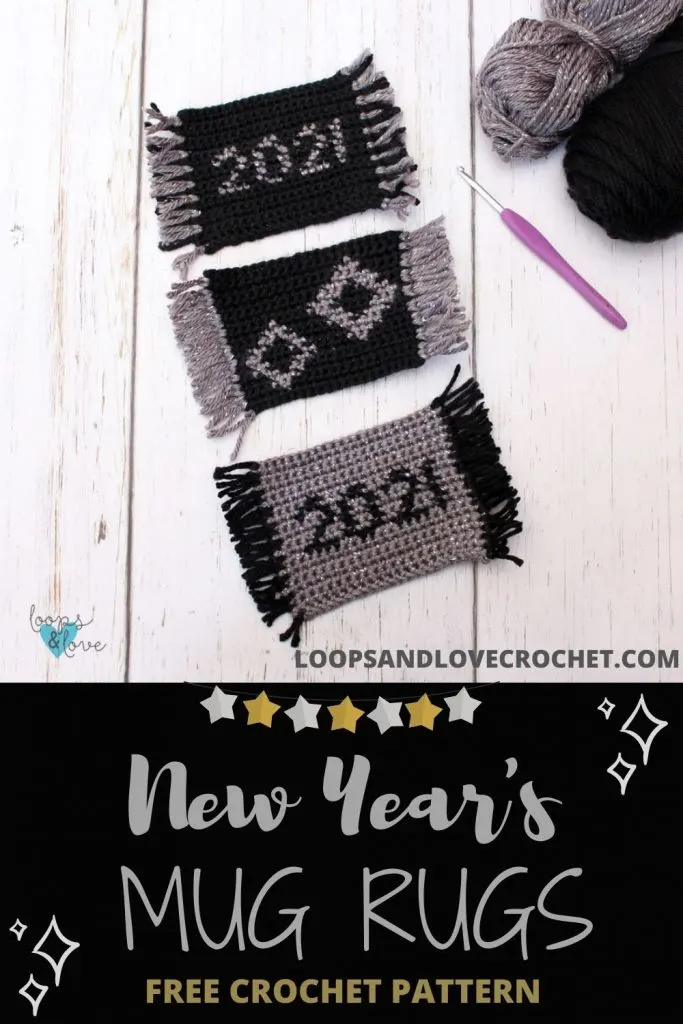
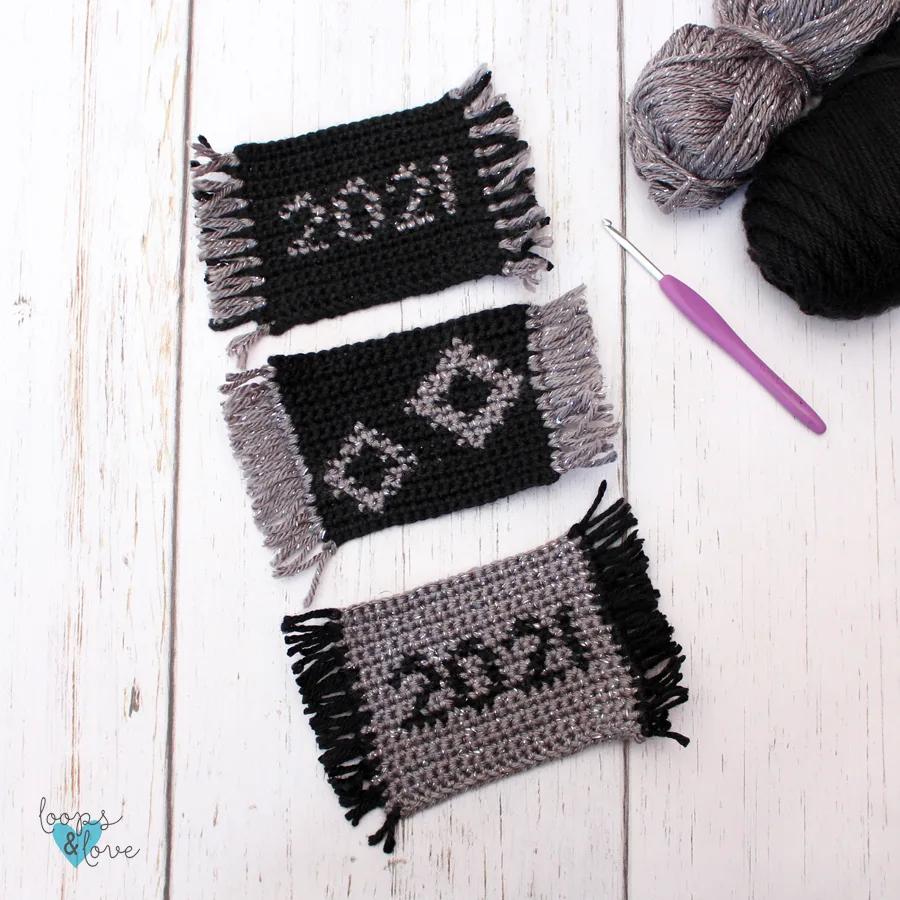
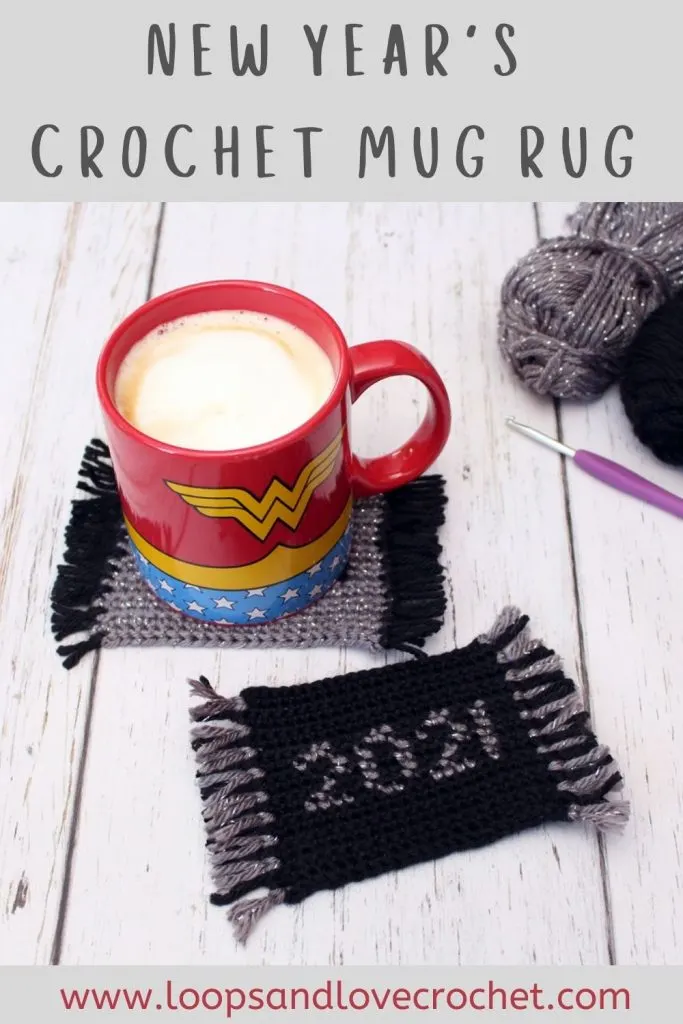
These New Year’s Mug Rugs are a fun way to ring in the New Year! They are made in tapestry crochet technique, which means that you’ll be alternating between the two colors of yarn and carrying the unused color along with you under your stitches. The fun fringe on the edges is added at the end to complete your little mug rugs!
I don’t know about you, but I am especially looking forward to this new year coming! I hope that 2021 is way better than 2020. Wishing you a 2021 that is full of peace, joy, family, friends, and good-health!
I hope you love making these New Year’s Mug Rugs as much as I did!
Remember to like Loops and Love Crochet on Facebook and join the Loops and Love Crochet Group! I’d also LOVE it if you followed @loopsandlovecrochet on Instagram!
If you like crochet video tutorials, check out (and subscribe to) my Loops and Love Crochet YouTube Channel!

The New Year’s Mug Rugs crochet pattern is available for FREE on this website. If you’d like an ad-free, printable PDF version, you may purchase it for a small fee from my Etsy or Ravelry shops. Thank you so much for supporting Loops & Love Crochet!
Disclosure: This post may contain affiliate links, which means I may receive a small commission if you click a link and purchase something that I have recommended. This is done at no extra cost to you. Thank you for supporting Loops & Love Crochet!
Materials:
- Worsted weight yarn (#4 weight) – Any worsted weight yarn can be used for this project. I used Caron Simply Soft in Black and Caron Simply Soft Party in Platinum Sparkle. You can find this yarn on Amazon or Yarnspirations!
- 4 mm crochet hook
- Yarn needle for weaving in ends.
Stitches Used:
- Ch – chain
- Sl St – slip stitch
- SC – single crochet
Gauge
- 2 inches square = approx. 10 rows of 9 SC stitches.
Finished Size:
- The New Year’s Mug Rugs measure approx. 4.75” wide by 3.5” tall, not including the fringe.
Important Notes:
- Turned Rows – This pattern is made in back and forth rows. After each row, you will chain 1 and turn your project. The chain 1 does not count towards the stitch count.
- Color Changes – You will be chaining colors often in this pattern to create the design in the graph. To change colors, complete the last SC in the first color up until the last yarn over. Yarn over with the new color and pull through last step of the SC stitch. So, your SC will go like this: insert hook into last stitch of the first color, pull up a loop, yarn over with new color, pull through all loops on hook. Now you will be working in the new color until you change colors again (carrying the unused color along with you under your stitches).
- Tapestry Crochet Tips – For this project, you will be using the tapestry crochet technique for the part of the mug rug that contains the pattern. For the 2021 mug rug, this will only be the portion that has the numbers, however, for the diamond design mug rug, you’ll be working in tapestry crochet for most of the project. This means, when you change colors, you will be carrying the unused color along under your stiches. Then, when you need to change colors, you’ll yarn over in the new color (using color change technique explained above) and crochet the written number of stitches, carrying the other color along with you, until you change colors again and switch.
- Carrying yarn at the end of each row – When you get to the last few stitches of the row, instead of carrying the second color with you for the chain 1 and turn, drop it a few stitches before the end of the row, continue the chain 1 and turn in the main color, then pick up the second color when you work back in the next row and carry it under your stitches again until you need to make color changes. Be sure that when you drop the second color, you drop it towards the wrong side of your project. The wrong side is the back of the mug rug, while the right side is the front side. When you are working on an odd numbered row, you’ll have the right side (RS) facing you and will drop any yarn towards the back of the project. When you are working on an even numbered row, you will have the wrong side (WS) facing you and you will drop any yarn towards you. Keeping any noticeable yarn drops and pickups on the back of the mug rug will keep the front nice and clean.
- I have a video tutorial that shows how to make color changes in tapestry crochet from a different one of my projects. You can find it on my YouTube Channel HERE. The difference in this mug rug pattern is that you will carry the unused yarn with you, instead of dropping and picking up as needed, with the exception of dropping the carried color at the end of the row.
- Size modifications –If you want to make the finished mug rug larger, you can easily add extra rows of the main color at the top and bottom of the project before you start on the design portion. To make the mug rug wider, just add extra stitches to the left and right of the mug rug in the main color. I’d recommend adding equal rows or stitches on either side (or top/bottom) so that the design stays centered.
New Year’s Mug Rugs – Tapestry Crochet Graphs and Instructions
Below, you’ll see the graphs that I created for the New Year’s Mug Rugs. Each box in the graph counts as one SC stitch. This means you’ll be working 18 rows of 22 stitches, following the color changes in the graph.
IMPORTANT NOTE – To read this graph, you will be starting at the bottom right and working your way across in back and forth rows. All ODD numbered rows will have the right side of the project facing you, EVEN numbered rows will have the wrong side facing you. If you are dropping any yarn to pick up (like before you get to the end of each row), be sure to drop it towards the wrong side of your project (this will be the back of the mug rug). At the end of each row, be sure to chain 1 and then turn your project and work back along the next row in the opposite direction . For example, row 1 is worked right to left, chain 1 and turn, row 2 is worked left to right, chain 1 and turn, row 3 is right to left, and so on).
*Note – When working the 2021 mug rug, I just worked in the main color (black) for the whole mug rug, other than the middle rows that were done in tapestry crochet alternating between back and silver yarn. For the diamond design mug rug, you’ll be working in tapestry crochet for almost the whole pattern.
***The PDF version of this pattern includes larger graphs for printing.***

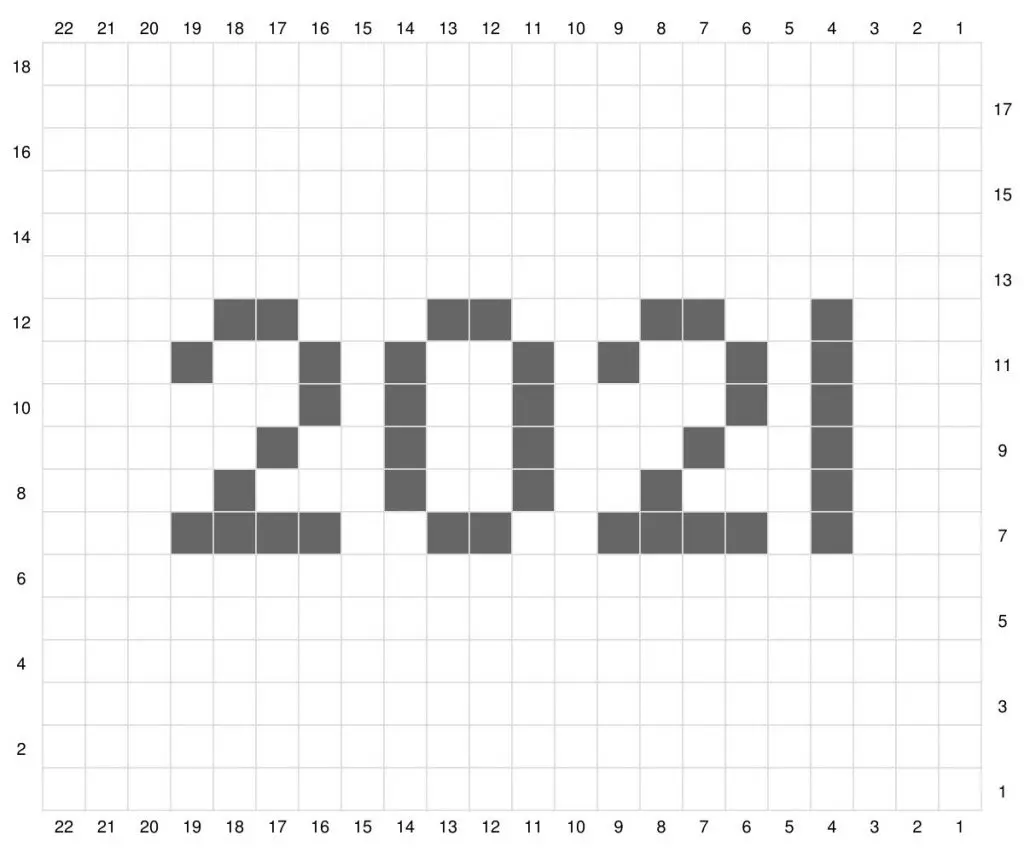

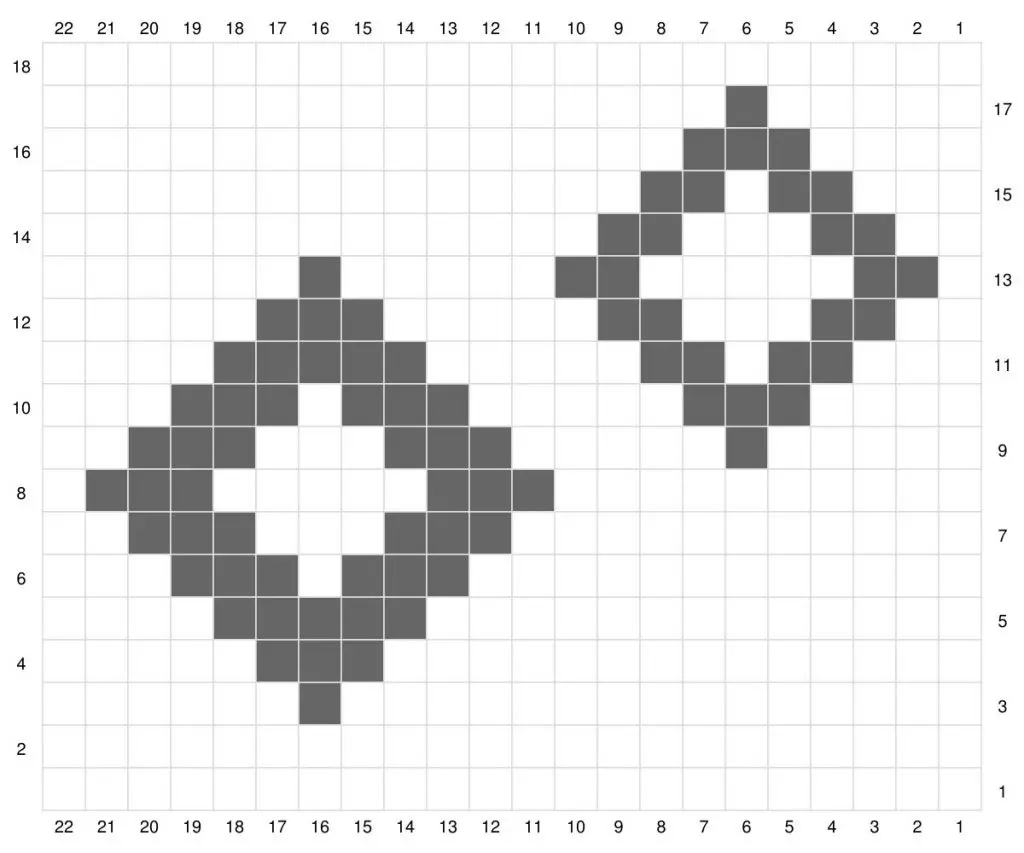
I made the mug rugs using black as the main color and silver as the accent color. To keep the graphs printer-friendly, the white boxes represent the main color and the grey boxes show the color changes to create the designs. You can change your main and accent color, according to your preference. They also look great with silver as the main color and black as the accent, if you want more sparkle in your mug rugs.
Remember to keep consistent tension, even when working with the different colors. This is so your rectangular panel comes out nice and even on the sides, making your mug rug nice and even in a perfect rectangle shape.
Below, I have provided written instructions below for working all of the color changes in the graph.
Written Instructions
Row 1: In black (or main color), Ch 23, SC in 2nd chain from hook and in each chain across, ch 1, turn. (22)
*As an alternative to a starting chain, you can work 22 foundation single crochet stitches. I prefer to start many projects with a foundation single crochet. This is because you can work the chain and the first row at the same time and it leaves a nicer finished edge. For this project, either a starting chain or foundation will work. If you are interested, there’s a Foundation Single Crochet Video Tutorial on my YouTube Channel HERE:
Rows 2-18: SC in each stitch across, ch 1, turn. (22) Follow the graph or written instructions for the color changes. *No chain 1 and turn after row 18, fasten off instead.
See the notes below for the color changes, number of SC stitches in each color, and the direction you are traveling in on the graph. I’ll indicate for each row whether you are working with the right side facing you (RS) or the wrong side (WS).
2021 Mug Rug – Written Instructions
b = Black and s = Silver
← Row 1 [RS]: b22
→ Row 2 [WS]: b22
← Row 3 [RS]: b22
→ Row 4 [WS]: b22
← Row 5 [RS]: b22
→ Row 6 [WS]: b22
← Row 7 [RS]: b3, s, b, s4, b2, s2, b2, s4, b3
→ Row 8 [WS]: b4, s, b3, s, b2, s, b2, s, b3, s, b3
← Row 9 [RS]: b3, s, b2, s, b3, s, b2, s, b2, s, b5
→ Row 10 [WS]: b6, s, b, s, b2, s, b4, s, b, s, b3
← Row 11 [RS]: b3, s, b, s, b2, s, b, s, b2, s, b, s, b2, s, b3
→ Row 12 [WS]: b4, s2, b3, s2, b3, s2, b2, s, b3
← Row 13 [RS]: b22
→ Row 14 [WS]: b22
← Row 15 [RS]: b22
→ Row 16 [WS]: b22
← Row 17 [RS]: b22
→ Row 18 [WS]: b22
Diamond Mug Rug – Written Instructions
b = Black and s = Silver
← Row 1 [RS]: b22
→ Row 2 [WS]: b22
← Row 3 [RS]: b15, s, b6
→ Row 4 [WS]: b5, s3, b14
← Row 5 [RS]: b13, s5, b4
→ Row 6 [WS]: b3, s3, b, s3, b12
← Row 7 [RS]: b11, s3, b3, s3, b2
→ Row 8 [WS]: b, s3, b5, s3, b10
← Row 9 [RS]: b5, s, b5, s3, b3, s3, b2
→ Row 10 [WS]: b3, s3, b, s3, b5, s3, b4
← Row 11 [RS]: b3, s2, b, s2, b5, s5, b4
→ Row 12 [WS]: b5, s3, b5, s2, b3, s2, b2
← Row 13 [RS]: b, s2, b5, s2, b5, s, b6
→ Row 14 [WS]: b13, s2, b3, s2, b2
← Row 15 [RS]: b3, s2, b, s2, b14
→ Row 16 [WS]: b15, s3, b4
← Row 17 [RS]: b5, s, b16
→ Row 18 [WS]: b22
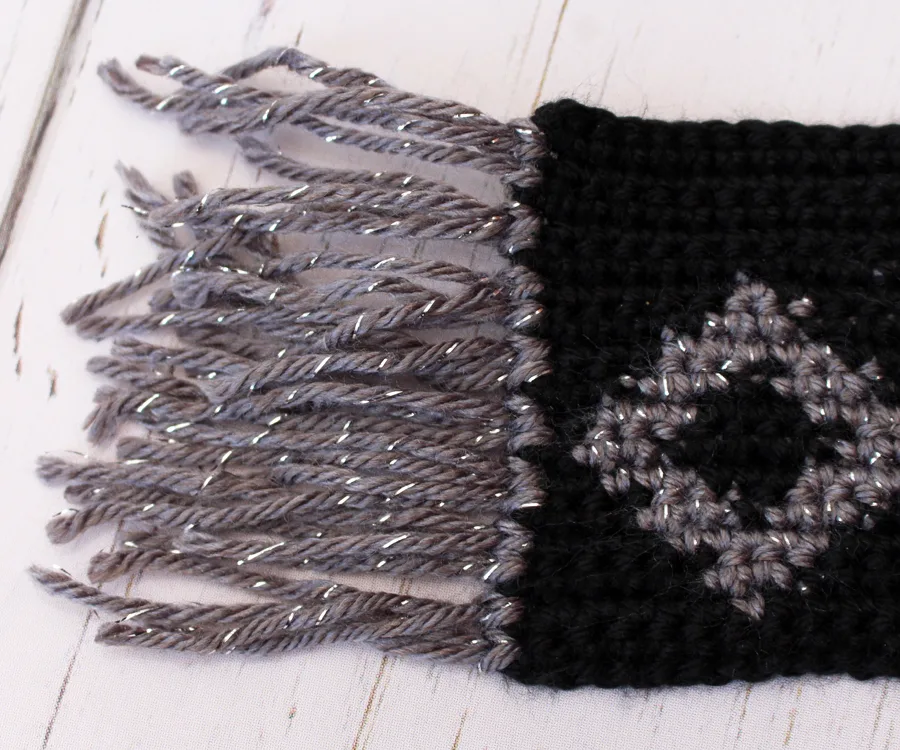
Now that you are finished the rectangle tapestry crochet portion of the pattern, you will now be adding the fringe to the sides to create the rug look.

Fringe Instructions
You can choose to do the fringe in the accent color or a combination of the main and accent color. For the 2021 mug rug, I alternated silver and black fringe. For the diamond design mug rug, I only used silver.
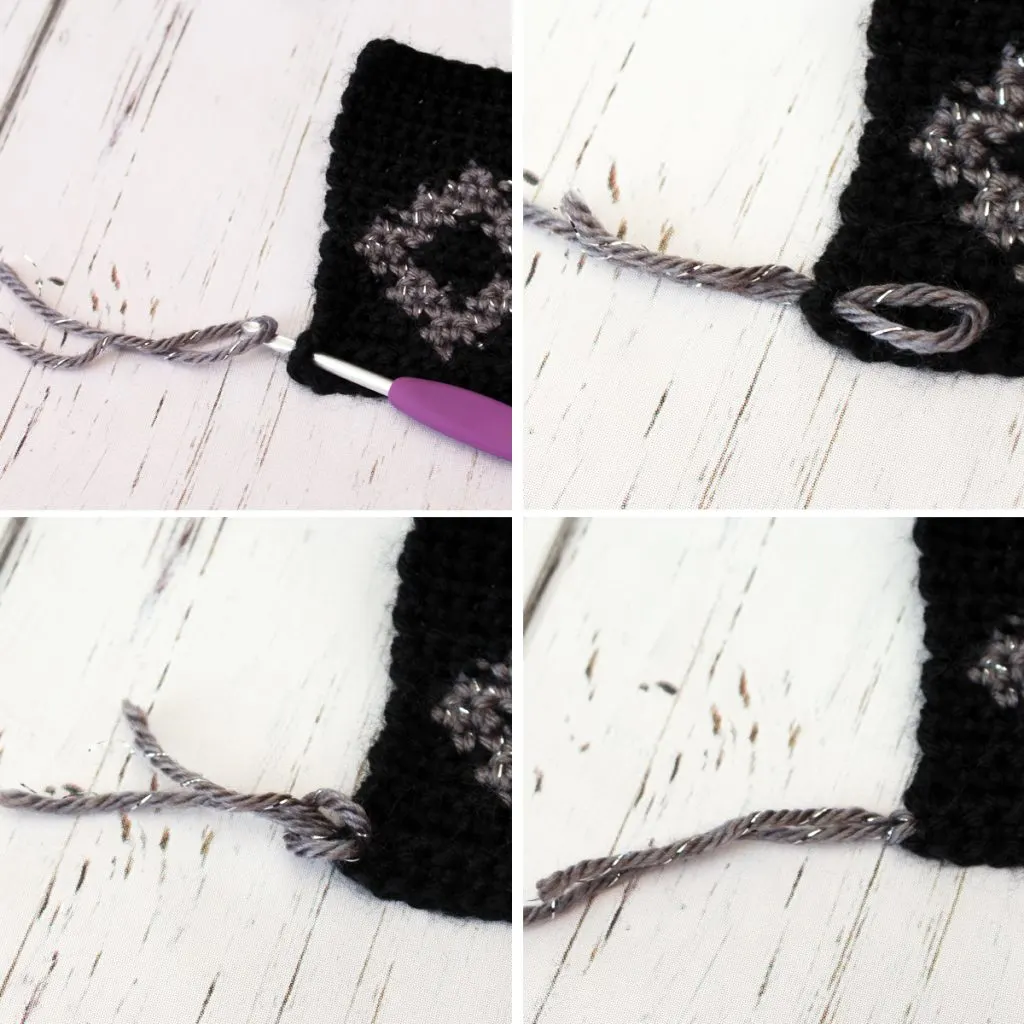
Cut 36 strands of yarn, about 5 inches long each. Fold a strand of yarn in half. Now, starting in one corner, insert your crochet hook through a stitch along the edge of the mug rug, grab the strand of yarn and pull the loop to the front side of your project. Remove your crochet hook and loop the ends of the yarn strand through the loop and pull it tight. Continue adding pieces of fringe up the side of the mug rug, placing one at the end of each row. Then do the same for the other side. When you are all finished, use scissors to trim the fringe so it’s even and at your desired length.


You’re all finished! I hope you love using your fun New Year’s Mug Rugs to ring in the New Year!
Wishing you a happy New Year and a wonderful 2021 ahead!

If you’re looking for more free crochet patterns on the blog, check them all out here!
**Want to be kept in the loop? Be sure to like Loops and Love Crochet on Facebook and join the Loops and Love Crochet Group! Don’t forget to follow @loopsandlovecrochet on Instagram! Remember to tag Loops and Love Crochet when you post your fnished projects on social media! I’d love to see them! **
*You may make and sell any items made from my patterns, but please link back to my blog or Loops & Love Crochet as the designer. Please do not copy this pattern or photos and share as your own, in part or in whole. Instead, link back to the Loops and Love Crochet blog (especially when selling items you make from my patterns). Thank you!
Alexandra
Tuesday 5th of January 2021
Love the glitter from the party yarn - really adds to the new years feel.
Loops and Love Crochet
Tuesday 5th of January 2021
Aweee thank you so much!!! :)
Cindy
Sunday 27th of December 2020
Hi Amanda, I've read & searched this post now 3 times for the graphs you indicated you included on here, but. I'm just NOT finding them...just written! can you point the graphs out to my old eyes please! thanks!
Loops and Love Crochet
Sunday 27th of December 2020
Hi Cindy! I'm so sorry! I did not realize the graphs weren't showing up properly. I uploaded them again and they seem to work now on my end. Let me know if you have trouble seeing them! :)