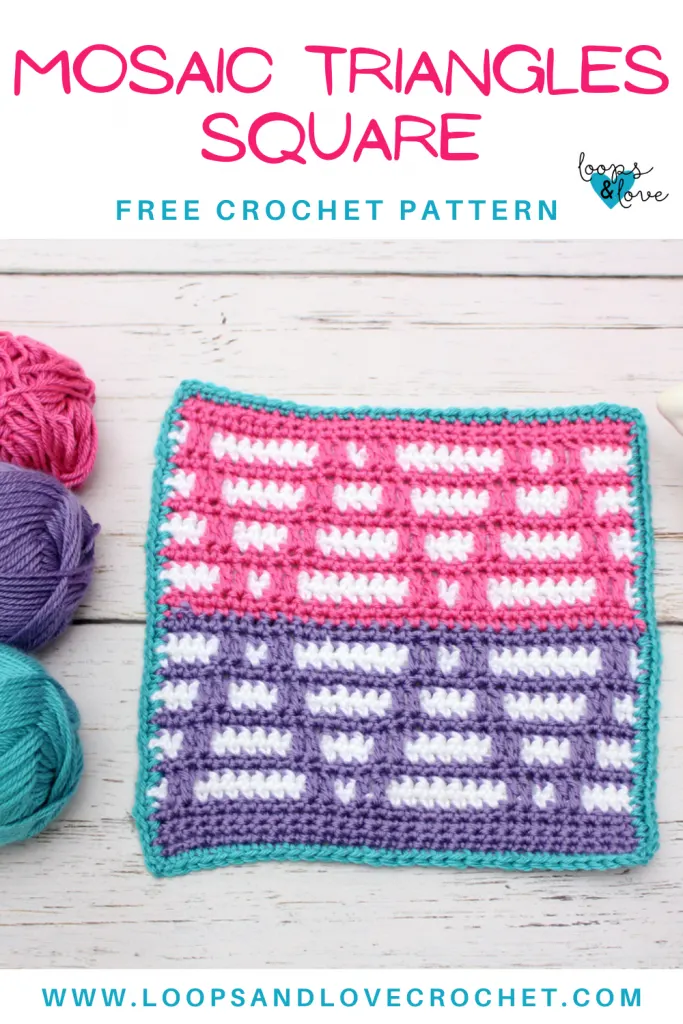
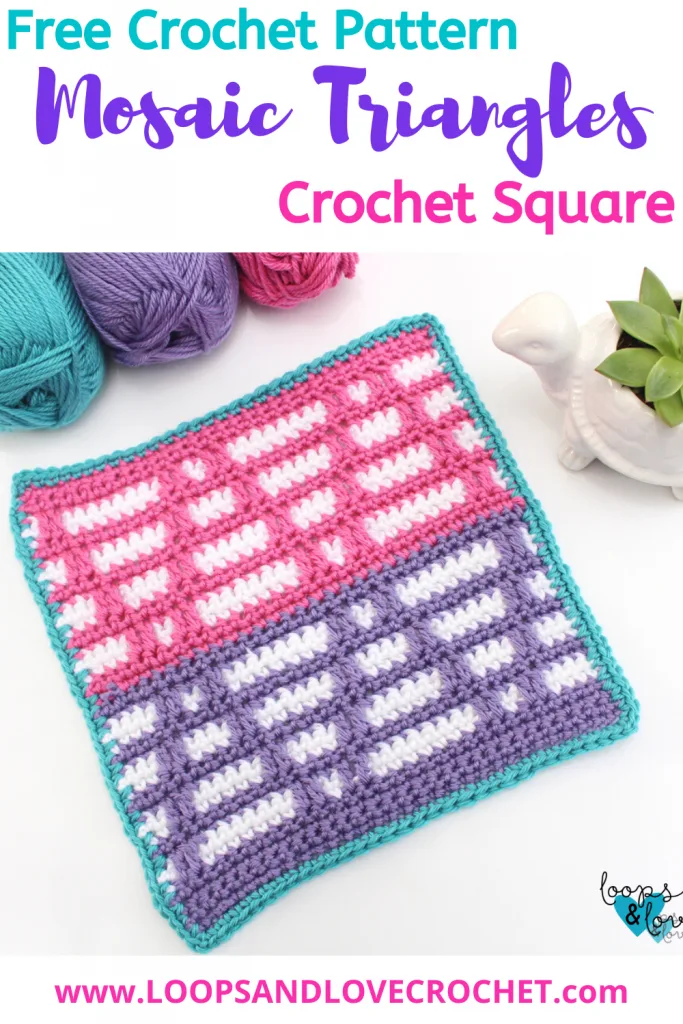
Hello Friends! I’m so excited to share the Mosaic Triangles Square with you today! Keep on reading to learn more about this square and the Stash Busting Sampler Crochet Along from Unraveled Mitten!


The Mosaic Triangles Square is worked up in the mosaic crochet technique, which is such a neat technique that isn’t too difficult once you get the hang of it. This project is a simple mosaic crochet pattern so it would be perfect if you are new to this technique, but, don’t worry, it’s also super fun for more those with more experience too!
The Stash Busting Sampler Afghan CAL by The Unraveled Mitten
I designed this crochet square for the Stash Busting Sampler Afghan CAL by Heather of the Unraveled Mitten. Starting in January of 2021, every 2-weeks a new square for the afghan has been released by a different designer so that you can bust through your stash and try out some new stitch patterns at the same time!
You can join in this event at any time, making all of the squares or just pick your favorite ones! By the end, you’ll have a lovely afghan to keep you nice and warm or to display in your home.
You can find more information about the Crochet Along and check out squares 1 to 15 here!
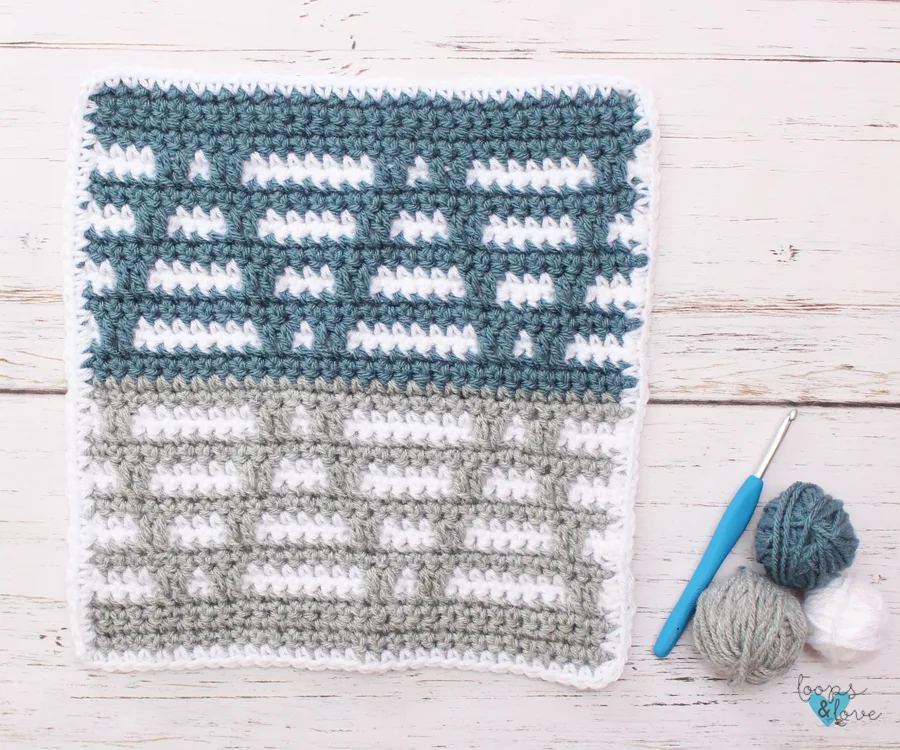
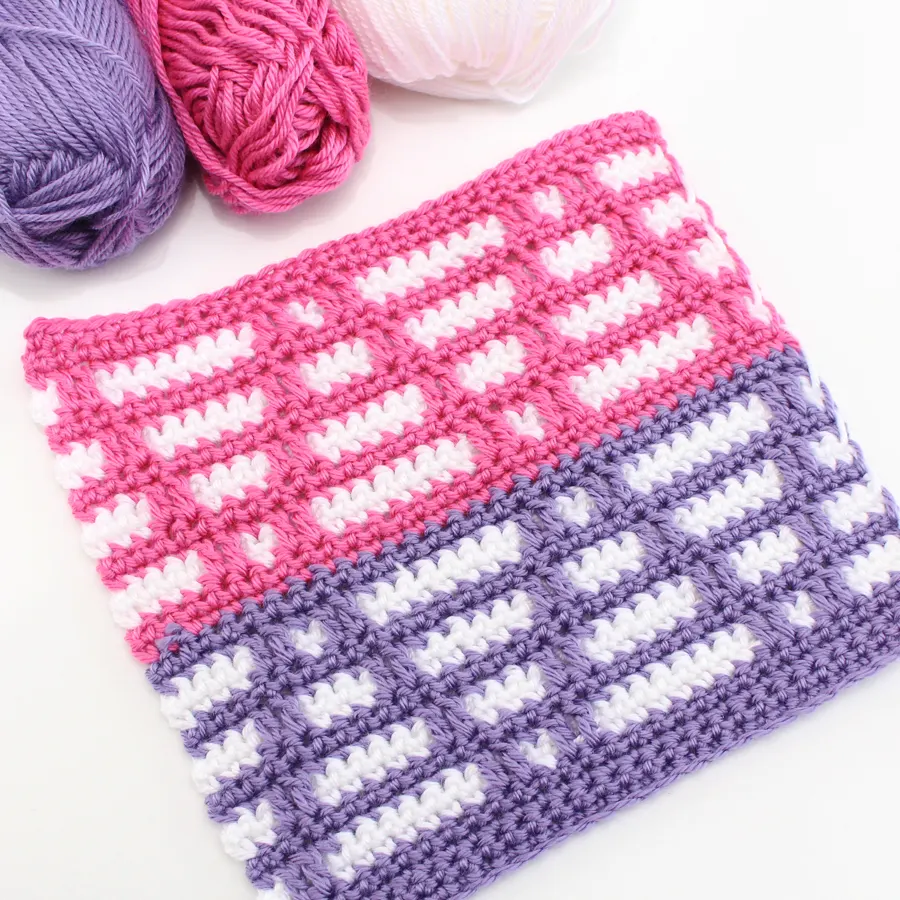
Our Mosaic Triangles Square is the 16th square to be released. I hope you enjoy working this one up! I love how when you look at this square, you see a mixture of triangles, diamonds, and a cool zig-zag across the square!
Video Tutorial
If you are new to the mosaic crochet technique, I have made a video tutorial to help give you some explanation and get you going on your way with this pattern. I promise, once you get started on the first few rows, you’ll see that mosaic crochet is not that intimidating and it’s fun to learn something new! You can find the video tutorial here!
Remember to like Loops and Love Crochet on Facebook and join the Loops and Love Crochet Group! I’d also LOVE it if you followed @loopsandlovecrochet on Instagram!
If you like crochet video tutorials, check out (and subscribe to) my Loops and Love Crochet YouTube Channel!
Click the image below to PIN the Mosaic Triangles Square Crochet Pattern for later!

Disclosure: This post may contain affiliate links, which means I may receive a small commission if you click a link and purchase something that I have recommended. This is done at no extra cost to you. Thank you for supporting Loops & Love Crochet!
The Mosaic Triangles Square crochet pattern is available for FREE on this website. If you’d like an ad-free, printable PDF version, you may purchase it for a small fee from my Etsy or Ravelry shops. Thank you so much for supporting Loops & Love Crochet!
Materials:
- Worsted weight yarn (#4 weight) – Cotton or acrylic yarn work for this project, depending on what you are using the square for. Depending on your choice of yarn, your square may turn our slightly smaller or larger than the one pictured here. This is because not all worsted weight yarns are created equally and some are thicker than others. To make the square as pictured, you’ll need three different colors, but you could also just use one main color and one accent color as well.
- Pink, Purple, Turquoise square: Bernat Satin in Lavender, Aqua, Snow, and Red Heart Soft Baby Steps in Strawberry.
- Grey, Blue, White square: Vanna’s Choice yarn in Silver Grey, Dusty Blue, and White.
- 5 mm crochet hook (or your preferred size to get the size of square you’d like)
- Yarn needle for weaving in ends.

Stitches Used:
- Ch – chain
- Sl St – slip stitch
- SC – single crochet
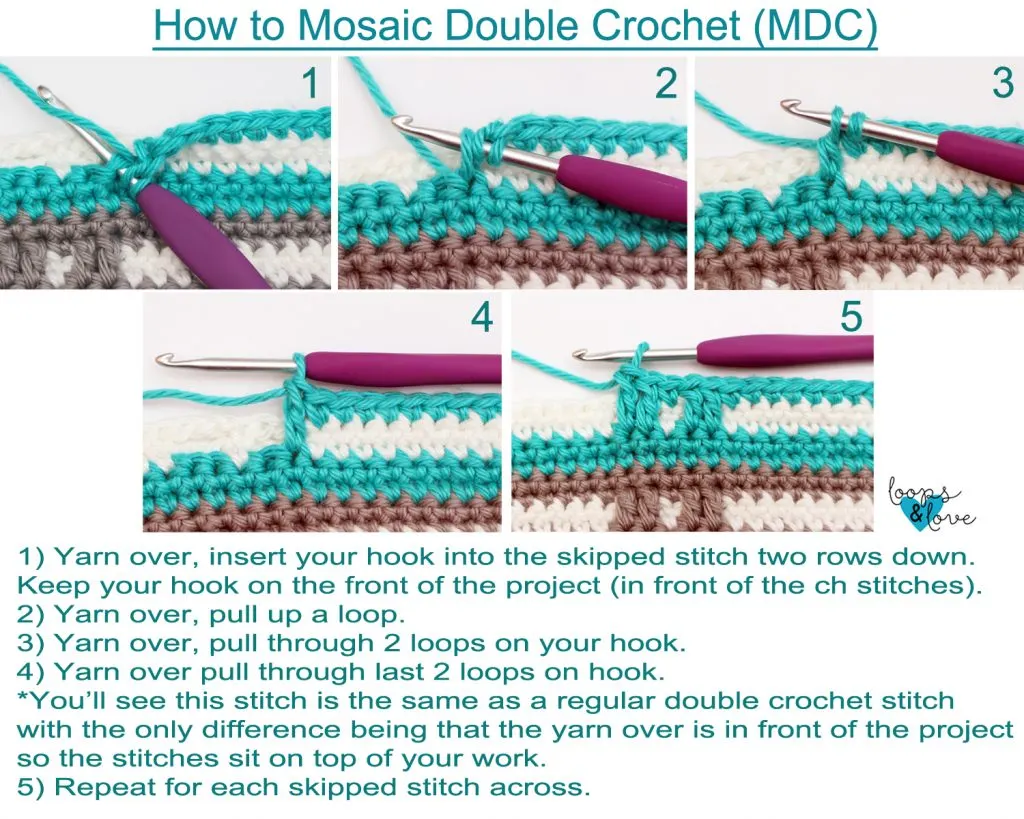
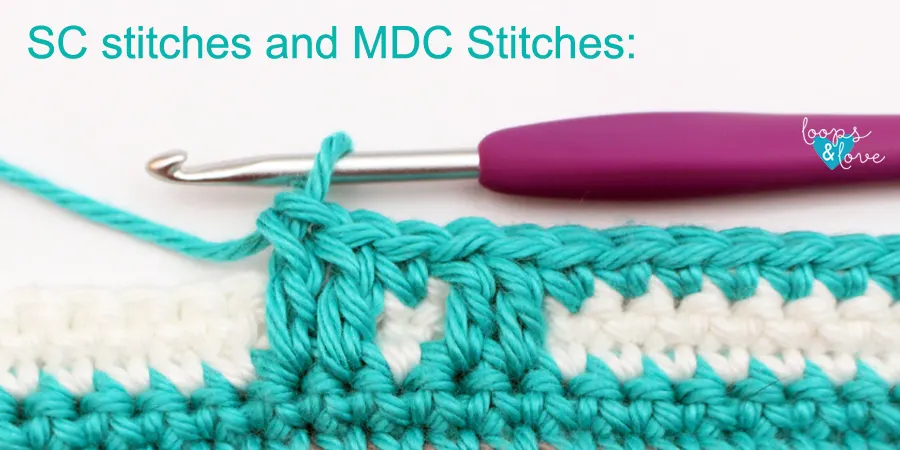
- MDC – mosaic double crochet. Yarn over, insert hook into stitch, draw up a loop in front of the chains of the previous rows, yarn over, pull through two loops, yarn over, pull through last two loops on hook. *See the MDC photo tutorial at the end of the pattern.
Gauge
- When using Vanna’s Choice or Red Heart Super Saver yarn (thicker #4 worsted weight yarns), 2 inches square = approx. 7 rows of 6 SC stitches. This yarn resulted in 11.5”x11.5” square.
- When using a Bernat Satin yarn (a lighter #4 worsted weight yarn), 2 inches square = approx. 9 rows of 8 SC stitches. This yarn resulted in 10”x 10” square.
Finished Size:
- When finished, this square measures 12x 12 inches square.
- This square is intended to be 12×12 inches square, however, different yarn brands and weights, hook sizes, and crochet tensions can affect the finished size. If your square is a little off (half to a full inch smaller), you can always block it by pinning on a board to the 12×12” size, spraying it with water, and letting it dry.
Important Notes:
- Turned Rows– this square is worked up in turned rows. At the end of each row, chain 1 and turn. Chain stitches do not count towards stitch count.
- Color Changes – For this pattern, you will be changing colors at the end of some of the rows to work the following row in the new color. To change colors: complete the last SC in the first color up until the last yarn over. Yarn over with the new color and pull through last step of the SC stitch. Now you will be working in the new color until you change colors again.
- Mosaic Crochet Tips – For this project, you will be using the mosaic crochet technique. Here are some tips to help you if you with this technique. I also recommend you watch the video tutorial that is linked below.
- In mosaic crochet, you will be changing colors at the end of each row of the graph (which is two rows of your crochet project, as explained in the graph section later).
- When you change colors, you will not be carrying the unused colors along under your stitches. Instead, you will be dropping the color that you are finished with and continuing to work with the new color. You can leave the dropped color attached at the end of the row and just pick it up in the next row when you need it again. This will not show in your finished square once the SC border is added around the outside. As an alternative, you can also cut and attach your yarn each time, which would leave you more ends to weave in.
- There is a right side (RS) and wrong side (WS) of this project. On the front (RS), you will see the mosaic crochet effect while the back (WS) will look like stripes. Mosaic Double Crochet (MDC) stitches will only be worked with the main color on the RS of the project, while the WS will just show the chain stitches where the MDC stitches are worked on the front.
- More mosaic crochet details are written in the graph instructions below with reference to how the graph works and the stitches.
- Size modifications – If you’d like to modify the pattern to create a different sized square, here are some tips. If you want to make the finished square taller, you can do this by adding extra rows at the top or bottom of the graph in the main color(s). You can also make it wider, by adding an extra repeat of the pattern on the left or right of the square. I would recommend adding equal rows or stitches on either side (or top/bottom) so that the design stays centered. Use the graph to help you decide where to add rows/columns to increase the size of your project. Note: If it’s important to you that your square is a square, be careful with adding rows/columns to the graph. You could end up with a rectangle instead.
Video Tutorial
I have a created a video tutorial for showing how the mosaic crochet technique and color changes work for this crochet square pattern. You can find the video on my YouTube Channel here!
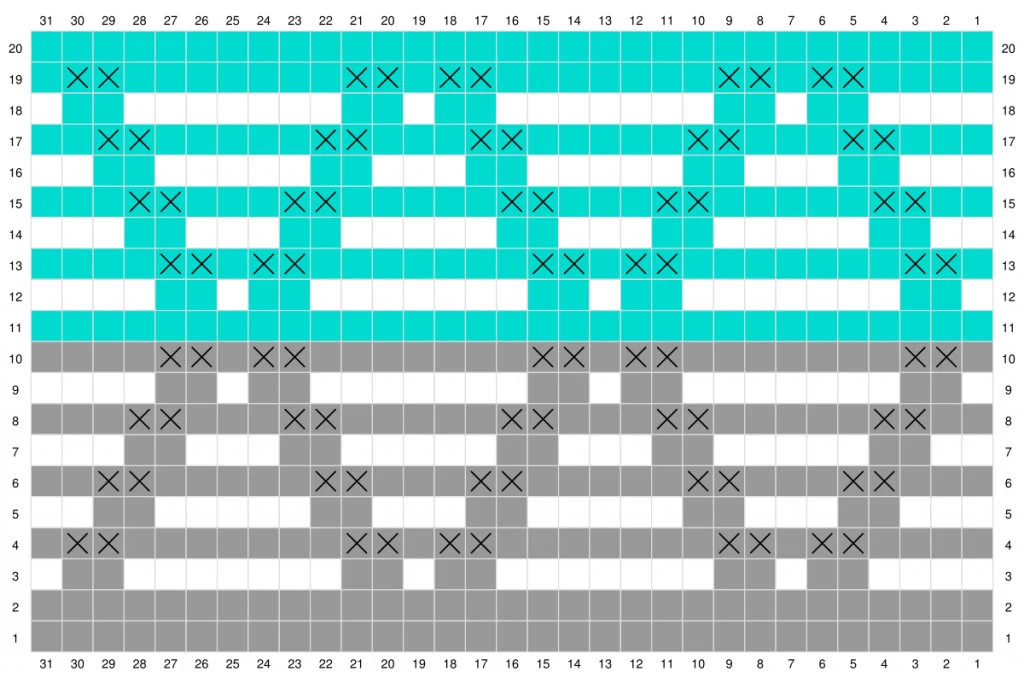
Mosaic Triangles Square – Graph Instructions
Below, you will see the mosaic crochet graph that I created for this crochet square.
Each row in the graph counts as two rows of crochet stitches. This means each row of the graph will be worked twice (once on the RS and once on the WS) before you go to the next row. You will start at the bottom right (or left, if left-handed) of the graph and work row 1 on the RS (front of square), then chain 1 and turn and repeat it again on the WS (back of square). The color of the first stitch of the row indicates the color you are using for the whole row of the graph (for two rows of your crocheted work).
Each square of the graph shows 1 stitch or 1 skipped stitch. When squares of different colors appear in the row, they should be skipped. When you skip these stitches, replace them with chain stitches. Always chain one more chain than the number of stitches you are skipping. This will prevent your work from pulling and looking uneven. For example, if you skip 2 stitches, you will chain 3. On the next row of the right side of the project, you will be working in the main color and working MDC stitches in the stitches you skipped from two rows below.
Mosaic Double Crochet stitches will only be worked on the right side (RS) of the panel and in the main color of that section only. MDC stitches are marked with an “X” on the graph. MDC stitches are worked in front of your work. On the wrong side (WS) you will work a SC stitch in the place that a MDC is worked on the right side (RS).
*You may choose to follow the graph or the written instructions below to complete the square.
If you are new to mosaic crochet, it is recommended that you read through the written instructions as well to make sure your SC, MDC, and Ch stitches are placed properly. These instructions may make mosaic crochet sound quite intimidating, but I promise it isn’t! Once you work up a few rows of the pattern, you will get the hang of it and how the technique works. This pattern is a great introduction to Mosaic Crochet and you’ll see it’s not as intimidating as it sounds! Remember to watch the video tutorial to help you get started with this pattern.
Remember to keep consistent tension, even when working with the different colors. This is so your square comes out nice and even on the sides.


**If 12×12” size of the finished square is very important, after working a few rows of the pattern, stop and measure your work to make sure it is between 11-12 inches wide. You can continue to measure it periodically, as well.
Mosaic Triangles Square – Written Instructions
Yarn A = Main Color #1 Yarn B = Accent Color Yarn C = Main Color #2
One main color can be used for both Yarn A and Yarn B, instead of two different colors.
Row 1 (RS): With Yarn A, chain 32, SC in 2nd ch from hook and in each ch across, ch 1, turn. (31)
*As an alternative to a starting chain, you can work 31 foundation single crochet stitches (see the foundation single crochet video tutorial on my YouTube Channel (https://www.youtube.com/watch?v=1ONi46Y5AYU)
*Starting chain/foundation will likely measure 1-2 inches smaller than the width of the finished square. Measure again once a few more rows are worked up to get a better idea of the width of your square. The border will add about an inch to the width/height at the end.
Row 1 (WS): SC in each stitch across, ch 1, turn. (31)
Row 2 (RS): SC in each stitch across, ch 1, turn. (31)
Row 2 (WS): SC in each stitch across, change color to Yarn B, ch 1, turn. (31)
Row 3 (RS): SC first 4 sts, *ch 3, skip 2 sts, SC next st, ch 3, skip 2 sts, SC next 7 sts, repeat from * one more time, ch 3, skip 2 sts, SC last st, ch 1, turn.
Row 3 (WS): SC in each SC from the previous row, ch 3 to match each ch 3 space, change to Yarn A, ch 1, turn.

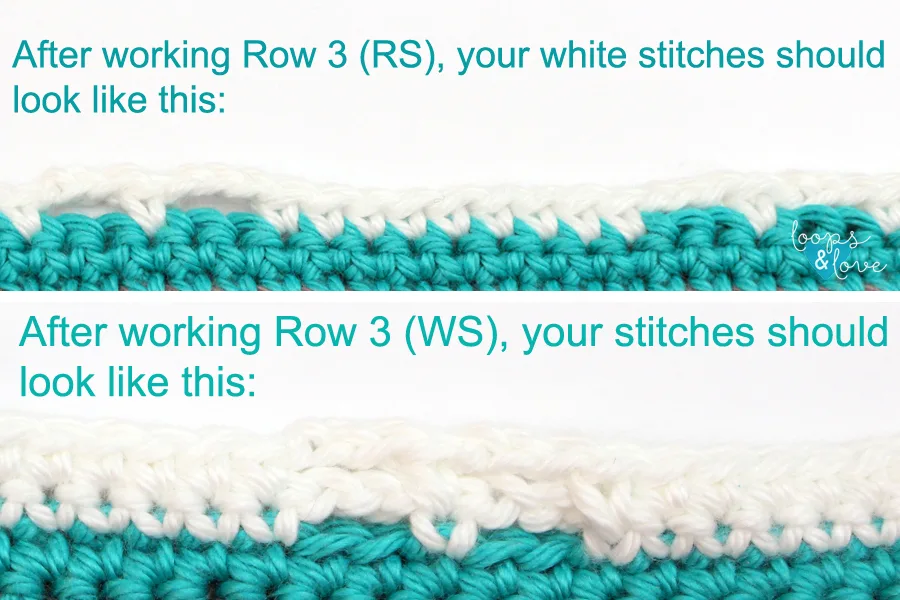
**Note that this photo shows 9 SC stitches in a row instead of 7 because it’s from another one of my mosaic crochet patterns.
Row 4 (RS): SC first 4 sts, *MDC next 2 sts, SC next st, MDC next 2 sts, SC next 7 sts, repeat from * one more time, MDC next 2 sts, SC last st, ch 1, turn.
*Remember to work all MDC stitches into the skipped stitches from 2 rows down. See the MDC photo tutorial above.

Row 4 (WS): SC in each stitch across, change to Yarn B, ch 1, turn. (31)
Row 5 (RS): SC first 3 sts, ch 3, skip 2 sts, *SC next 3, ch 3, skip 2 sts, SC next 5, ch 3, skip 2 sts, repeat from * one more time, SC last 2 sts, ch 1, turn.
Row 5 (WS): SC in each SC from the previous row, ch 3 to match each ch 3 space, change to Yarn A, ch 1, turn.
Row 6 (RS): SC first 3 sts, MDC next 2 sts, *SC next 3, MDC next 2 sts, SC next 5, MDC next 2 sts, repeat from * one more time, SC last 2 sts, ch 1, turn.
Row 6 (WS): SC in each stitch across, change to Yarn B, ch 1, turn. (31)
Row 7 (RS): SC first 2 sts, ch 3, skip 2 sts, *SC next 5, ch 3, skip 2 sts, SC next 3, ch 3, skip 2 sts, repeat from * one more time, SC last 3 sts, ch 1, turn.
Row 7 (WS): SC in each SC from the previous row, ch 3 to match each ch 3 space, change to Yarn A, ch 1, turn.
Row 8 (RS): SC first 2 sts, MDC next 2, *SC next 5, MDC next 2 sts, SC next 3, MDC next 2 sts, repeat from * one more time, SC last 3 sts, ch 1, turn.
Row 8 (WS): SC in each stitch across, change to Yarn B, ch 1, turn. (31)
Row 9 (RS): SC first st, ch 3, skip 2 sts, *SC next 7, ch 3, skip 2 sts, SC next st, ch 3, skip 2 sts, repeat from * one more time, SC last 4 sts, ch 1, turn.
Row 9 (WS): SC in each SC from the previous row, ch 3 to match each ch 3 space, change to Yarn A, ch 1, turn.
Row 10 (RS): SC first st, MDC next 2 sts, *SC next 7, MDC next 2 sts, SC next st, MDC next 2 sts, repeat from * one more time, SC last 4 sts, ch 1, turn.
Row 10 (WS): SC in each stitch across, change to Yarn C, ch 1, turn. (31)
Row 11 (RS): SC in each stitch across, ch 1, turn. (31)
Row 11 (WS): SC in each stitch across, change to Yarn B, ch 1, turn (31)
Row 12 (RS): SC first st, ch 3, skip 2 sts, *SC next 7, ch 3, skip 2 sts, SC next st, ch 3, skip 2 sts, repeat from * one more time, SC last 4 sts, ch 1, turn.
Row 12 (WS): SC in each SC from the previous row, ch 3 to match each ch 3 space, change to Yarn C, ch 1, turn.
Row 13 (RS): SC first st, MDC next 2 sts, *SC next 7, MDC next 2 sts, SC next st, MDC next 2 sts, repeat from * one more time, SC last 4 sts, ch 1, turn.
Row 13 (WS): SC in each stitch across, change to Yarn B, ch 1, turn. (31)
Row 14 (RS): SC first 2 sts, ch 3, skip 2 sts, *SC next 5, ch 3, skip 2 sts, SC next 3, ch 3, skip 2 sts, repeat from * one more time, SC last 3 sts, ch 1, turn.
Row 14 (WS): SC in each SC from the previous row, ch 3 to match each ch 3 space, change to Yarn C, ch 1, turn.
Row 15 (RS): SC first 2 sts, MDC next 2, *SC next 5, MDC next 2 sts, SC next 3, MDC next 2 sts, repeat from * one more time, SC last 3 sts, ch 1, turn.
Row 15 (WS): SC in each stitch across, change to Yarn B, ch 1, turn. (31)
Row 16 (RS): SC first 3 sts, ch 3, skip 2 sts, *SC next 3, ch 3, skip 2 sts, SC next 5, ch 3, skip 2 sts, repeat from * one more time, SC last 2 sts, ch 1, turn.
Row 16 (WS): SC in each SC from the previous row, ch 3 to match each ch 3 space, change to Yarn C, ch 1, turn.
Row 17 (RS): SC first 3 sts, MDC next 2 sts, *SC next 3, MDC next 2 sts, SC next 5, MDC next 2 sts, repeat from * one more time, SC last 2 sts, ch 1, turn.
Row 17 (WS): SC in each stitch across, change to Yarn B, ch 1, turn. (31)
Row 18 (RS): SC first 4 sts, *ch 3, skip 2 sts, SC next st, ch 3, skip 2 sts, SC next 7 sts, repeat from * one more time, ch 3, skip 2 sts, SC last st, ch 1, turn.
Row 18 (WS): SC in each SC from the previous row, ch 3 to match each ch 3 space, change to Yarn C, ch 1, turn.
Row 19 (RS): SC first 4 sts, *MDC next 2 sts, SC next st, MDC next 2 sts, SC next 7 sts, repeat from * one more time, MDC next 2 sts, SC last st, ch 1, turn.
Row 19 (WS): SC in each stitch across, ch 1, turn. (31)
Row 20 (RS): SC in each stitch across, ch 1, turn. (31)
Row 20 (WS): SC in each stitch across (31)
Fasten off. Weave in all ends.

Single Crochet Border
Next, we will add a single crochet border around your square. Choose a color for your border. With the front of the square facing you, join your yarn in any stitch. Chain 1, SC in the same stitch and in each stitch around your square by placing one SC in each stitch around. When you travel down the sides of the square, you’ll be placing one SC at the end of each row. In each of the corners, work SC+Ch1+SC (all in the corner stitch). Fasten off, weave in ends.
If needed, add another round or two of the border to get closer to the desired size dimensions.
Block your square, if needed, and you are all finished. I hope you loved working up your Mosaic Triangles Square!

Now that you are finished the Mosaic Triangles Square, are you feeling Mosaic Crochet inspired? There are a couple other patterns using this technique that you might like!
Check out all of the other free crochet patterns on my blog here!
Mosaic Triangles Pillow – The front panel of the pillow is just a larger version of this square!
Mosaic Bricks Tote – An easy mosaic crochet pattern to make this neat tote bag!


**Want to be kept in the loop? Be sure to like Loops and Love Crochet on Facebook and join the Loops and Love Crochet Group! Don’t forget to follow @loopsandlovecrochet on Instagram! Remember to tag Loops and Love Crochet when you post your fnished projects on social media! I’d love to see them! **
*You may make and sell any items made from my patterns, but please link back to my blog or Loops & Love Crochet as the designer. Please do not copy this pattern or photos and share as your own, in part or in whole. Instead, link back to the Loops and Love Crochet blog (especially when selling items you make from my patterns). Thank you!