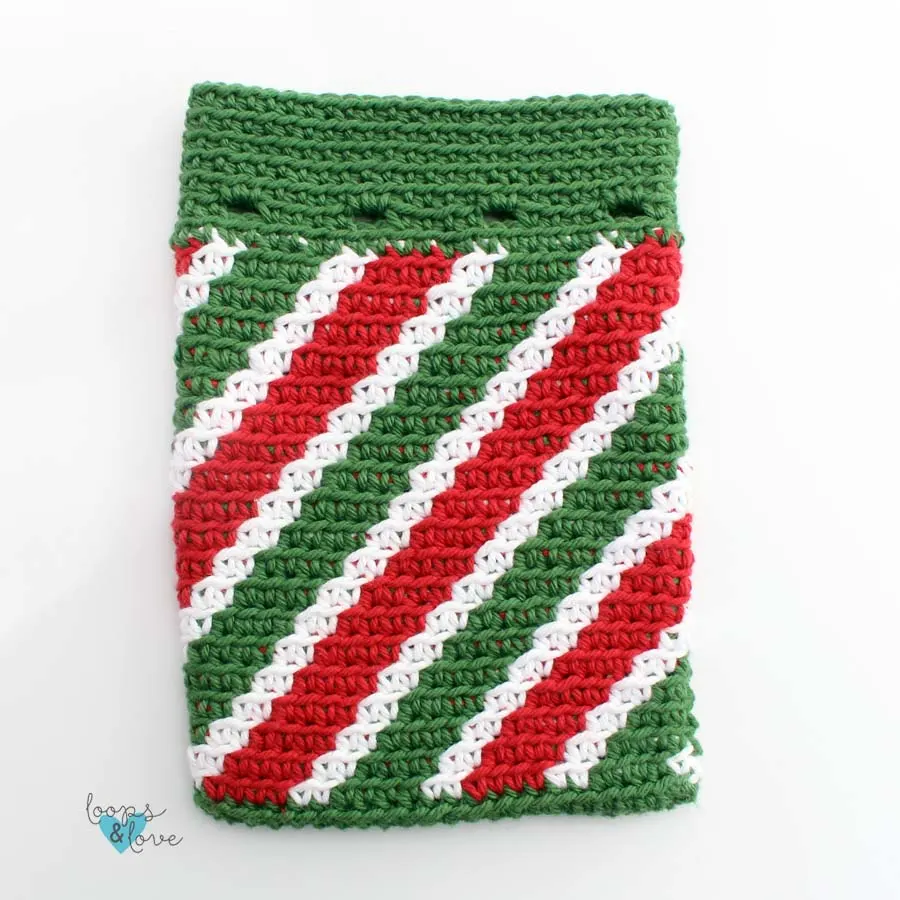
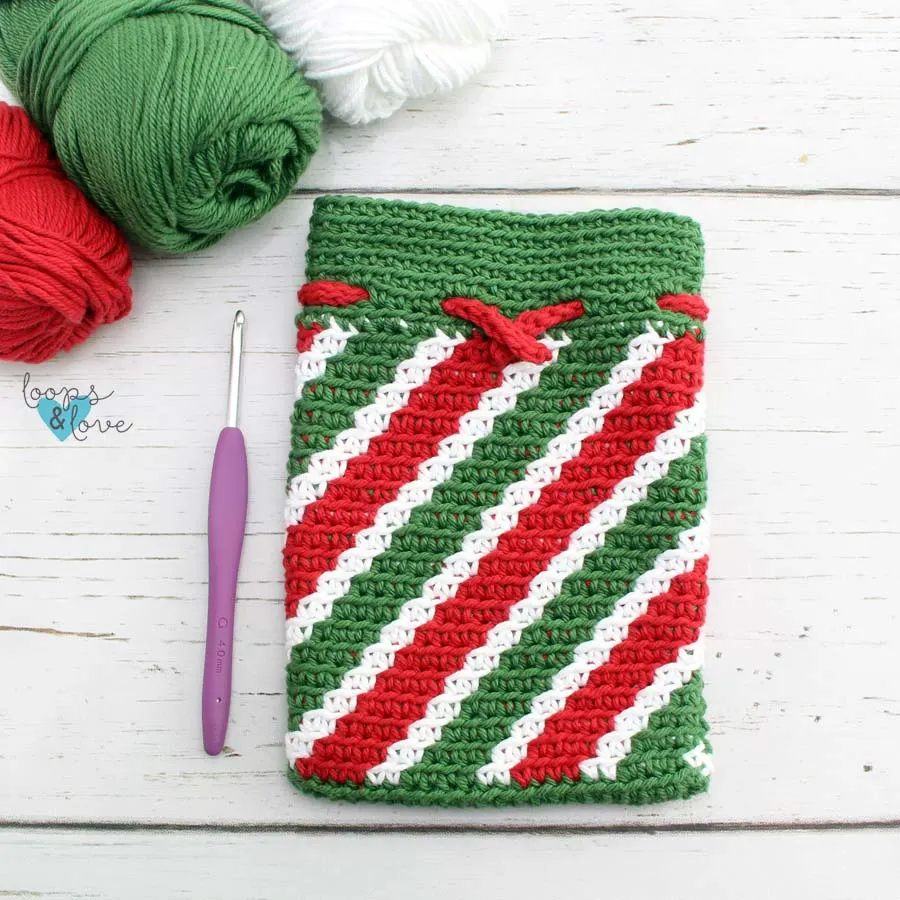
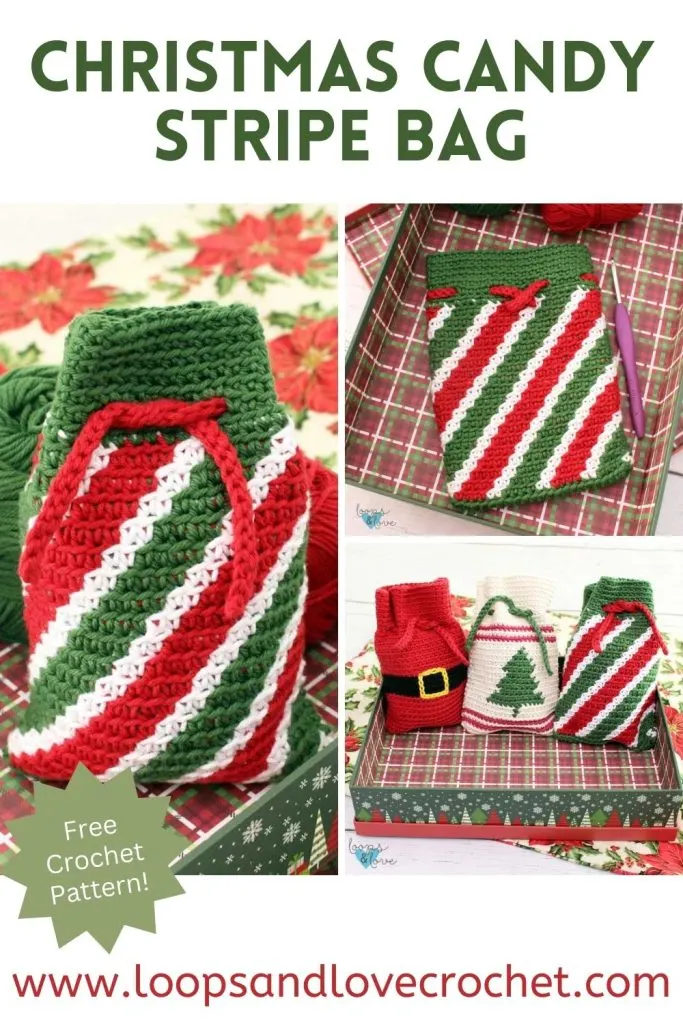
This Christmas candy stripe pouch makes the perfect little bag for your holiday gifts! Just add a little gift or some treats, tie up the top, and your gift is all ready to be enjoyed!
Happy Friday! It’s the second week of July which means it’s the second week of our Christmas in July event! Stephanie of Grace and Yarn and I are so excited to bring you four new, holiday inspired crochet patterns again this year, for the 5th year of our Christmas in July event!
Each Friday in July, we are releasing a new crochet pattern to help get you started on your holiday crocheting nice and early! Last week, Stephanie released an adorable Plush Penguin Amigurumi. If you haven’t checked it out, be sure to do that! He is the sweetest little penguin!
If you missed our Christmas in July event details, or want the links to the patterns, you can head to our main Christmas in July info post HERE!
This week, for the second week of our Christmas in July event, it’s our turn to release a new pattern! We are so excited to release this Christmas Candy Stripe Bag on the blog today!

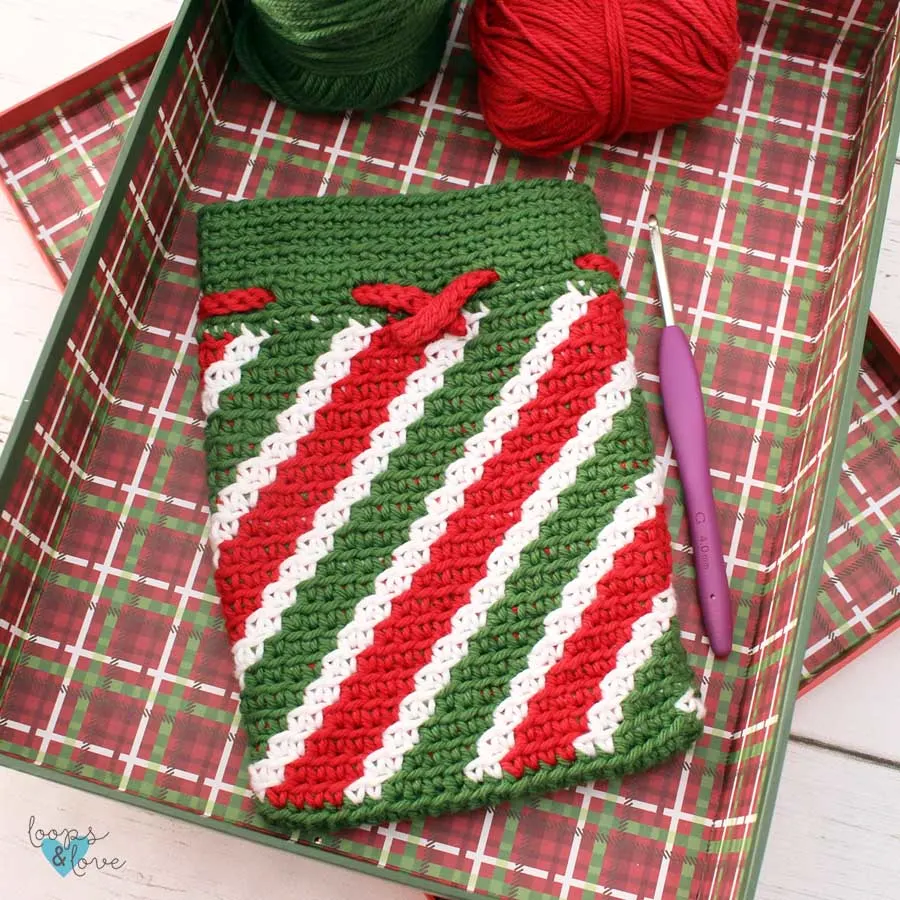
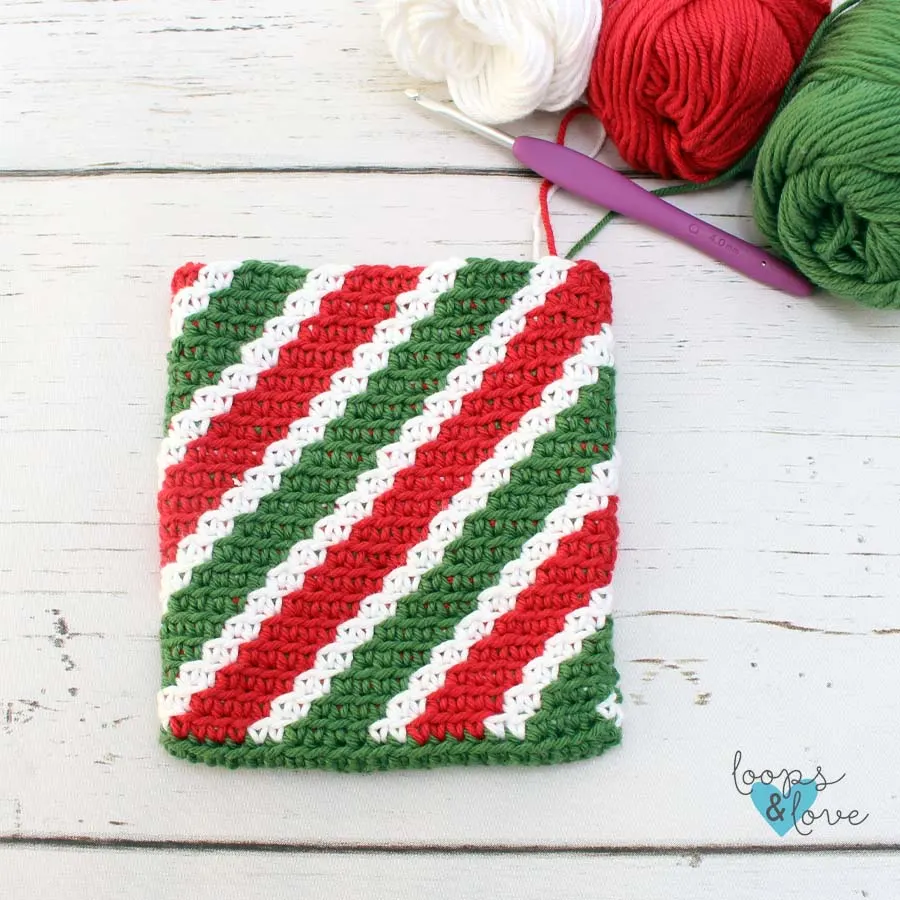
The Christmas candy stripe bag is such a fun one to work up! The diagonal stripe pattern is eye-catching and festive, reminding me of candy canes or Christmas wrapping paper!
If you’re looking for a way to make a holiday gift a little extra special this holiday season, putting it into a handmade bag is sure to do the trick! This little bag is perfect for holding small holidays gifts and is sure to help you check off names on your gift list this year.
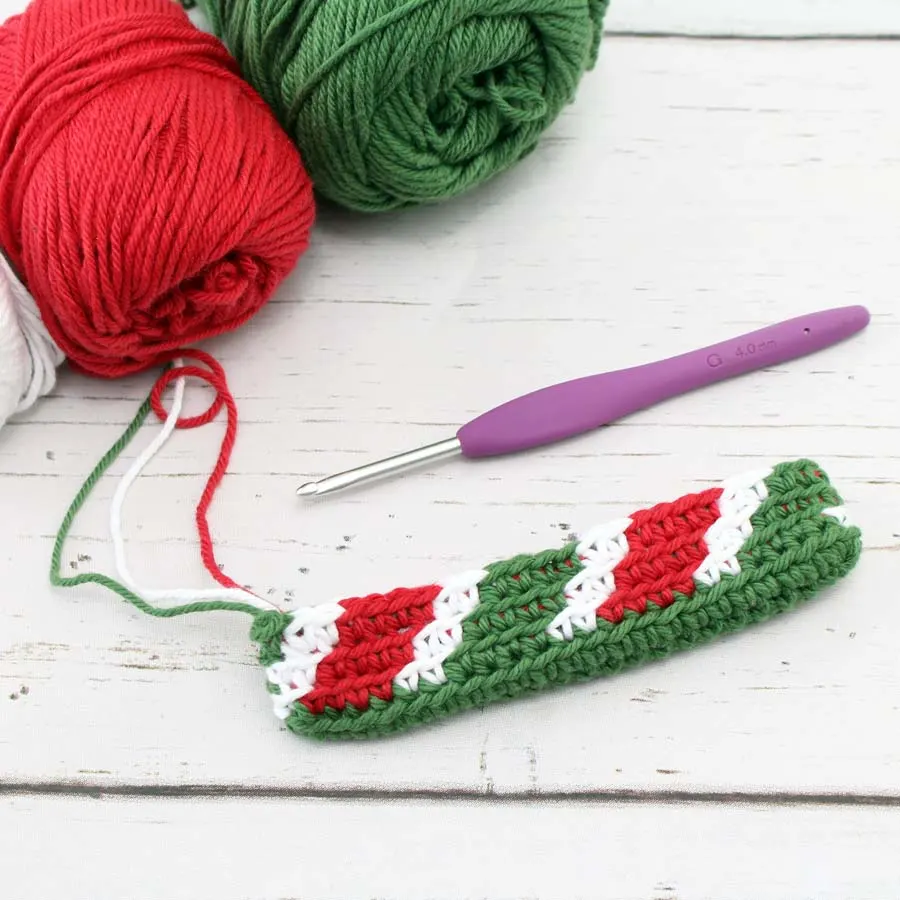
The body of the Christmas Candy Stripe bag is worked up in tapestry crochet, which adds some extra fun without adding too much difficulty. This crochet bag is unlined, but a liner can be sewn in afterwards, if desired. The stitches are nice and tight together so you don’t have to worry about any items falling out if your bag stays unlined.
If you’ve been following us for a bit, you’ll notice that this bag has a familiar shape! There are two others like it in our Christmas patterns! Make all 3 Christmas Bags for the complete set! You can find the Christmas Tree Bag and the Santa Bag patterns on the blog!


Remember to like Loops and Love Crochet on Facebook and join the Loops and Love Crochet Group for sharing your finished projects! I’d also LOVE it if you followed @loopsandlovecrochet on Instagram! If you like crochet video tutorials, check out (and subscribe to) my Loops and Love Crochet YouTube Channel!
PIN the Christmas Candy Stripe Bag crochet pattern to your favorite Pinterest board to save it for later!


Disclosure: This post may contain affiliate links, which means I may receive a small commission if you click a link and purchase something that I have recommended. This is done at no extra cost to you. Thank you for supporting Loops & Love Crochet!
The Christmas Candy Stripe Bag crochet pattern is available for FREE on this website. If you’d like an ad-free, printable PDF version, you may purchase it for a small fee from my Etsy or Ravelry shops. Thank you so much for supporting Loops & Love Crochet!
Materials:
- Worsted Weight (#4) Yarn – Cotton or acrylic yarn will work for this project. The bag pictured here was made with WeCrochet/Knit Picks Dishie yarn in the Jalapeno, Fiesta Red, and White colorways. You’ll need approx. 100 yds of yarn, split between two or three colors, depending on how many colors are being used.
- 4 mm crochet hook
- Yarn needle to weave in ends
Stitches Used:
- Ch – chain
- Sl St – slip stitch
- SC – single crochet
- BLO SC – single crochet in the back loops only
Finished Size:
- Bag Dimensions – approximately 5” wide x 7.5” tall (measured with bag laying flat)
Gauge:
- Gauge is not critical for this pattern to turn out, however, for reference, 2 inches square is approximately 9 rows of 10 SC stitches.
Important Notes:
- Joined Rounds– This bag is made in joined rounds. At the end of each round, you will be joining the last stitch of the round to the first one with a slip stitch. Then you will chain 1 and start the next round in the first stitch, which is the same stitch as the join. To keep more seam more hidden and from traveling much, be sure to pull the joining slip stitch and the chain 1 nice and tight. Chain 1 stitches do not count towards stitch count of each round.
- Back Loops Only – All of the single crochet stitches for the body of this bag are worked in the back loops only (BLO). However, slip stitch joins are worked through both loops.
- Color Changes – The bag body is worked in tapestry crochet. This means you will be changing colors often and carrying the colors you are not using along with you under/behind your stitches. To change colors, complete the last single crochet in the first color up until the last yarn over. Yarn over with the new color and pull through last step of the single crochet stitch. So, your SC will go like this: insert hook into last stitch in the first color, pull up a loop, yarn over with the new color, pull through all loops on hook. Now you will be working in the new color until you change colors again.
- Tapestry Crochet Tips – You will be carrying the inactive yarn colors behind the active yarn you are using. Try to keep your tension a little on the tighter side to help keep the stitches tightly together which will help minimize the amount of carried yarn colors showing between the stitches.
- Changing the Bag Size – To make the bag wider, add stitches to the starting chain. In order for the color pattern to work for the graph, you’ll need to add stitches to the starting chain in groups of 12. This will give you a stitch count that is a multiple of 12 at the end of row/round 1 forming the bag base. Now you’ll just need to repeat the graph (or written instructions) as many times as needed to get around your bag. To change the bag height, just continue the color pattern of graph for extra rounds until you are close to the height desired. Then work extra rounds of the solid color at the top as needed. The stitches forming the drawstring holes should still be able to be followed as written and just repeated longer. If the holes aren’t matching up properly, you may have to alter them slightly.
- Video Tutorial – There’s a video tutorial for another one of our holiday themed tapestry crochet pouches on my YouTube Channel here that would also be helpful for this pattern. This video shows how to alternate the colors, add the draw string, etc. as the bag is worked up from start to finish.

Christmas Candy Striped Pouch
This bag is pictured using three colors for the stripes, but can easily be modified for using two colors instead. For example, to make a white and red striped bag, just repeat the red sections instead of switching to green.
Bag Base
Row/Round 1: In green yarn, ch 23, 2 SC in 2nd ch from hook, SC in each st across, 4 SC in last ch. Now, continue around so you are working on the other side of the chain. SC in each stitch across, work 2 SC in the last stitch (this will be in the same stitch as your first SC of the round). Join with a sl st to first SC, ch 1. (48)
Bag Body
Now we will start the body (height) of the bag. For this section, you may choose to follow the written instructions for all the bag rounds below, or you may follow the graph.

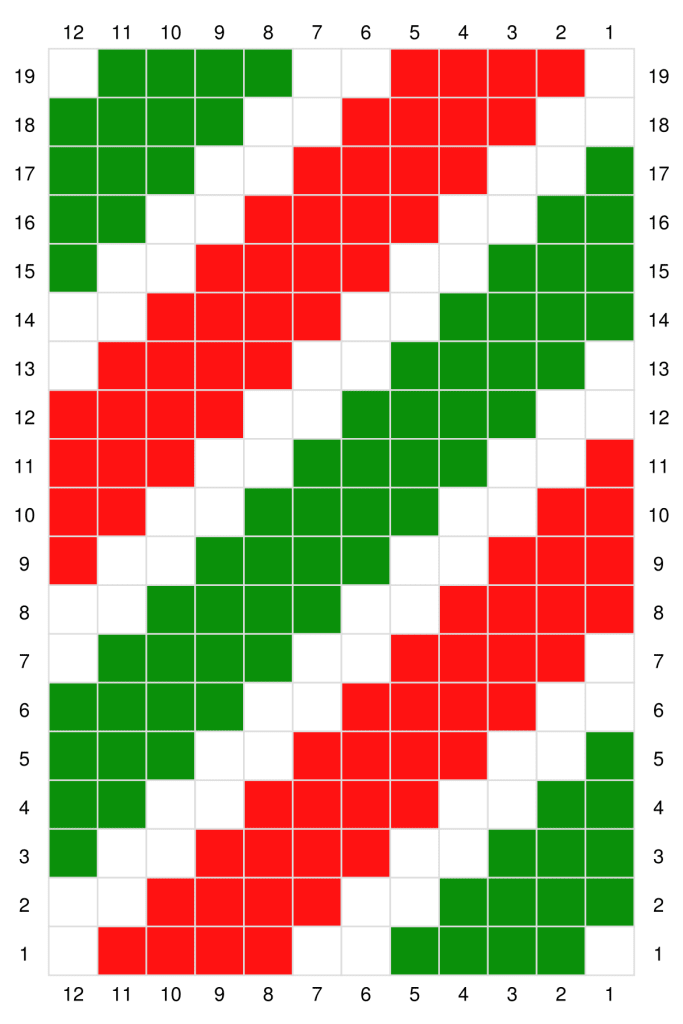
Graph Notes:
- Each box counts as one single crochet stitch (in the back loops only).
- Graph is worked from bottom to top, either right to left or left to right.
- The graph shows 12 stitches, so you will need to repeat three more times for the 48 stitches around the bag.
- After row 19, refer to the written instructions below for the top section of the bag.
- Keep all colors joined, carrying the inactive colors behind the active yarn.
Written Instructions
- The written instructions below indicate how many stitches in each color you’ll make as you work around the bag. There are 48 stitches in each round.
- Round count starts back at 1 for the bag body so it matches the rows on the graph.
- Each stitch is a back loop only single crochet stitch. At the end of the round, join to the first SC of the round with a slip stitch through both loops. Chain 1, and then work the first SC of the round in the same stitch (back loop only).
w = white, r = red, g = green
Round 1: *w1, g4, w2, r4, w2, g4, w2, r4, w1, repeat from * one more time.
Round 2: *g4, w2, r4, w2, g4, w2, r4, w2, repeat from * one more time.
Round 3: *g3, w2, r4, w2, g4, w2, r4, w2, g1, repeat from * one more time.
Round 4: *g2, w2, r4, w2, g4, w2, r4, w2, g2, repeat from * one more time.
Round 5: *g1, w2, r4, w2, g4, w2, r4, w2, g3, repeat from * one more time.
Round 6: *w2, r4, w2, g4, w2, r4, w2, g4, repeat from * one more time.
Round 7: *w1, r4, w2, g4, w2, r4, w2, g4, w1, repeat from * one more time.
Round 8: *r4, w2, g4, w2, r4, w2, g4, w2, repeat from * one more time.
Round 9: *r3, w2, g4, w2, r4, w2, g4, w2, r1, repeat from * one more time.
Round 10: *r2, w2, g4, w2, r4, w2, g4, w2, r2, repeat from * one more time.
Round 11: *r1, w2, g4, w2, r4, w2, g4, w2, r3, repeat from * one more time.
Round 12: *w2, g4, w2, r4, w2, g4, w2, r4, repeat from * one more time.
Round 13: *w1, g4, w2, r4, w2, g4, w2, r4, w1, repeat from * one more time.
Round 14: *g4, w2, r4, w2, g4, w2, r4, w2, repeat from * one more time.
Round 15: *g3, w2, r4, w2, g4, w2, r4, w2, g1, repeat from * one more time.
Round 16: *g2, w2, r4, w2, g4, w2, r4, w2, g2, repeat from * one more time.
Round 17: *g1, w2, r4, w2, g4, w2, r4, w2, g3, repeat from * one more time.
Round 18: *w2, r4, w2, g4, w2, r4, w2, g4, repeat from * one more time.
Round 19: *w1, r4, w2, g4, w2, r4, w2, g4, w1, repeat from * one more time.
Change to green yarn, join and chain 1. Do not fasten off. This is the end of the tapestry crochet section for the body of the bag. Next, you’ll be working up the top of the bag using the instructions below.

Top of Bag Instructions
Round 20: BLO SC in each stitch around (working over red and white yarn tails to secure them), join, ch 1 (48)
The stitches of the next round will create the holes the drawstring will pass through.
Round 21: SC first 4 sts, ch 2, skip next 2 sts, *SC next 4 sts, ch 2, skip next 2 sts, repeat from * around, join, ch 1 (48 sts including SC and chain stitches replacing the skipped stitches)
Round 22: SC in each stitch around, work 2 SC stitches into each ch 2 space, join, ch 1 (48)
Rounds 23 – 26: SC in each stitch around, join, ch 1 (48)
Do not ch 1 after round 26. Fasten off and weave in ends.
Continue to Drawstring Instructions below.

Drawstring Instructions
In the color of your choice (red shown in this pattern), make a chain long enough to go around the bag with a little extra for short ends to tie into a knot. For the bag pictured, a starting chain of 54 was used. Starting in the 2nd chain from your hook, work slip stitches into the 3rd loop (back bump) of each stitch across. Fasten off, weave in ends.

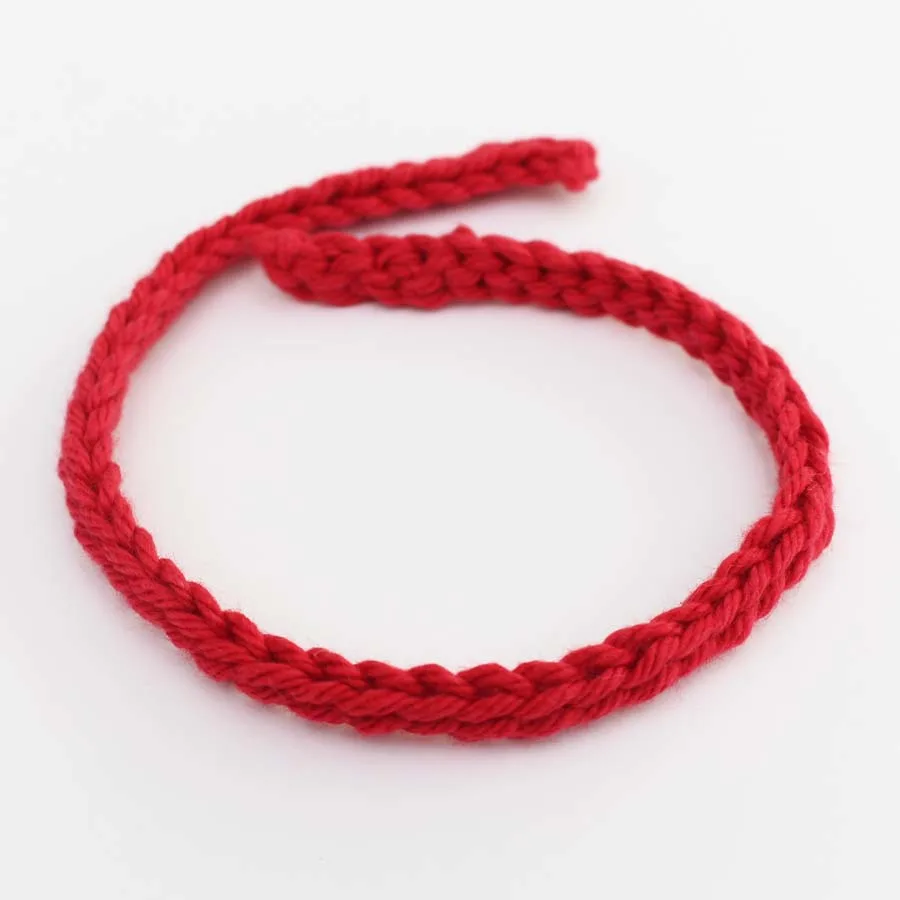
Weave the drawstring in and out of the holes around the bag starting in one of the center holes. The ends may seem short to tie, but when you draw the strings in, they’ll be long enough.
To close the top of the bag, pull the ends of the drawstring to cinch up the top of the bag. Then tie a knot at the top to secure it so the items inside don’t fall out.

You’re all done your drawstring pouch! Now you can have fun filling it with items for someone special!
For more holiday and Christmas themed crochet pattern inspiration, visit all of our holiday patterns on the blog!

**Want to be kept in the loop? Be sure to like Loops and Love Crochet on Facebook and join the Loops and Love Crochet Group! Don’t forget to follow @loopsandlovecrochet on Instagram! Remember to tag Loops and Love Crochet when you post your fnished projects on social media! I’d love to see them! **
*You may make and sell any items made from my patterns, but please link back to my blog or Loops & Love Crochet as the designer. Please do not copy this pattern or photos and share as your own, in part or in whole. Instead, link back to the Loops and Love Crochet blog (especially when selling items you make from my patterns). Thank you!
Ruth
Friday 12th of July 2024
Is the a way to make this bag larger both in length and width.
Ruth
Tuesday 16th of July 2024
@Loops and Love Crochet, thank you so much!! I just saw the directions above and wondered how I could have missed them before. :). Now I see that you just added them and I thank you again. This bag is exactly a bag that my 9 year old grandson asked me to make for him. He'll be happy to have one.The only other thing he wanted besides the drawstring is a long handle to make it a cross body bag and that will be easy to do.
Loops and Love Crochet
Friday 12th of July 2024
Hi Ruth! Yes, I'll add those instructions in the notes above. Thanks! Basically, the stitch count after the first round forming the base has to be a multiple of 12. So if you add 12 stitches to the starting chain (or 24, 38, etc), you should get a stitch count after round 1 that is a multiple of 12. For example, the starting chain is 23, but if you add 12 stitches your starting chain will be 35. After you finish round 1 forming the base, your stitch count will be 72 which will still work for the graph, if you just continue the repeats of the stitches and colors. To make the bag taller, just continue the pattern for as many rounds using the graph (adding to the graph if needed), and then work more rounds of the solid color at the top if needed too. I hope that helps! :)