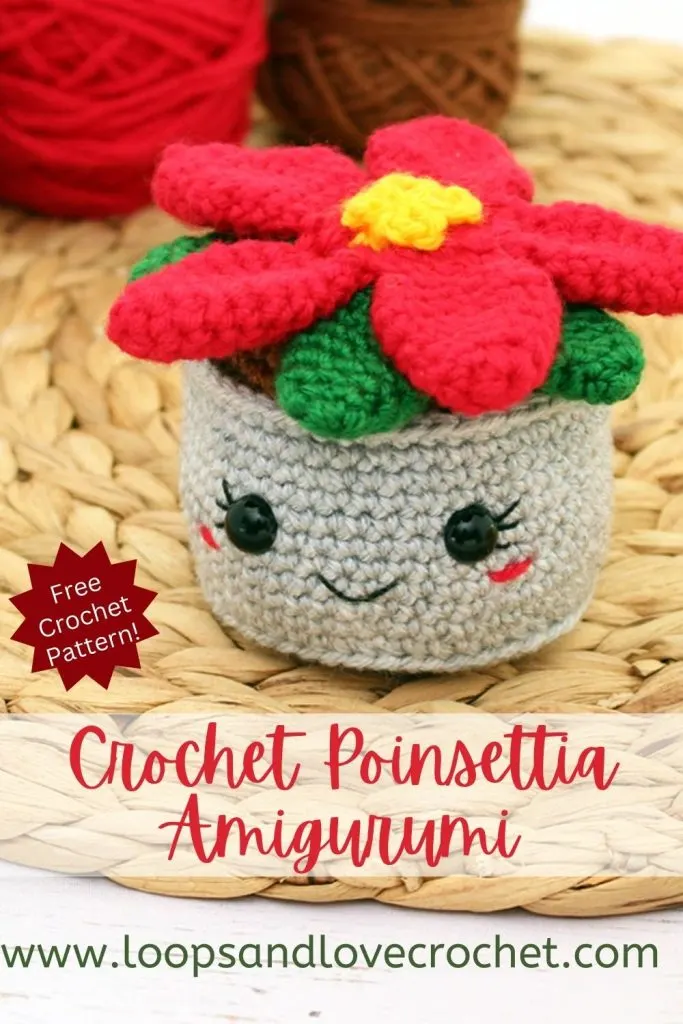
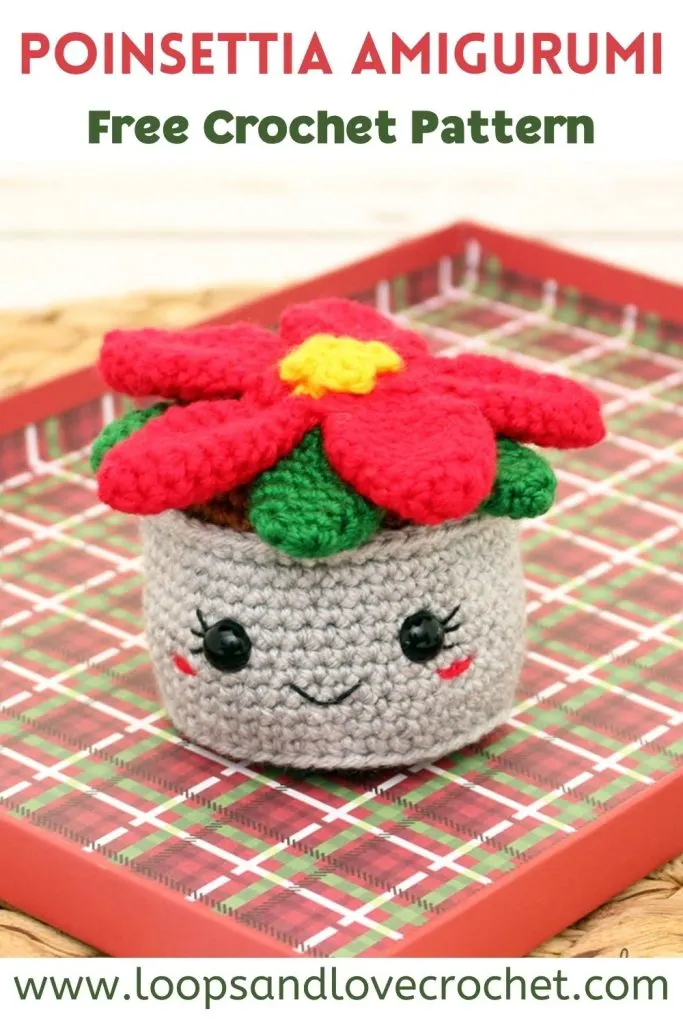
This little poinsettia amigurumi is a fun little addition to your holiday décor. Or change up the colors and make a pretty little flower for any time of the year!
It’s the last Friday of July and that means it’s the fourth and final week of our Christmas in July event! Stephanie of Grace and Yarn and I have had so much fun bringing you four new, holiday inspired crochet patterns again this year, for the 5th year in a row!
Each Friday in July, we are released a new crochet pattern to help get you started on your holiday crocheting nice and early! Last week, Stephanie released an adorable Gingerbread Ornament. If you haven’t checked it out, definitely head there! The tiny details are so sweet!
If you missed our Christmas in July event details, or want the links to the patterns, you can head to our main Christmas in July info post HERE!
This week, for the final week of our Christmas in July event, it’s our turn to release a new pattern! We are so excited to share this Poinsettia Amigurumi on the blog today!
PIN the Poinsettia Amigurumi crochet pattern to your favorite Pinterest board to save it for later!

Remember to like Loops and Love Crochet on Facebook and join the Loops and Love Crochet Group for sharing your finished projects! I’d also LOVE it if you followed @loopsandlovecrochet on Instagram! If you like crochet video tutorials, check out (and subscribe to) my Loops and Love Crochet YouTube Channel!
Disclosure: This post may contain affiliate links, which means I may receive a small commission if you click a link and purchase something that I have recommended. This is done at no extra cost to you. Thank you for supporting Loops & Love Crochet!
The Poinsettia Amigurumi crochet pattern is available for FREE on this website. If you’d like an ad-free, printable PDF version, you may purchase it for a small fee from my Etsy or Ravelry shops. Thank you so much for supporting Loops & Love Crochet!
Materials:
- Worsted Weight (#4) Yarn – Cotton or acrylic yarn will work for this project. You’ll need about 100 yds. The poinsettia amigurumi pictured in this pattern was made with WeCrochet/Knit Picks Brava Worsted yarn. The colorways and approximate amounts required are as follows: Dove Heather (30 yds), Espresso (10 yds), Red (30 yds), Grass (30 yds), Canary (2 yds).
- 3.5 mm crochet hook
- Black embroidery thread (for the mouth and eyelashes)
- Safety eyes – 10mm size
- Stuffing (any fiber-based stuffing like Poly-fil or Fiber Fill)
- Yarn needle to weave in ends (bent yarn needles are the best for amigurumi projects)
- Scissors for cutting yarn (these little ones are great!)
Stitches Used:
- Ch – chain
- Sl St – slip stitch
- SC – single crochet
- DC – double crochet
- BLO SC – single crochet in the back loops only
- FLO SC – single crochet in the front loops only
- SC DEC – single crochet decrease (same as SC 2 Tog)
- INV DEC – invisible single crochet decrease – insert hook into front loop of next stitch, then insert your hook into the front loop of the following stitch (3 loops on hook). Yarn over and draw through 2 loops (2 loops on hook), yarn over and pull through 2 remaining loops on hook. Here’s a video tutorial for the INV DEC.
Finished Size:
- When finished, this poinsettia amigurumi measures approximately 2.5” tall from bottom of the pot to the top of the flowers.
Gauge:
- Gauge is not critical for this pattern to turn out, however, for reference, 2 inches square is approximately 9 rows of 11 SC stitches.
Important Notes:
- Continuous Rounds – Most of this poinsettia amigurumi is worked up in continuous rounds. This means that at the end of each round, you will proceed right to the stitches of the next round without joining. It is handy to have a stitch marker or piece of yarn to help you keep track of the start/end of each round.
- Joined Rounds – Although the majority of this pattern is worked up in continuous rounds, there are a few places where there will be some joined rounds added into the instructions. At the end of a joined round, the last stitch of the round will be joined to the first stitch with a slip stitch followed by a chain 1 stitch. Start the next round in the first stitch, which is the same stitch as the join. Chain 1 stitches do not count towards the stitch count of each round.
- Color Changes – There are a couple places in this pattern where you’ll change colors. To change colors, complete the last single crochet in the first color up until the last yarn over. Yarn over with the new color and pull through the last step of the single crochet stitch. So, your SC will go like this: insert hook into last stitch in the first color, pull up a loop, yarn over with the new color, pull through all loops on hook. Then join to the first stitch of the round with a slip stitch, chain 1, and work your next round in the new color.
Let’s get started on your own poinsettia amigurumi!
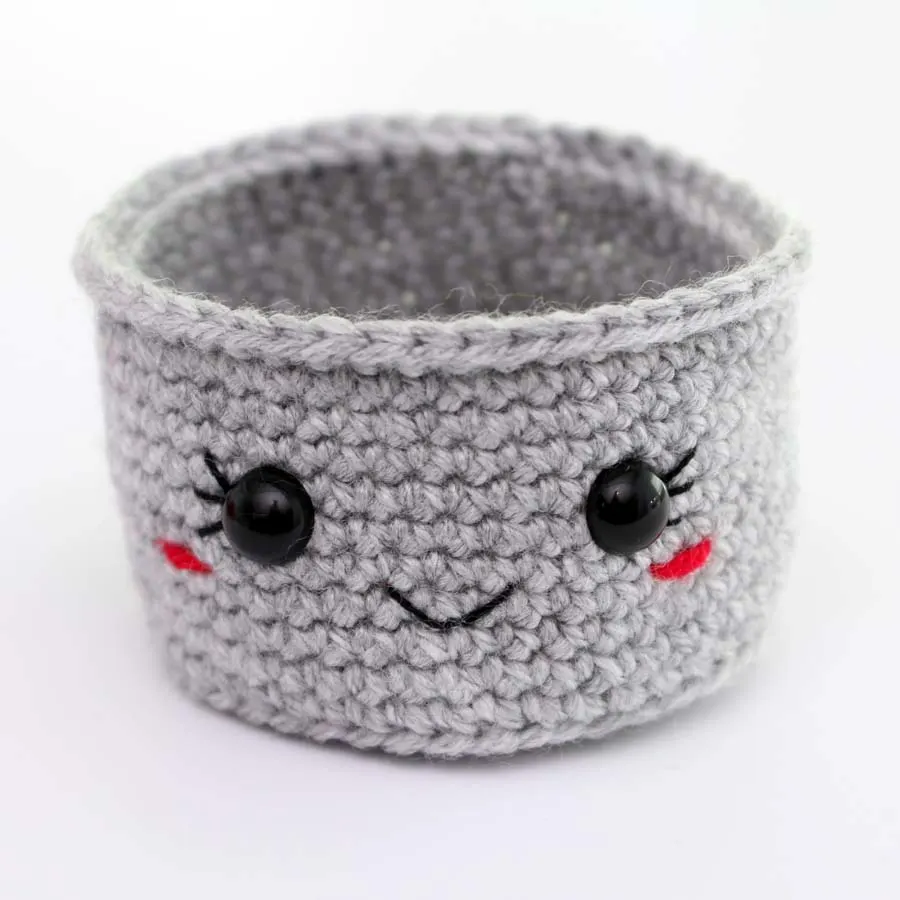
Flower Pot
Round 1: In grey, magic circle, ch 1, 6 SC into ring (6)
Round 2: 2 SC in each stitch around (12)
Round 3: *2 SC in first, SC in next st, repeat from * around (18)
Round 4: *2 SC in first, SC in next 2 sts , repeat from * around (24)
Round 5: *2 SC in first, SC in next 3 sts, repeat from * around (30)
Round 6: *2 SC in first, SC in next 4 sts, repeat from * around (36)
Round 7: *2 SC in first, SC in next 5 sts, repeat from * around (42)
Round 8: *2 SC in first, SC in next 6 sts, repeat from * around (48)
The base of the pot is complete, the next rounds will form the height/sides of the pot.
Round 9: BLO SC in each stitch around (48)
Rounds 10-18: SC in each st around (48)
Round 19: FLO SC in each stitch around, sl st join to first st (48)
Fasten off, weave in ends.
The pot is now complete. To help keep the shape of the bottom so your finished poinsettia can sit flat on a surface, cut a piece of cardboard or plastic the same size as the bottom of the pot and press it into the bottom of your pot. Part of a yogurt container lid or a piece of a cardboard box will work perfectly.
Next, add the cute face to your flower pot.
Insert safety eyes between rounds 14 and 15, approximately 7 stitches apart. If you are adding eyelashes, stitch them on first before inserting safety eyes and securing the backs. For the cheeks, make a couple stitches in red yarn below the eyes. Use the black embroidery thread or a strand of black yarn to sew a “V” shaped smile in the center of the face a couple of rounds below the eyes.
Tie off all yarn and embroidery thread ends from creating the facial features. These ends can be trimmed shorter and left inside the pot.

In the next rounds, you’ll be working with the brown yarn to add the “soil” to the pot. The first round of the brown yarn will be worked in the back loops of round 19. This is right behind where you used the front loops to create the top edge of the pot.

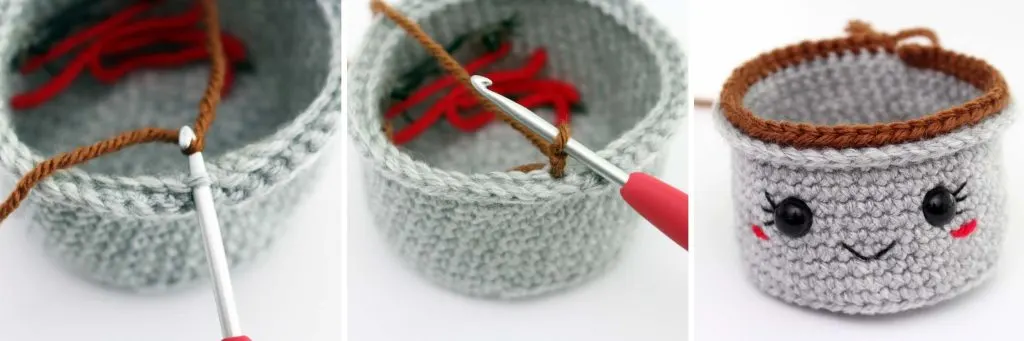
Start by joining your brown yarn in the back loop of the first stitch with a slip stitch. Chain 1 and pull the slip stitch nice and tight. Then continue with the round below working the first SC stitch in the same stitch as your join.
Round 20: BLO SC in each stitch around (48)
*Work all the remaining rounds in both loops.
Round 21: *INV DEC, SC in next 6 sts, repeat from * around (42)
Round 22: *INV DEC, SC in next 5 sts, repeat from * around (36)
Round 23: *INV DEC, SC in next 4 sts, repeat from * around (30)
Round 24: *INV DEC, SC in next 3 sts, repeat from * around (24)
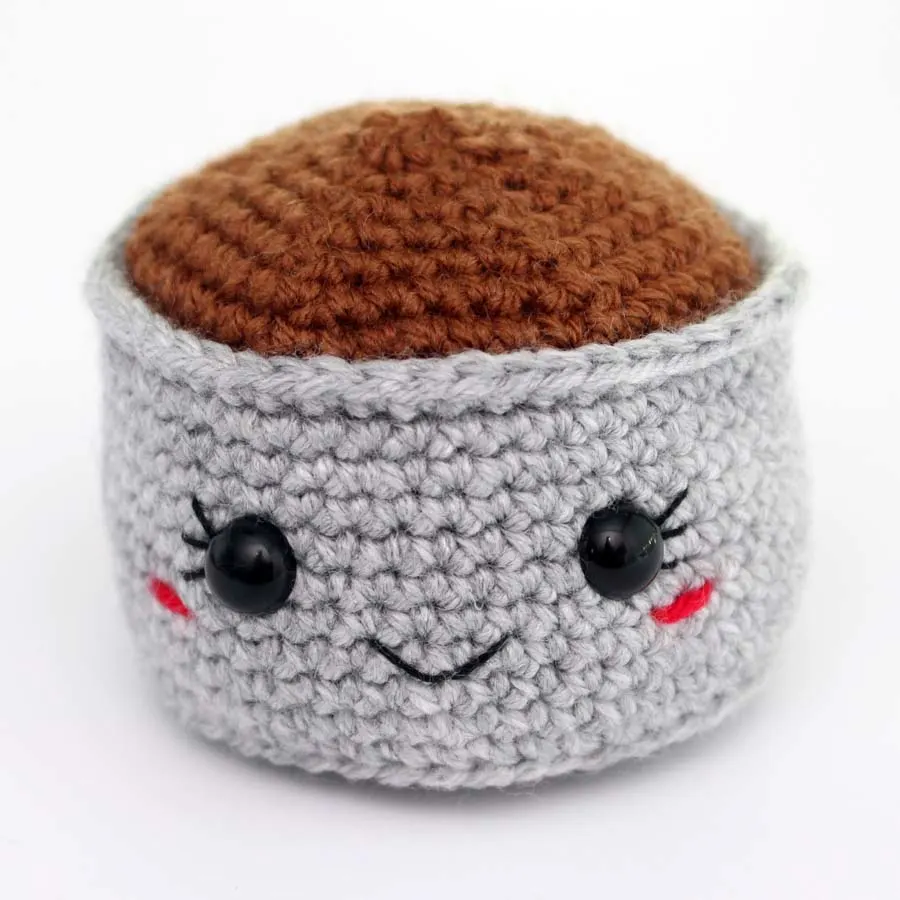
Start adding stuffing to your pot. Continue adding stuffing throughout the next rounds.
Round 25: *INV DEC, SC in next 2 sts, repeat from * around (18)
Round 26: *INV DEC, SC in next st, repeat from * around (12)
Make sure you’ve added enough stuffing to the pot before the opening gets too small.
Round 27: INV DEC in each stitch around (6)
Fasten off, weave in ends, cut yarn tails. Put aside the pot for assembly later. Next, you’ll work up the rest of the poinsettia pieces.

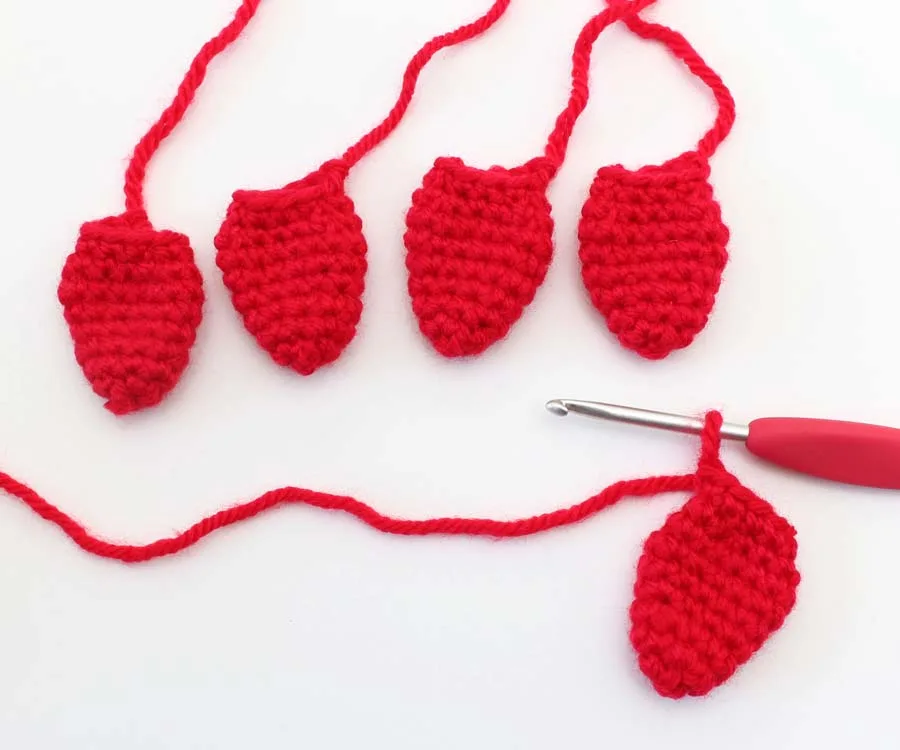
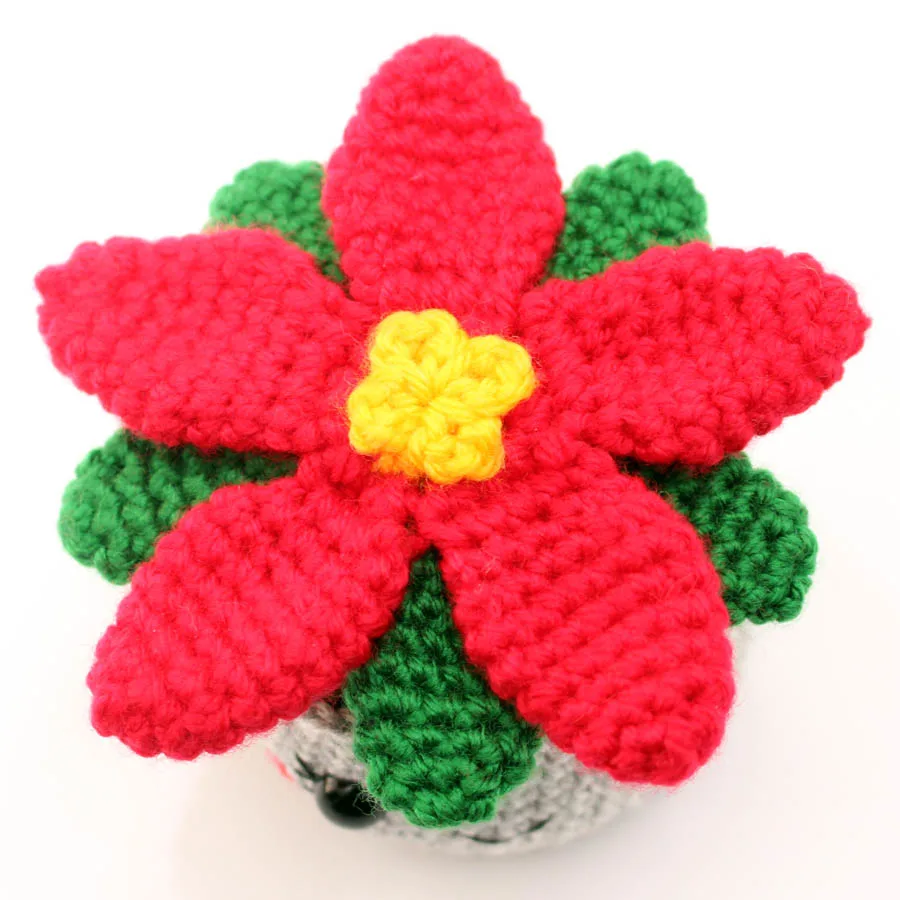
Flower Petals (make 5)
Round 1: In red, magic circle, ch 1, 6 SC into ring (6)
Round 2: *2 SC in first st, SC next st, repeat from * around (9)
Round 3: SC in each st around (9)
Round 4: *2 SC in first, SC in next 2 sts, repeat from * around (12)
Round 5: SC in each st around (12)
Round 6: *2 SC in first, SC in next 3 sts, repeat from * around (15)
Round 7: SC in each st around (15)
Round 8: *INV DEC, SC in next 3 sts, repeat from * around (12)
Round 9: *INV DEC, SC in next 2 sts, repeat from * around (9)
Fasten off, cut yarn leaving a short tail to work over to secure ends later. As an option, you can weave in the ends now or work over them in the next step while joining the petals together.
Repeat instructions above to make 5 petals. When you are finished the 5th petal, do not fasten off. Continue to instruction below to join the petals together.

Joining the Flower Petals
In this step, you’ll join all 5 petals together to create the flower shape. Get each petal ready by flattening it so that the yarn tail is on the edge. Starting with the petal that is attached to your hook first, close the opening by working 4 SC stitches across the top of the petal, passing through both layers of stitches.
Next, pick up the second petal and join to it with a SC in the next stitch from where it was fastened off. Be sure to work through both layers of stitches. Make 3 more SC across the stitches at the top of the petal. When you get to the last SC, pick up the next petal and repeat the same steps. Continue until you have all 5 petals joined together in one piece and there are 4 SC stitches across the top of each petal (a total of 20 SC stitches in the strand of petals).
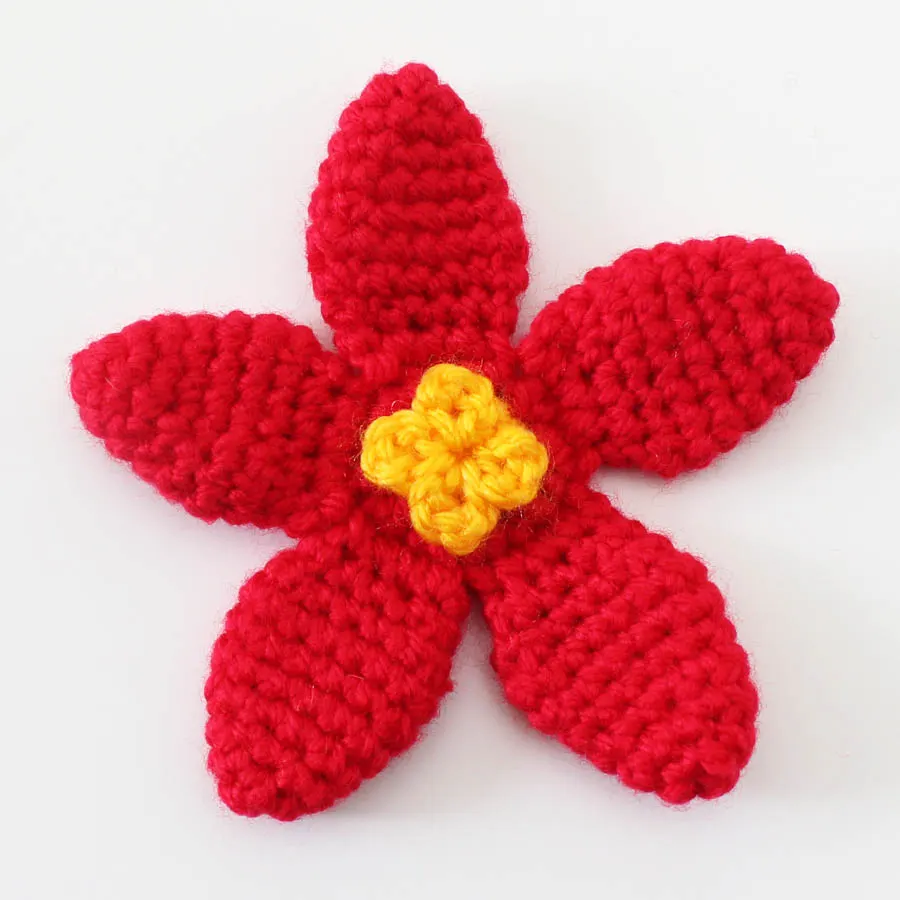
Join with a slip stitch to the top of the first SC stitch and chain 1. Make sure to keep your working yarn on the top of the flower (the side facing you) so it doesn’t get stuck underneath as you close the center of the flower. Do not fasten off. In the next few rounds, we’ll close the center opening of the flower and add the yellow in the middle.

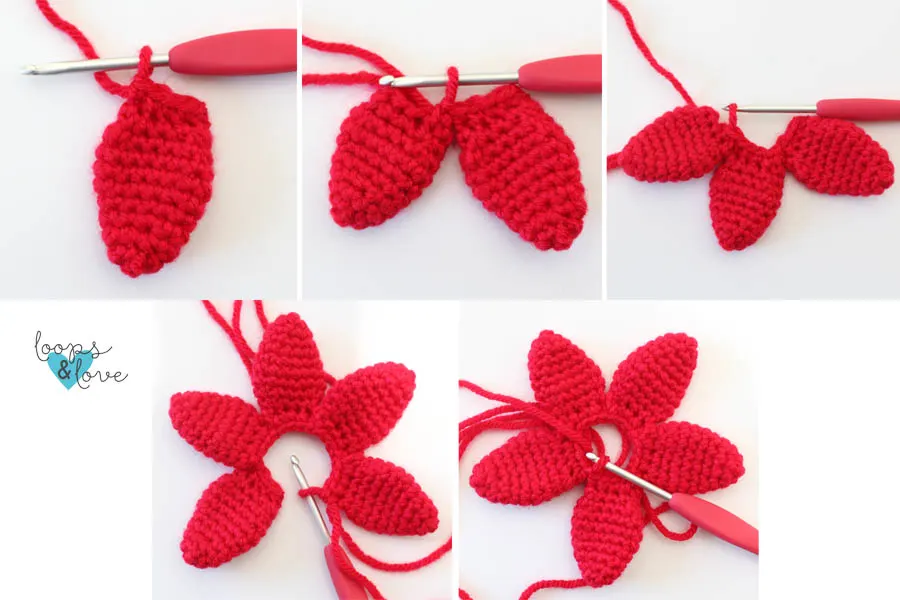
Closing the Flower
Round 1: SC DEC in each st, change color to yellow, sl st join to top of first SC DEC, ch 1 (10)
Round 2: SC DEC in each st, sl st join to top of first SC DEC, ch 1 (5)
Round 3: Ch 3 (4 chs in total including ch 1 after join), sl st to next st, *ch 4, sl st to next st. Repeat 2 more times so there are 4 little petals created. Then sl st join to first st.
Fasten off. Use your yarn needle to pass the yellow yarn through to the back of the flower and then sew the center closed by passing your yarn needle through the back of the center stitches and pulling tight to close. Weave in all ends and cut yarn tails.

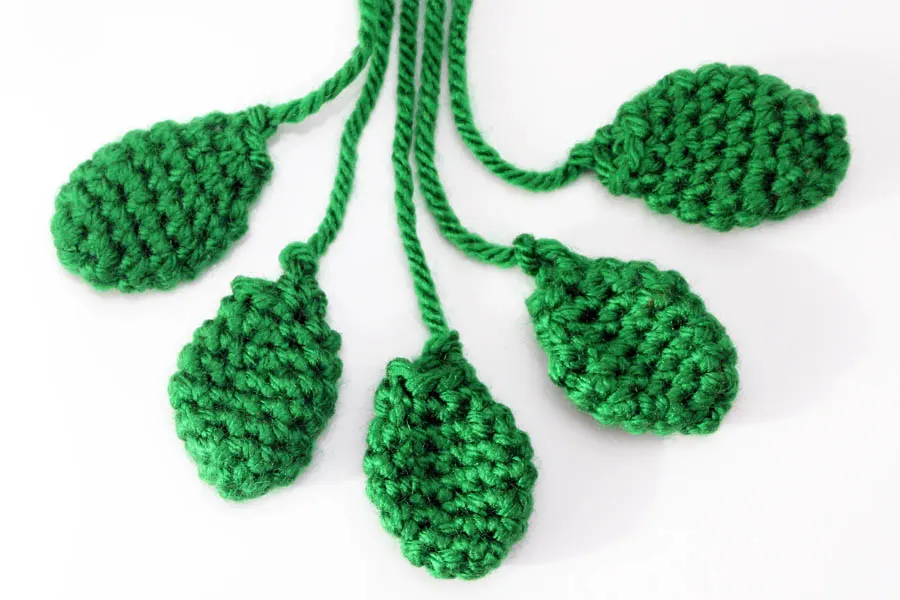
Leaves (make 5)
Round 1: In green, magic circle, ch 1, 6 SC into ring (6)
Round 2: *2 SC in first st, SC next st, repeat from * around (9)
Round 3: SC in each st around (9)
Round 4: *2 SC in first, SC in next 2 sts, repeat from * around (12)
Round 5: SC in each st around (12)
Round 6: SC in each st around (12)
Round 7: *INV DEC, SC in next 2 sts, repeat from * around (9)
Round 8: *INV DEC, SC in next st, repeat from * around (6)
Fasten off, cut yarn leaving a short tail to work over to secure ends later. As an option, you can weave in the ends now or work over them in the next step while joining the petals together.

Poinsettia Assembly
Step 1: Attach the leaves to the top of the soil. Evenly space them around. Use the flower piece as a guide to where to place the leaves so that the leaves will stick out between the flower petals. Use your yarn needle to sew around a few stitches in the top few rounds of the leaves, passing through stitches on the soil section. When leaves are secure, cut yarn tails.

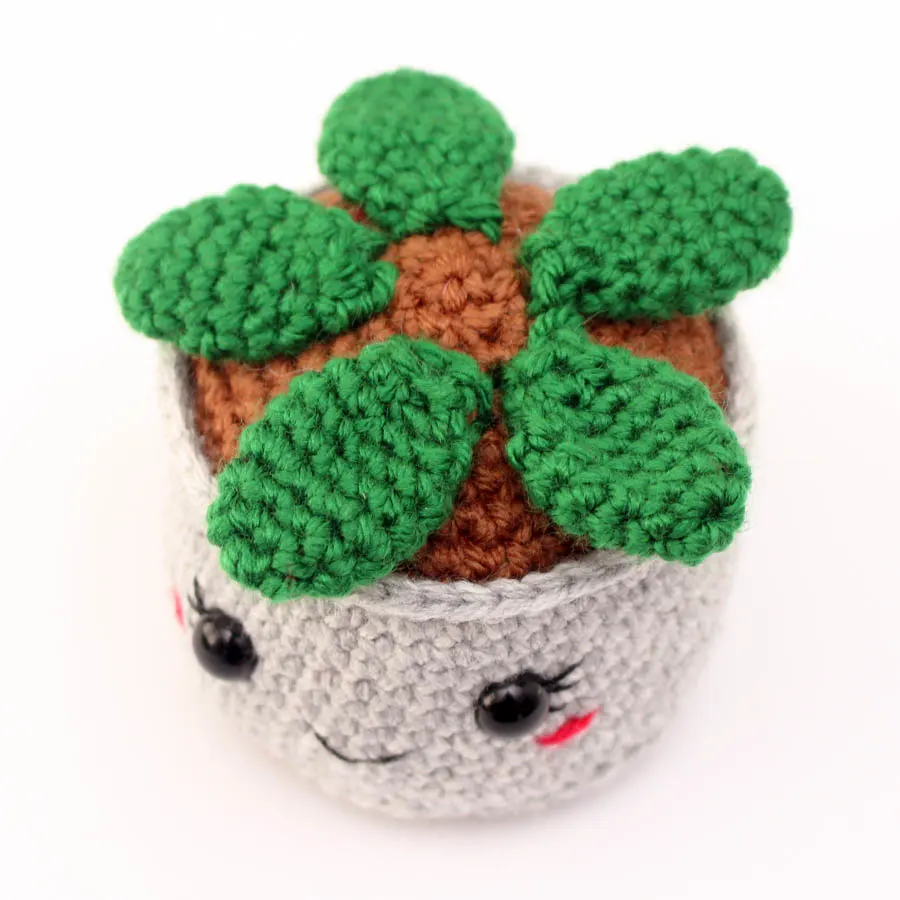
Step 2: Place flower piece on top of the leaves. Line it up so that the leaves are visible between the petals. Use a strand of red yarn and your yarn needle to sew the flower in place. Only sew around the red stitches that are closer to the center and in the first few rounds of the petals. This is so the petals can point straight out and not be pulled down towards the pot. Weave in ends and cut yarn tails.

You are all finished making your little crochet poinsettia amigurumi! I hope you love it!

**Want to be kept in the loop? Be sure to like Loops and Love Crochet on Facebook and join the Loops and Love Crochet Group! Don’t forget to follow @loopsandlovecrochet on Instagram! Remember to tag Loops and Love Crochet when you post your fnished projects on social media! I’d love to see them! **
*You may make and sell any items made from my patterns, but please link back to my blog or Loops & Love Crochet as the designer. Please do not copy this pattern or photos and share as your own, in part or in whole. Instead, link back to the Loops and Love Crochet blog (especially when selling items you make from my patterns). Thank you!