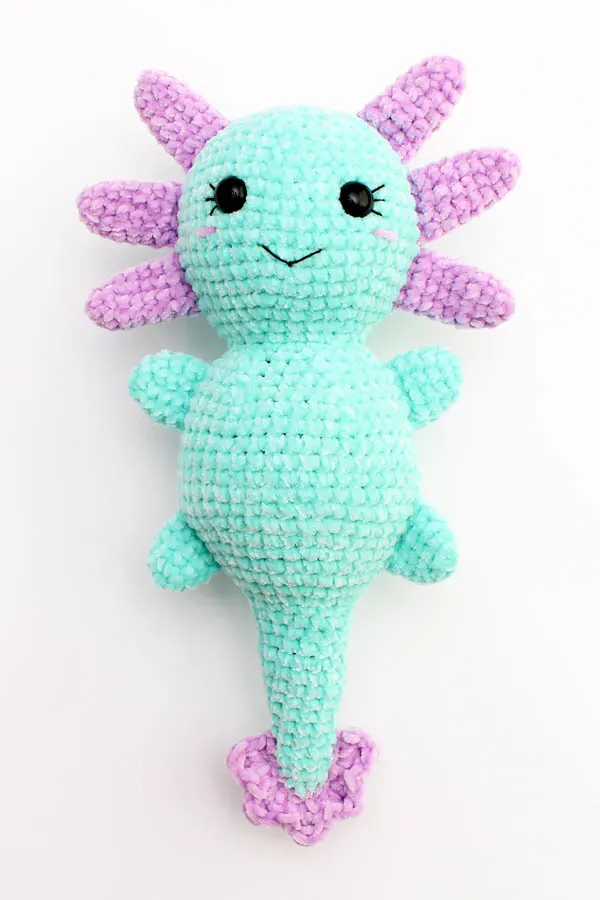
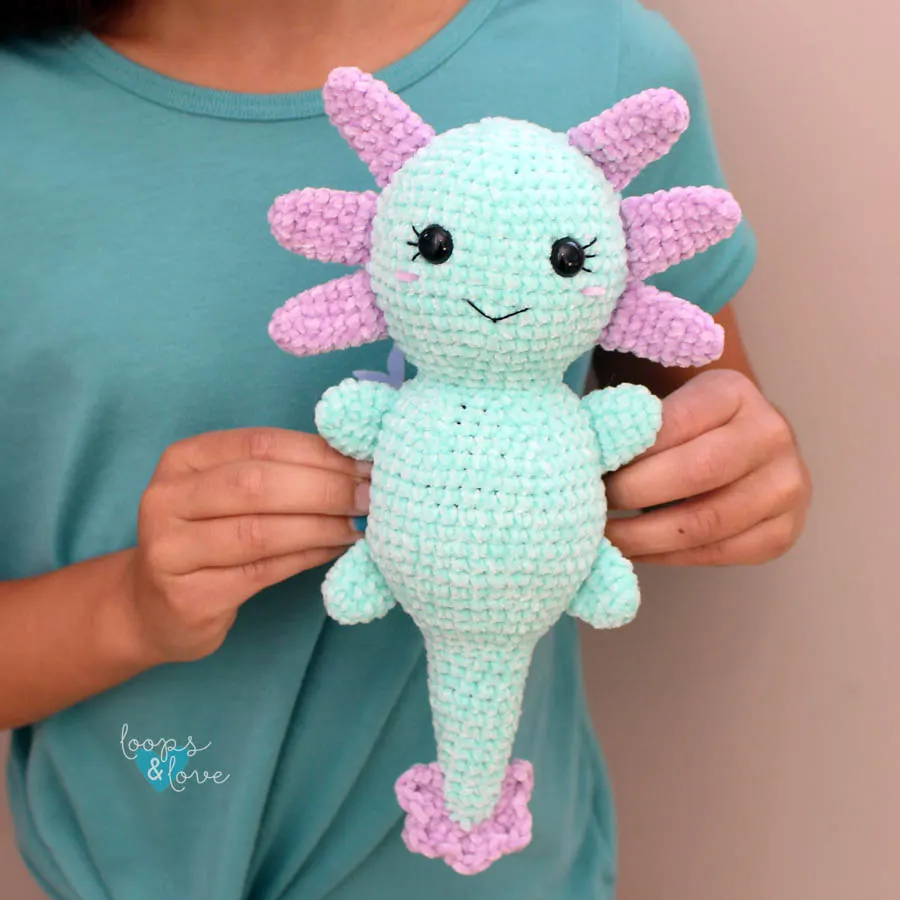
This plush axolotl amigurumi is a larger version of our original axolotl pattern. This one is the perfect size for cuddling!
Our original axolotl pattern was released a couple years ago and is still a popular one on the blog! It seems like people of all ages are drawn to the adorable and playful charm of axolotls, making them so fun to make in amigurumi version! I thought it would be fun to make a larger version of our original design in a chenille yarn for an extra squishy and cuddly plush axolotl amigurumi!
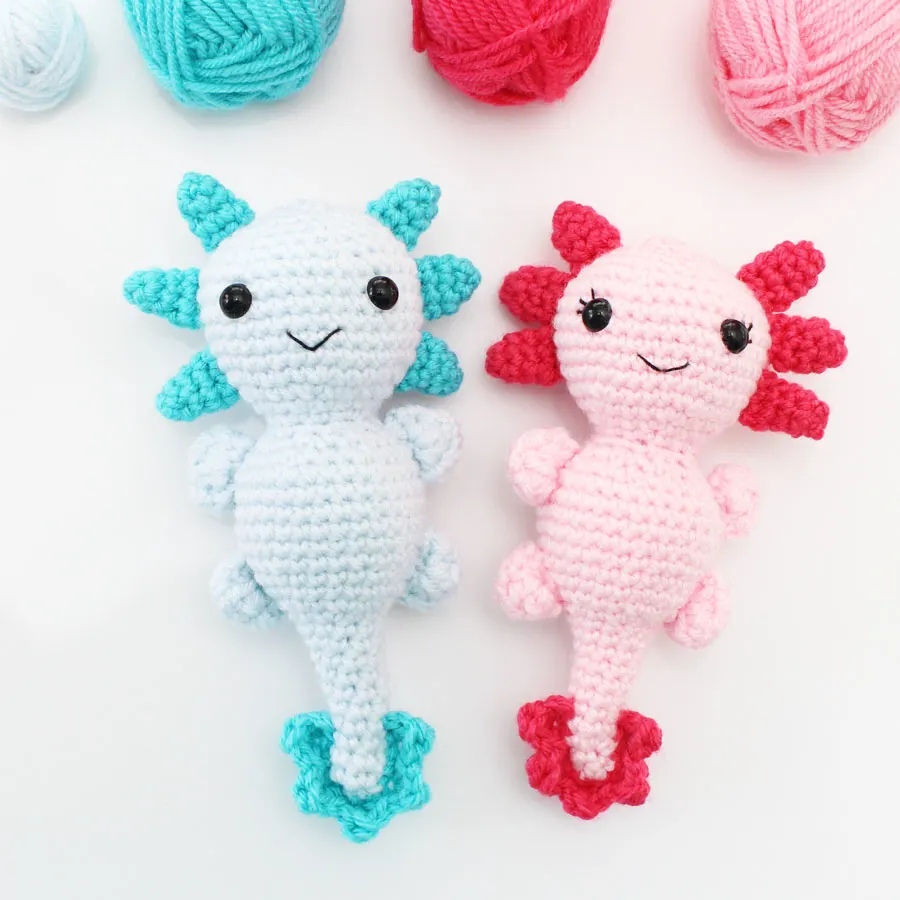
Axolotls are so fun to work up with the wide variety of possible color combinations. I picked complementing solid colors for the axolotl pictured in this pattern, however your axolotl amigurumi will also look great in variegated or striping yarn too!

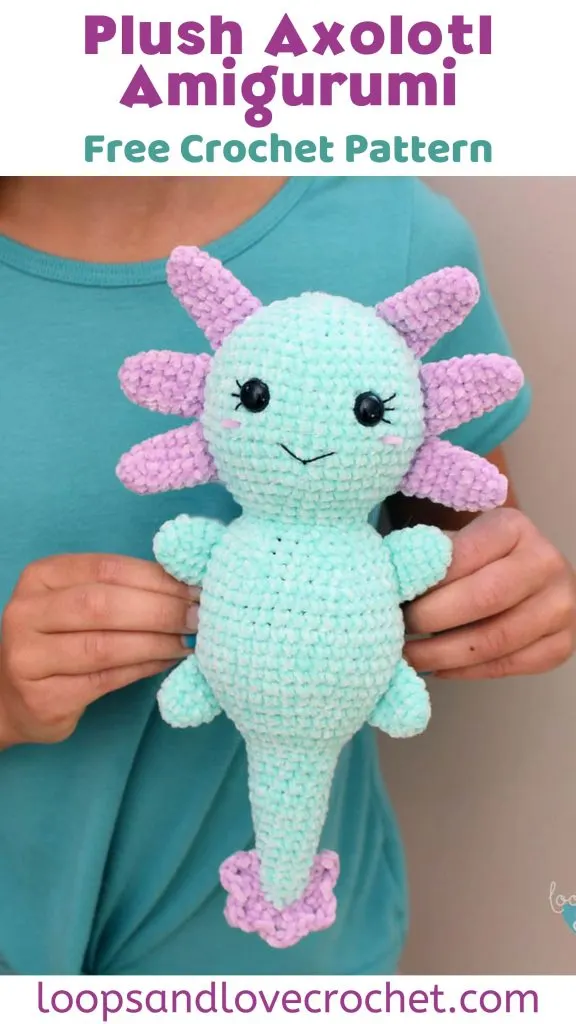
For the plush axolotl amigurumi pictured in this pattern, I used Lion Brand’s A Star is Born: Naptime yarn. This yarn is a soft, chenille #4 worsted-weight yarn. The result is a soft and snuggly axolotl amigurumi that is so fun to squish and cuddle! If you don’t have this yarn on hand, substituting with another worsted-weight plush or non-plush (cotton/acrylic) yarn will work for this pattern too! Just keep in mind that changing the yarn or hook size for this pattern could result in a larger or smaller finished axolotl amigurumi.
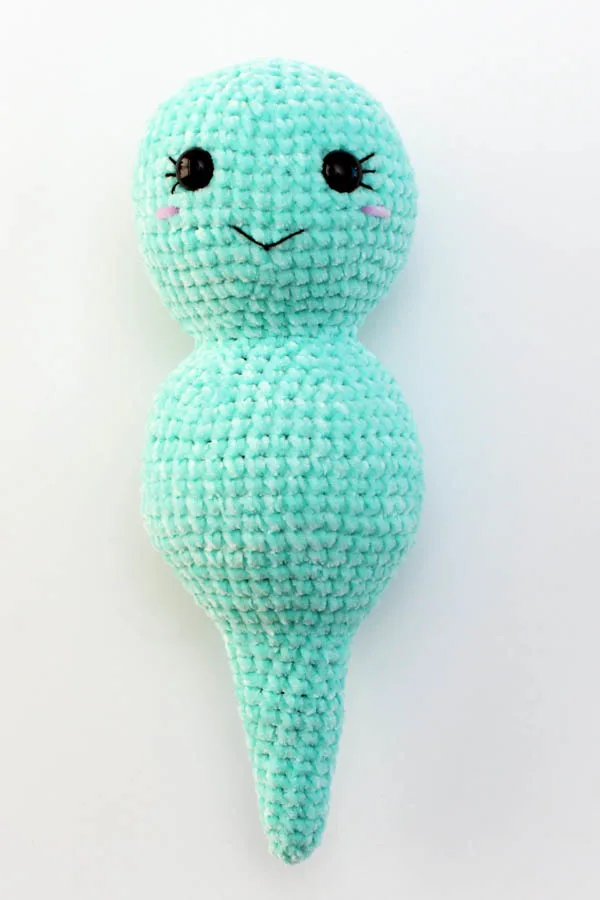
This plush axolotl amigurumi is worked from the bottom up, with the tail, body, and head all one piece. The legs, external gills, and fins are worked separately and attached at the end.
Have fun working up your Plush Axolotl Amigurumi!
Remember to like Loops and Love Crochet on Facebook and join the Loops and Love Crochet Group for sharing your finished projects! I’d also LOVE it if you followed @loopsandlovecrochet on Instagram! If you like crochet video tutorials, check out (and subscribe to) my Loops and Love Crochet YouTube Channel!
Disclosure: This post may contain affiliate links, which means I may receive a small commission if you click a link and purchase something that I have recommended. This is done at no extra cost to you. Thank you for supporting Loops & Love Crochet!
The Plush Axolotl Amigurumi crochet pattern is available for FREE on this website. If you’d like an ad-free, printable PDF version, you may purchase it for a small fee from my Etsy or Ravelry shops. Thank you so much for supporting Loops & Love Crochet!
If you’re looking for our original Axolotl Amigurumi crochet pattern, you can find it here!

Materials:
- Worsted Weight #4 yarn – You can use any worsted-weight yarn for this project. The axolotl pictured was made with Lion Brand A Star is Born: Naptime (Pale Aqua and Lilac colorways). This yarn is a super soft, plush chenille yarn and makes a super soft crochet project with extra squish. This pattern also works well with a regular worsted-weight yarn too. You’ll need approximately 175 yards of yarn in total, which works out to approx. 150 yds in a main color and 25 yds in an accent color.
- 4 mm crochet hook – or your preferred hook size for amigurumi. This size of hook worked well with this plush yarn so the stitches are still visible. Note that substituting a different hook may change the size of your finished project.
- Safety Eyes – 12 mm size (or your preferred size)
- Stuffing – any fiber-based stuffing
- Embroidery or crochet thread – a small amount of black for the eyelashes and mouth.
- Yarn needle (for weaving in ends and attaching pieces together) – bent yarn needles work great for amigurumi projects.
Stitches Used:
- Ch – chain
- Sl St – slip stitch
- SC – single crochet
- DC – double crochet
- INV DEC – invisible single crochet decrease – insert hook into front loop of next stitch, then insert your hook into the front loop of the following stitch (3 loops on hook). Yarn over and draw through 2 loops (2 loops on hook), yarn over and pull through 2 remaining loops on hook. Here’s a video tutorial for the INV DEC.
Gauge
- 2”x2” = approx. 11 rows of 10 SC stitches
Finished Size
- Finished axolotl measures approximately 8 inches tall.
Important Notes:
- Magic Circle – Make a circle with your yarn, insert crochet hook into circle and draw up a loop. Chain one and then start making the stitches of round 1 into the ring. This video tutorial will show you the magic circle and working the first rounds of stitches.
- Worked in rounds – This pattern is worked in continuous rounds starting with a magic circle. At the end of each round, you will not be joining the last stitch of the round with the first one. Instead, you’ll be continuing right on to the stitches of the next round (with no join). It is useful to use a stitch marker (or a piece of yarn) to mark the start or end of each round to keep track of where you are in the pattern.
The Pattern:
Axolotl Tail, Body, and Head
Working from the bottom up, starting with the tail. Add stuffing to the tail section and body as you work up each section. Stuff firmly, but not so full so you see the stuffing showing between the stitches.
Round 1: In main color of yarn, magic circle, ch 1, make 6 SC stitches into ring (6)
Round 2: *2 SC in first st, SC in next 2 sts, repeat from * around (8)
Round 3: SC in each st around (8)
Round 4: *2 SC in first st, SC in next 3 sts, repeat from * around (10)
Round 5: SC in each st around (10)
Round 6: *2 SC in first st, SC in next 4 sts, repeat from * around (12)
Rounds 7-8: SC in each st around (12)
Round 9: *2 SC in first st, SC in next 5 sts, repeat from * around (14)
Rounds 10-11: SC in each st around (14)
Round 12: *2 SC in first st, SC in next 6 sts, repeat from * around (16)
Round 13: SC in each st around (16)
Round 14: *2 SC in first st, SC in next 7 sts, repeat from * around (18)
Rounds 15-16: SC in each st around (18)
Round 17: *2 SC in first st, SC in next 2 sts, repeat from * around (24)
Round 18: *2 SC in first st, SC in next 3 sts, repeat from * around (30)
Rounds 19-20: SC in each st around (30)
Stuff the tail section. Continue working up body section.
Round 21: *2 SC in first st, SC in next 4 sts, repeat from * around (36)
Round 22: *SC in each st around (36)
Round 23: *2 SC in first st, SC in next 5 sts, repeat from * around (42)
Rounds 24-31: SC in each st around (42)
Make sure the tail and the lower part of the body are stuffed.
Round 32: *INV DEC, SC in next 5 sts , repeat from * around (36)
Round 33: *INV DEC, SC in next 4 sts, repeat from * around (30)
Round 34: *INV DEC, SC in next 3 sts, repeat from * around (24)
Round 35: *INV DEC, SC in next 2 sts, repeat from * around (18)
Round 36: SC in each st around (18)
Make sure the tail and body section are stuffed. Leave a couple rounds unstuffed under where you are working so that you don’t catch stuffing in your stitches. Next, increases will be worked to start forming the head.
Round 37: *2 SC in first st, SC in next 2 sts, repeat from * around (24)
Round 38: *2 SC in first st, SC in next 3 sts, repeat from * around (30)
Round 39: *2 SC in first st, SC in next 4 sts, repeat from * around (36)
Round 40: *2 SC in first st, SC in next 5 sts, repeat from * around (42)
Round 41: *2 SC in first st, SC in next 6 sts, repeat from * around (48)
Rounds 42-50: SC in each st around (48)
Insert safety eyes between rounds 47 and 48, about 6-7 stitches apart, centering them in the middle of the face. If you are adding eyelashes, first place the safety eyes where you would like them, but do not secure the back. Take the safety eyes out and use your yarn needle and thread to stitch on the eyelashes first. Then place the safety eyes back in and secure the backs. The mouth can also be sewn on at this point. Use your yarn needle to sew a “v” in the center of the face 2-3 rounds below the eyes. Optional – Use a stitch of pink yarn on either side of the face to create cheeks.
Round 51: *INV DEC, SC in next 6 sts, repeat from * around (42)
Round 52: *INV DEC, SC in next 5 sts, repeat from * around (36)
Round 53: *INV DEC, SC in next 4 sts, repeat from * around (30)
Round 54: *INV DEC, SC in next 3 sts, repeat from * around (24)
Round 55: *INV DEC, SC in next 2 sts, repeat from * around (18)
Round 56: *INV DEC, SC in next st, repeat from * around (12)
Round 57: *INV DEC in each st around (6)
Fasten off. To close the top of the head, pass your yarn needle through the front loop of each of the stitches around, pull yarn to close opening. Weave in ends by passing through the head/body a few times, then cut yarn.

Legs (make 4)
Round 1: In main color of yarn, magic circle, ch 1, make 6 SC stitches into ring (6)
Round 2: *2 SC in first st, SC in next st, repeat from * around (9)
Rounds 3-6: SC in each st around (9)
Fasten off. Cut tail leaving a long enough yarn tail to sew onto body. Set aside legs until assembly.

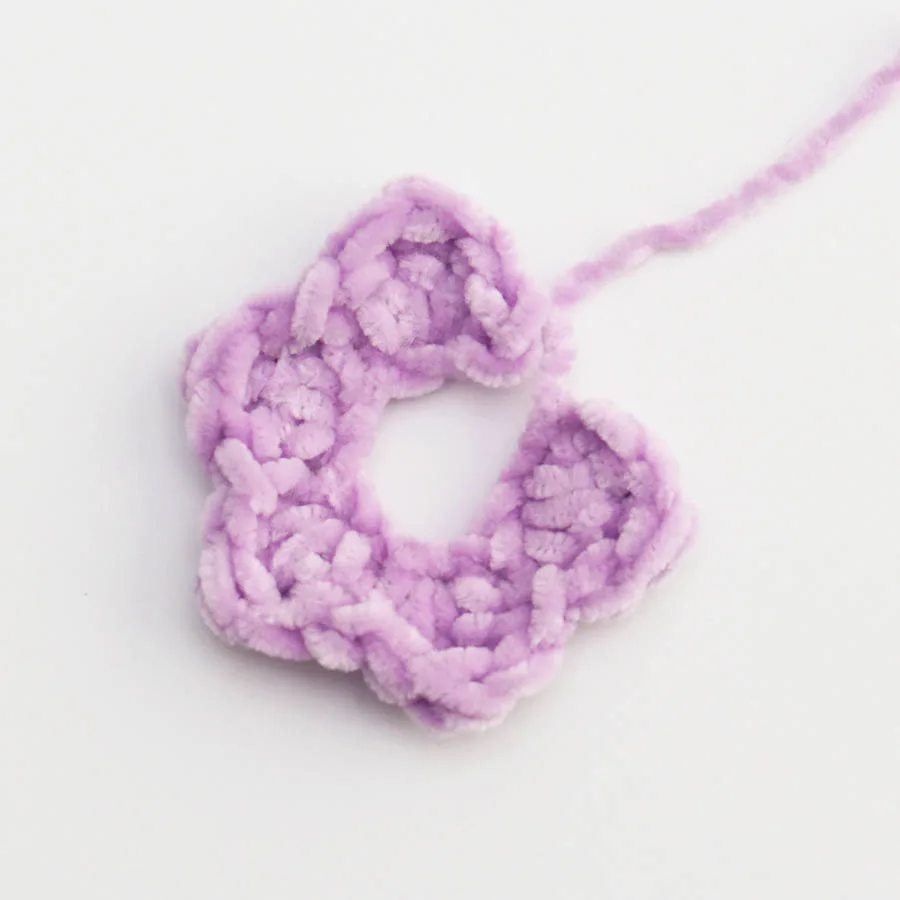
Tail Fin
In accent color, chain 12, sl st in 2nd ch from hook, *3 DC sts in next st, sl st in next, repeat from * across.
Fasten off. Cut yarn leaving one yarn long enough for sewing tail to body. Set aside until assembly.

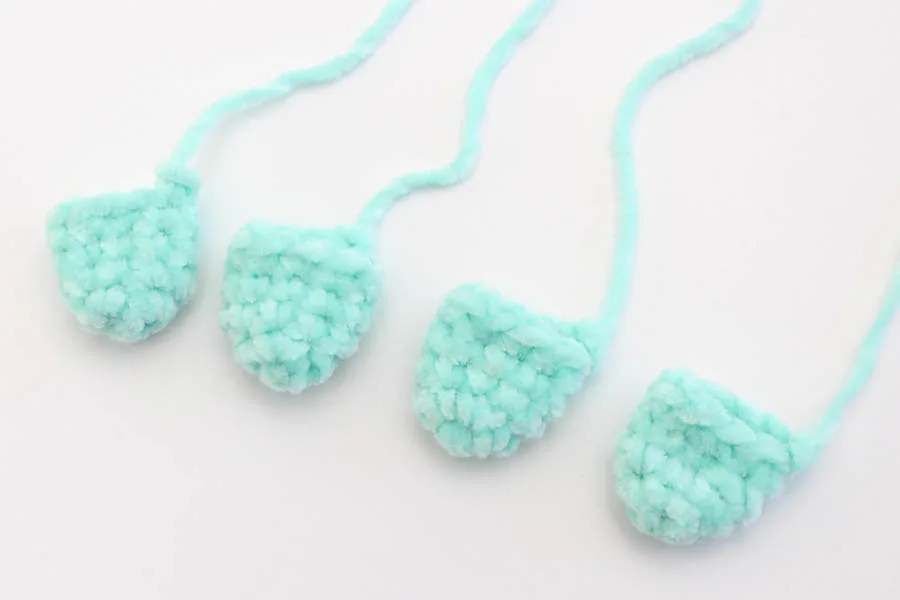
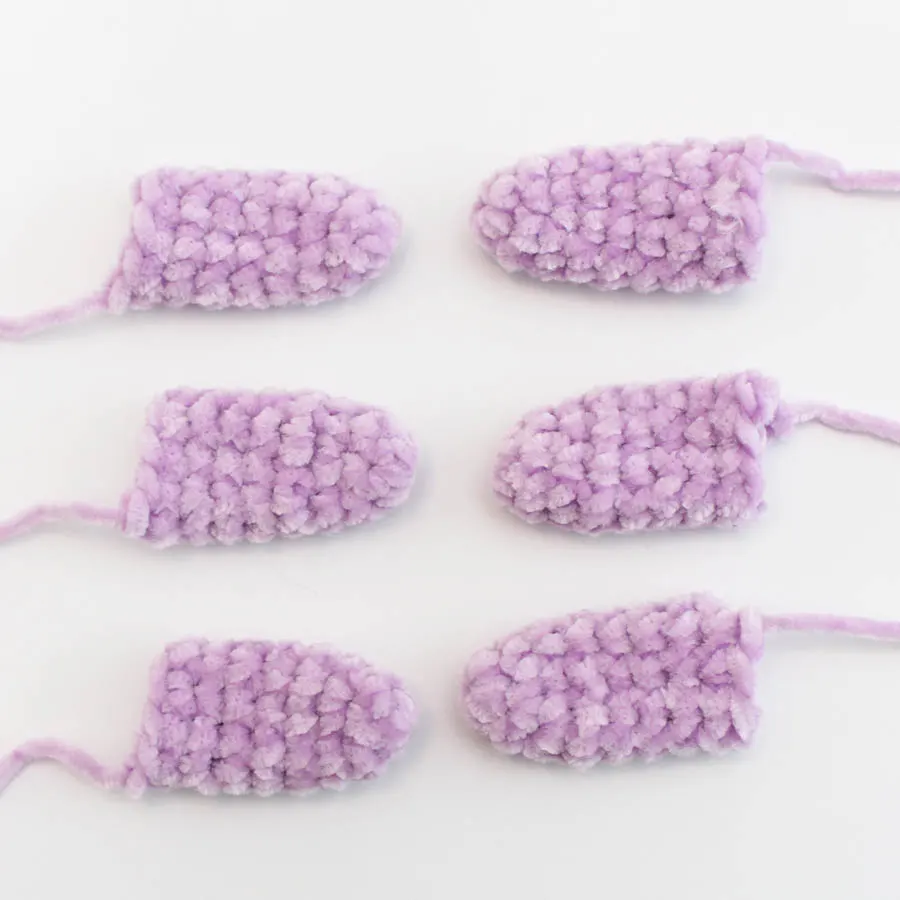
External Gills (make 6)
Round 1: In accent color, magic circle, ch 1, make 6 SC stitches into ring (6)
Round 2: *2 SC in first st, SC in next st, repeat from * around (9)
Rounds 3-9: SC in each st around (9)
Fasten off. Cut yarn leaving a long enough yarn tail for sewing the top of the gill closed and attaching to the axolotl’s head.
Repeat instructions above until you have a total of 6 gills.

All pieces for your axolotl amigurumi are now worked up. Next, continue to assembly instructions below.
Plush Axolotl Assembly Instructions
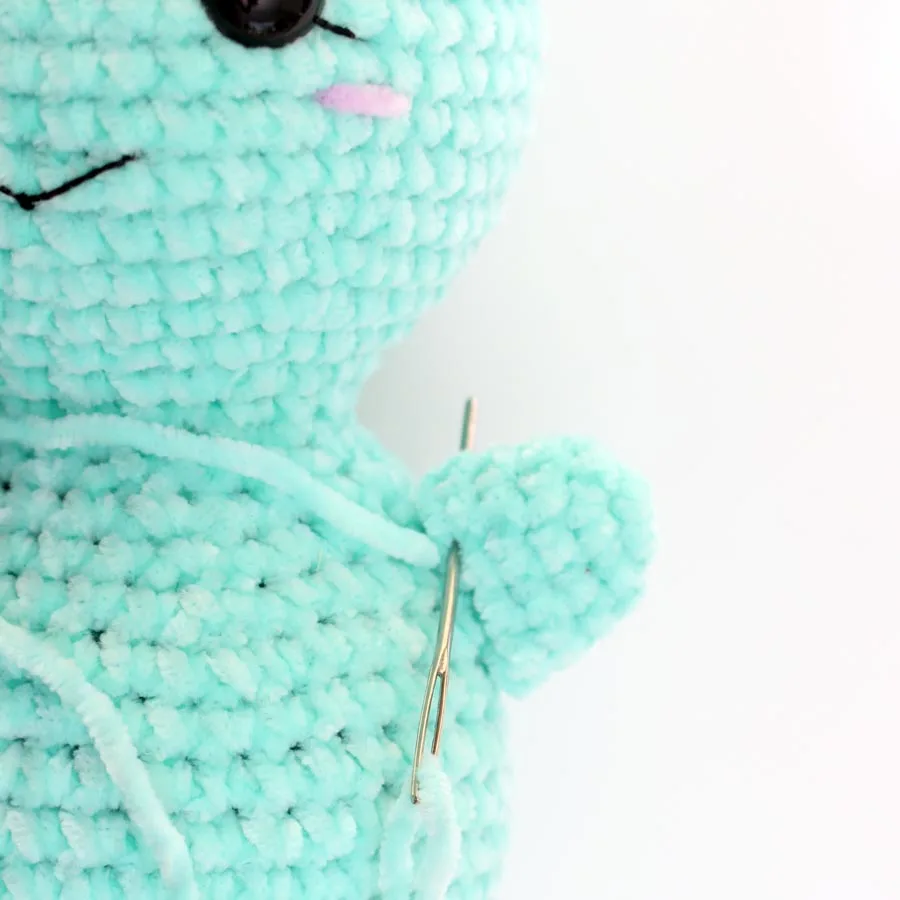
Attaching the Legs – Top legs are sewn on the sides of the body starting one to two rounds down from the neck. Bottom legs are sewn on starting one round up from the tail section where the body starts. Place the flat side of the leg against the body. Sew in and out of each stitch across the top of the leg, passing through a stitch on the axolotl each time. Weave in ends and cut extra yarn tails.

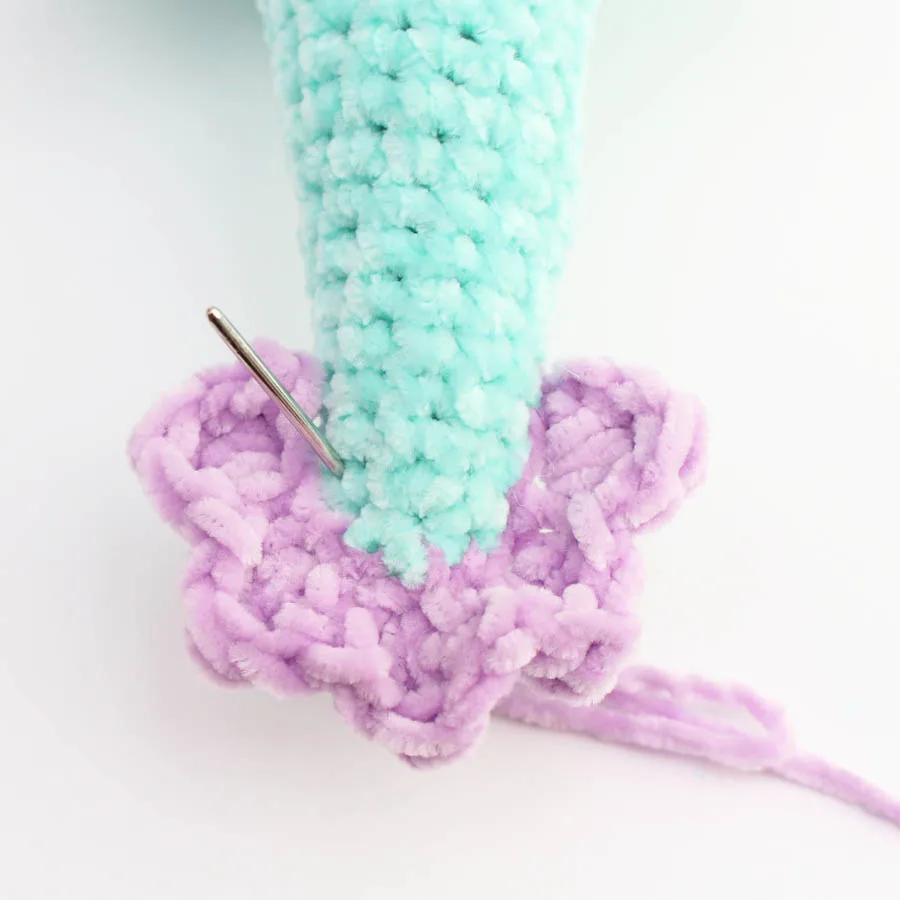
Sewing on the Tail Fin – Line up the tail fin piece so it’s wrapped around the bottom of the tail. Center the fin “bumps” so there are two on each side of the tail and one centered at the bottom of the tail. Use your yarn needle to sew the tail fin piece on by passing through each stitch on the fins and through a stitch around the bottom of the tail. When fins are secure, weave in ends and cut yarn.

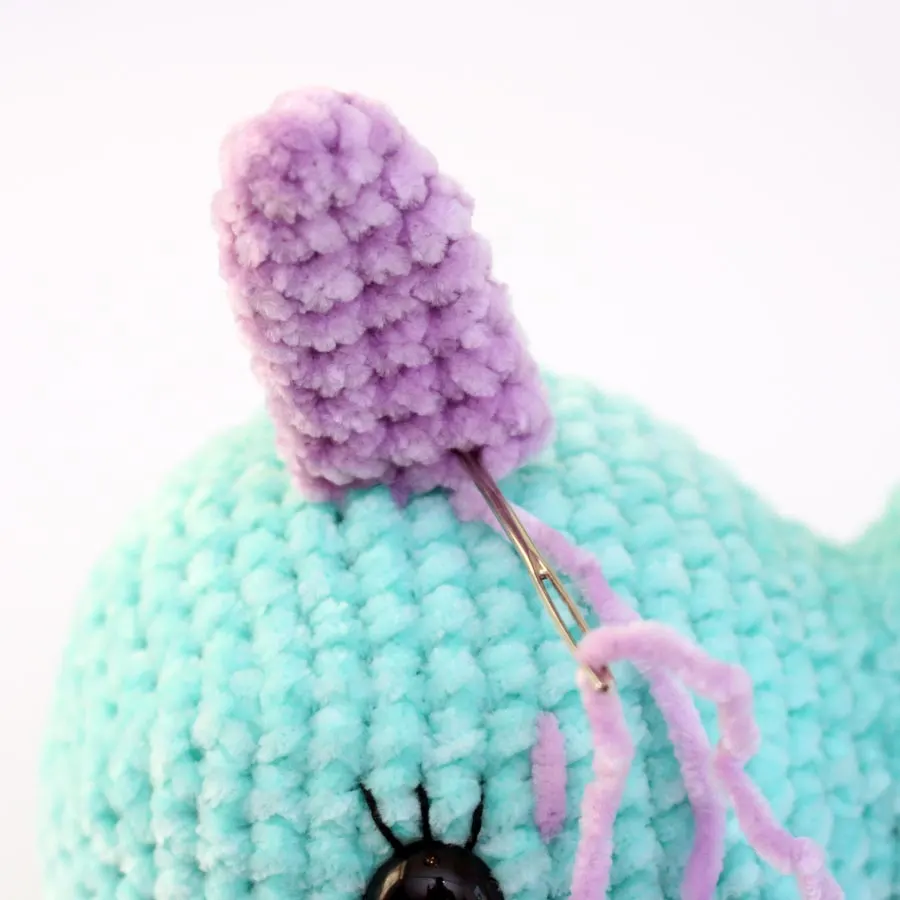
Attaching the External Gills – the six external gill pieces are sewn around the sides of the head, three on each side. Start by lining up one of the middle gills on the side of the head, centering it to the eyes. Sew in and out of each stitch along the top of the gill, passing through stitches on the head to secure it in place. Weave in end and cut yarn. Next, line up and sew on the two remaining gills on the same side of the head. One above the first one and one below. Repeat for the three gills on the other side of the head. Weave in all ends and cut all yarn tails.

You are all finished making your plush axolotl amigurumi! I hope you had so much fun! Now you can crochet them in all different color combinations to add more to your collection!

**Want to be kept in the loop? Be sure to like Loops and Love Crochet on Facebook and join the Loops and Love Crochet Group! Don’t forget to follow @loopsandlovecrochet on Instagram! Remember to tag Loops and Love Crochet when you post your finished projects on social media! I’d love to see them! **

*You may make and sell any items made from my patterns, but please link back to my blog or Loops & Love Crochet as the designer. Please do not copy this pattern or photos and share as your own, in part or in whole. Instead, link back to the Loops and Love Crochet blog (especially when selling items you make from my patterns). Thank you!
Teresa
Tuesday 12th of November 2024
I love this and can’t wait to make one or more!!
Loops and Love Crochet
Tuesday 12th of November 2024
Thank you so much! I hope you enjoy making them!