
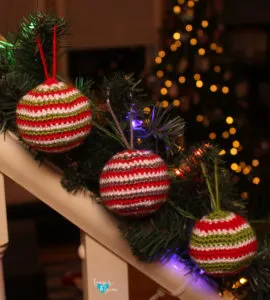
These little Christmas baubles are a fun crochet addition to your Christmas tree or holiday décor. The best part is that they are so fast and easy, which is exactly what you need for this time of year! You can make them in classic red, green, and white or in a color combination that fits with the rest of your decorating. The possibilities are endless! I had fun adding sparkle yarn to one of my ornaments and I love how it turned out. I also played around with thick and thin stripes by adding more or less rows of each color.
Remember to like Loops and Love Crochet on Facebook and join the Loops and Love Crochet Group! You can also follow @loopsandlovecrochet on Instagram!
Disclosure: This post may contain affiliate links, which means I may receive a small commission if you click a link and purchase something that I have recommended. This is done at no extra cost to you. Thank you for supporting Loops & Love Crochet!
Materials:
- Worsted weight yarn – You can use any worsted-weight yarn for this project. Specifically, I used Red Heart Soft in White and Guacamole, Bernat Satin in Crimson, and Caron Simply Soft Party in Platinum Sparkle.
- 3.5 mm crochet hook
- Poly-fil fibre stuffing
- Yarn needle for weaving in ends and adding the loop at the top of the ornament
Stitches Used:
- Sl St – slip stitch
- SC – single crochet
- INV DEC – invisible single crochet decrease – insert hook into front loop of next stitch, then insert your hook into the front loop of the following stitch (3 loops on hook). Yarn over and draw through 2 loops (2 loops on hook), yarn over and pull through 2 remaining loops on hook. There are many tutorials on this on YouTube. Check one out if you’d like to see the invisible decrease in action.
Important Notes:
- Magic Circle – Make a circle with your yarn, insert crochet hook into circle and draw up a loop. Chain one and then start making the stitches of round 1 into the ring. If you are unsure of how to make a magic circle, check out my Magic Circle Video Tutorial.
- Joining Rounds – This pattern is worked in joining rounds, which means that you will be joining the last stitch of the round to the first one with a slip stitch and then chaining 1 before continuing with the next round. Make the first stitch of the next round in the same stitch as the chain 1.
- Choose any color scheme you like. For the two ornaments with the thinner stripes, I just alternated doing one round of each of the 3 colors. For the thicker striped ornament, I alternated 2 rounds of red and green with 1 round of white in between each (red, red, white, green, green, white, and so on….). The color possibilities are endless, so you can choose what goes best with your décor.
- Color Changes – Since this pattern is worked in joining rounds, your color changes will be less noticeable. To have almost invisible color changes and seam, make your color changes at the end of each round as follows: work the last stitch of the first color right up to when you do your last yarn over. Yarn over in the new color and pull through the loop. Next, join to the first SC of the round with a slip stitch, then pull the slip stitch nice and tight before doing your chain 1 and continuing on with the round. See the photos below to help you with color changes.


The Pattern
Round 1: Make a magic circle, chain 1 and make 6 SC stitches into ring (6)
Round 2: 2 SC in each stitch around (12)
Round 3: 2 SC in first stitch, SC in next, repeat around (18)
Round 4: 2 SC in first stitch, SC in next 2, repeat around (24)
Round 5: 2 SC in first stitch, SC in next 3, repeat around (30)
Round 6: 2 SC in first stitch, SC in next 4, repeat around (36)
Round 7: 2 SC in first stitch, SC in next 5, repeat around (42)
Rounds 8-15: SC in each stitch around (42)
Round 16: INV DEC, SC next 5 stitches, repeat around (36)
Round 17: INV DEC, SC next 4 stitches, repeat around (30)
*Start stuffing the ornament here before the opening gets too small. Continue stuffing as you go.
Round 18: INV DEC, SC next 3 stitches, repeat around (24)
Round 19: INV DEC, SC next 2 stitches, repeat around (18)
Round 20: INV DEC, SC next stitch, repeat around (12)
*Make sure you have added enough stuffing. The opening will be very small now!
Round 21: INV DEC around (6)
Fasten off leaving a long tail. Use your yarn needle to sew the hole closed. Then use the yarn tail to make a loop at the top of the ornament large enough for hanging on your tree or wherever you plan on hanging it. Secure your loop and weave in the yarn tail by sewing around the stitches at the top. Hold onto the loop so you don’t accidently pull to hard and shrink it before it’s secured.
That’s it! You’re all done!


**You may make and sell any items made from my patterns, but please link back to my blog or Loops & Love Crochet as the designer. Please do not copy and post claiming it as your own. Please do not re-publish my photos as your own. Thank you!**
**Want to be kept in the loop? Be sure to like Loops and Love Crochet on Facebook and join the Loops and Love Crochet Group! Don’t forget to follow @loopsandlovecrochet on Instagram!**


Rumi
Monday 3rd of December 2018
I just made my first bauble with your pattern in red and white. Thanks for sharing, and great instruction. Happy holidays!
Loops and Love Crochet
Monday 3rd of December 2018
Awesome! Thanks so much! :)