I made this baby set as part of a baby shower gift for my cousin who is expecting a baby girl soon! She loved it and was very excited to put her new baby in it! I’m hoping she will sent me a photo so I can add it to this post!
This set worked up quite quickly and the simple stitches make it pretty easy! I love how the back loop double crochet stitches give it some extra texture without extra difficulty. The ears on the hat also add a lot of cuteness!
For now, this pattern is just available in 0-3 month size. However, I might add a couple more sizes in the new year!


This pattern is available for FREE on this website. If you’d like an ad-free, printable PDF version, you may purchase it for a small fee from my Etsy or Ravelry shops. Thank you so much for supporting Loops & Love Crochet!
Remember to like Loops and Love Crochet on Facebook and join the Loops and Love Crochet Group! You can also follow @loopsandlovecrochet on Instagram!
Disclosure: This post may contain affiliate links, which means I may receive a small commission if you click a link and purchase something that I have recommended. This is done at no extra cost to you. Thank you for supporting Loops & Love Crochet!
Materials (for hat and mittens):
- Worsted weight yarn – You can use any worsted-weight yarn for this project. I used Red Heart Soft in Light Grey Heather and Red Heart Soft Baby Steps in Baby Pink.
- 5mm crochet hook – I crochet a little on the tighter side and I used a 5mm hook. If you crochet loosely, it might be a good idea to go down a hook size so your hat isn’t too big.
- Yarn needle – for weaving in ends
Stitches Used:
- Ch – chain
- Sl St – slip stitch
- SC – single crochet
- DC – double crochet
- DC BLO – double crochet in back loops only
- FPDC – front post double crochet
- BPDC – back post double crochet
Gauge
- 2” across = 9 DC
- 2” height = 4.5 rows of DC.
Important Notes:
- This hat is crocheted from the top down, starting with a magic circle. To make the magic circle, make a circle with your yarn, insert crochet hook into circle and draw up a loop. Chain 2 and then work the stitches of round 1 into the ring. If you are unsure of how to make a magic circle, check out my Magic Circle Video Tutorial.
- Always start the first stitch of the round in the same space as chain 2.
- Chain stitches do not count towards stitch count.
- This pattern is worked in joining rounds. When you finish the stitches of one round, you will be joining to the first stitch of the round with a slip stitch, chaining 2 and then starting the next round of the pattern, starting in same stitch as chain.
- To make color changes, work the last stitch of the round all the way up to the last yarn over. Yarn over in the new color and then join with a slip stitch to the first stitch of the round. Continue the next round in the new color.
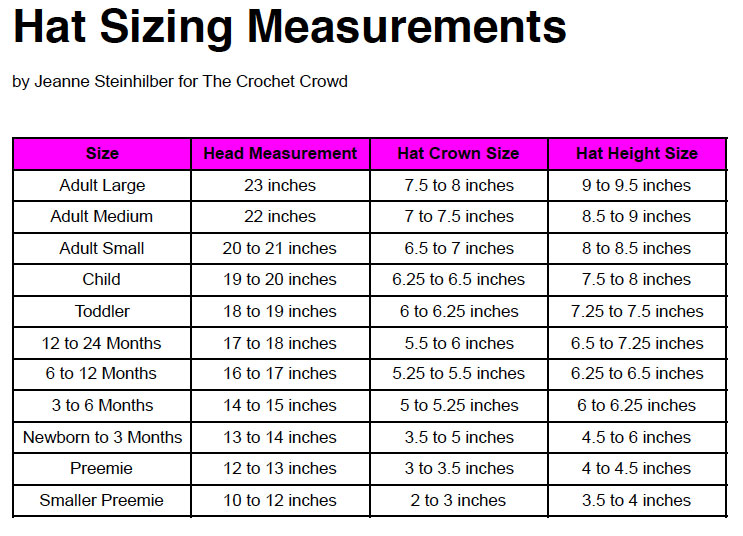
- I crochet a little on the tighter side. If you crochet quite loosely, you may need to go down a hook size to get the desired hat size. I referred to THIS hat sizing chart to make sure it fit within then range of the size I was making. When you finish the rounds of increases, the diameter should fit within the Newborn-3 months range. Then when you are finished the rest of the DC and FPDC/BPDC rounds, the height of your hat from top to bottom should also be in this range. If you are off, you can change hook sizes, or add/remove rounds as needed.
- If you are unsure of how to do the FPDC and BPDC stitches, I have some detailed photos in the tutorial at the end of my ear warmer pattern HERE.
The Pattern: Baby Bear Hat


Hat Size: 0–3 Months
Head circumference: 13-14”
Hat height: approx. 5”
Round 1: In grey, magic circle, ch 2, 9 DC inside circle, join to first DC with a slip stitch, ch 2. (9)
Round 2: 2 DC in each stitch around, join to first DC, ch 2. (18)
Round 3: 2 DC in first stitch, 1 DC in the next, repeat around, join, ch 2 (27)
Round 4: 2 DC in first stitch, 1 DC in the next 2, repeat around, join, ch 2 (36)
Round 5: 2 DC in first stitch, 1 DC in next 3, repeat around, join, ch 2 (45)
Round 6: 2 DC in first stitch, 1 DC in next 4, repeat around, join, ch 2 (54)
Round 7-10: Work these rounds in back loops only. DC in each stitch (BLO), join, ch 2 (54)
Change color to pink
Round 11: DC in each stitch around, join, ch 2. (54)
Round 12: FPDC around first stitch, BPDC around next stitch. Continue alternating FPDC and BPDC stitches around, join, ch 2 (54)
Round 13: Alternate FPDC and BPDC stitches around. Be sure to match the FPDC and BPDC with the FPDC and BPDC stitches of the previous round. Join, fasten off, weave in ends. (54)
Weave in ends.
Ears (make 2)
Round 1: In pink, magic circle, ch 2, 9 DC inside circle, join to first DC with a slip stitch, ch 2. (9)
Change color to grey.
Round 2: 2 DC in each stitch around, join to first DC, Fasten off, leave a tail to sew onto hat. (18)
The ears will curl as you to the DC stitches. The “right side” of the ears will be the inside of the ear. The back of the ear will be the “wrong side” or back or the work. Sew ears onto hat. When the hat is laying flat, I sewed the ears around the DC stitches in the crease of the 4th round from the top of the hat. The middle of the ear is lined up with the 4th round, but it overlapped into the 3rd and 5th rounds as well.
The Mittens:
For the mittens, I used the same materials and stitches as listed abovet. The important notes are very similar as well, but I thought I’d include them below with any minor changes.
Important Notes
- These mittens are crocheted starting with the fingers and then down towards the wrist, starting with a magic circle. To make the magic circle, make a circle with your yarn, insert crochet hook into circle and draw up a loop. Chain 1 and then work the stitches of round 1 into the ring. There are many online tutorials and videos if the magic circle is new to you.
- Always start the first stitch of the round in the same space as chain 1.
- Chain stitches do not count towards stitch count.
- This pattern is worked in joining rounds. When you finish the stitches of one round, you will be joining to the first stitch of the round with a slip stitch, chaining 1 and then starting the next round of the pattern, starting in same stitch as chain.
- To make color changes, work the last stitch of the round all the way up to the last yarn over. Yarn over in the new color and then join with a slip stitch to the first stitch of the round. Continue the next round in the new color.
- I crochet a little on the tighter side. If you crochet quite loosely, you may need to go down a hook size to get the desired size.
- If you are unsure of how to do the FPDC and BPDC stitches, I have some detailed photos in the tutorial at the end of my ear warmer pattern HERE.
The Pattern: Baby Mittens


Size: 0-3 Months
Measurements: When finished, these mittens measure about 2” wide and 3.5” long.
Round 1: In pink, magic circle, ch 1, 6 SC into ring, join to top of first SC, ch 1 (6)
Round 2: 2 SC in each stitch around, join, ch 1 (12)
Round 3: 2 SC in first stitch, SC in next, repeat around, join, ch 1 (18)
Rounds 4-6: SC in each stitch around, join, ch 1 (18)
Change color to grey
Rounds 7-13: SC in each stitch around, join, ch 1 (18)
Round 14: SC in each stitch around, join, ch 2 (18)
Round 15: DC in each stitch around, join, ch 2 (18)
Round 16: FPDC around first stitch, BPDC around next stitch. Continue alternating FPDC and BPDC stitches around, join, ch 2 (18)
Round 17: Alternate FPDC and BPDC stitches around. Be sure to match the FPDC and BPDC with the FPDC and BPDC stitches of the previous round. Join, fasten off, weave in ends. (18)


**You may make and sell any items made from my patterns, but please link back to my blog or Loops & Love Crochet as the designer. Please do not copy and post claiming it as your own. Please do not re-publish my photos as your own. Thank you!**
**Want to be kept in the loop? Be sure to like Loops and Love Crochet on Facebook and join the Loops and Love Crochet Group! Don’t forget to follow @loopsandlovecrochet on Instagram!**
Edith
Friday 28th of December 2018
Love your patterns. Please notify me of new posts. Edith