
Meet Bailey the Blue Whale! This little amigurumi whale is another one of my ocean themed crochet projects inspired by my vacation in Hawaii this winter! Bailey is the perfect cuddling size for small hands, measuring about 6 inches in length from head to tail, and 4 inches tall from bottom of body to top of spout!

For this amigurumi whale, the head/body, tail, fins, and spout are all worked up separately and then sewn together at the end. This project is a pretty quick one! The pieces come together pretty fast and it’s fun seeing the progress so fast!

If you are feeling ocean inspired like I am, check out my other crochet patterns inspired by the sea! You can crochet the whole collection of sea creatures!
If you are feeling ocean inspired like I am, check out my other crochet patterns inspired by the sea! You can crochet the whole collection of sea creatures!


Disclosure: This post may contain affiliate links, which means I may receive a small commission if you click a link and purchase something that I have recommended. This is done at no extra cost to you. Thank you for supporting Loops & Love Crochet!
Remember to like Loops and Love Crochet on Facebook and join the Loops and Love Crochet Group! I’d also LOVE it if you followed @loopsandlovecrochet on Instagram!
This pattern is available for FREE on this website. If you’d like an ad-free, printable PDF version, you may purchase it for a small fee from my Etsy or Ravelry shops. You can purchase this individual pattern or a bundle of all of the ocean themed crochet patterns. Thank you so much for supporting Loops & Love Crochet!
The Whale Amigurumi is featured in week 4 of the Stash Busting Challenge! From July 6 – 12, you can download the PDF version for free! Head to the blog post and roundup for more details and the coupon code. Then come back here and click the “download this free pattern” button further down in this post. You’ll be taken to the pattern on Ravelry where you can enter the coupon code at checkout for FREE!


Materials:
- Worsted weight yarn – I used Caron Simply Soft in Blue Mint.
- Safety eyes – I used 10 mm size
- If you’d rather not use safety eyes, Grace and Yarn has a great tutorial on making a crochet alternative for safety eyes!
- 3.5mm crochet hook – I love my Clover Amour hooks!
- Polyfil fiber stuffing
- Yarn needle – bent yarn needles work great for amigurumi projects!
Stitches Used:
- Ch – chain
- Sl St – slip stitch
- SC – single crochet
- DC- double crochet
- HDC – half double crochet
- SC INC – single crochet increase – two single crochet stitches worked into one stitch. SC INC Video Tutorial HERE.
- INV DEC – invisible single crochet decrease – insert hook into front loop of next stitch, then insert your hook into the front loop of the following stitch (3 loops on hook). Yarn over and draw through 2 loops (2 loops on hook), yarn over and pull through 2 remining loops on hook. INV DEC Video Tutorial HERE
- HDC DEC – half double crochet decrease – yarn over and insert hook into first stitch, pull up a loop, yarn over and insert hook into next stitch, pull up a loop, yarn over and draw through all 5 loops on hook.
Important Notes:
- Magic Circle – Make a circle with your yarn, insert crochet hook into circle and draw up a loop. Use this loop to start your first chain 1 of the pattern. If you are unsure of how to make a magic circle, check out my Magic Circle Video Tutorial.
- Continuous Rounds – This pattern is worked in continuous rounds without joining (except for the white belly which is worked up in rows). After you finish the stitches of one round, start right on the next round without joining between. You may want to use a stitch marker or a piece of yarn to keep track of where one round ends and the next starts.
HEAD/BODY

In blue yarn, stuffing as you go…
Round 1: Magic circle, chain 1 and make 6 SC stitches into ring (6)
Round 2: 2 SC in each stitch around (12)
Round 3: 2 SC in first stitch, SC in next, repeat around (18)
Round 4: 2 SC in first stitch, SC in next 2, repeat around (24)
Round 5: 2 SC in first stitch, SC in next 3, repeat around (30)
Round 6: 2 SC in first stitch, SC in next 4, repeat around (36)
Round 7: 2 SC in first stitch, SC in next 5, repeat around (42)
Rounds 8-16: SC in each stitch around. (42)
*Insert safety eyes between rounds 11 and 12. Place eyes about 21 stitches apart so they are on opposite sides of the head/body.
Round 17: INV DEC, SC in next 5 stitches, repeat around (36)
Rounds 18-19: SC in each stitch around (36)
Round 20: INV DEC, SC in next 4 stitches, repeat around (30)
Round 21: SC in each stitch around (30)
Round 22: INV DEC, SC in next 3 stitches, repeat around (24)
Round 23: INV DEC, SC in next 2 stitches, repeat around (18)
Round 24: SC in each stitch around (18)
Round 25: INV DEC, SC in next stitch, repeat around (12)
Rounds 26-27: SC in each stitch around (12)
Finish stuffing the body, making sure you have added enough before you sew on the tail.
TAIL


To make the tail, first you will make two of the tail pieces below and then follow the instructions to join them together, forming the tail.
In blue yarn, stuffing as you go…
Round 1: Magic circle, chain 1 and make 4 SC stitches into the ring (4)
Round 2: 2 SC in first stitch, SC in next, repeat around (6)
Round 3: 2 SC in first stitch, SC in next 2, repeat around (8)
Rounds 4-7: SC in each stitch around (8)
Fasten off on one of the tail pieces only (leaving a tail of yarn). When you are finished making the second tail piece, do not fasten off. Continue to instructions below to crochet the two pieces together.
Round 8: Attach the first tail piece to the second piece with a SC in the next stitch on the first piece (this is the stitch after you fastened off). SC in the remainder of the stitches around the first tail piece (8) (you can work over the yarn tail from the first piece to secure it) and then continue to make SC stitches around the second tail piece (8). You should now be back to where you joined the two pieces together and have completed 16 SC stitches in total this round. (It might help to put a stitch marker or a piece of yarn at the start of this round so you can see where the round starts/ends). (16)
Round 9: INV DEC, SC in next 2 stitches, repeat around (12)
Rounds 10-13: SC in each stitch around (12)
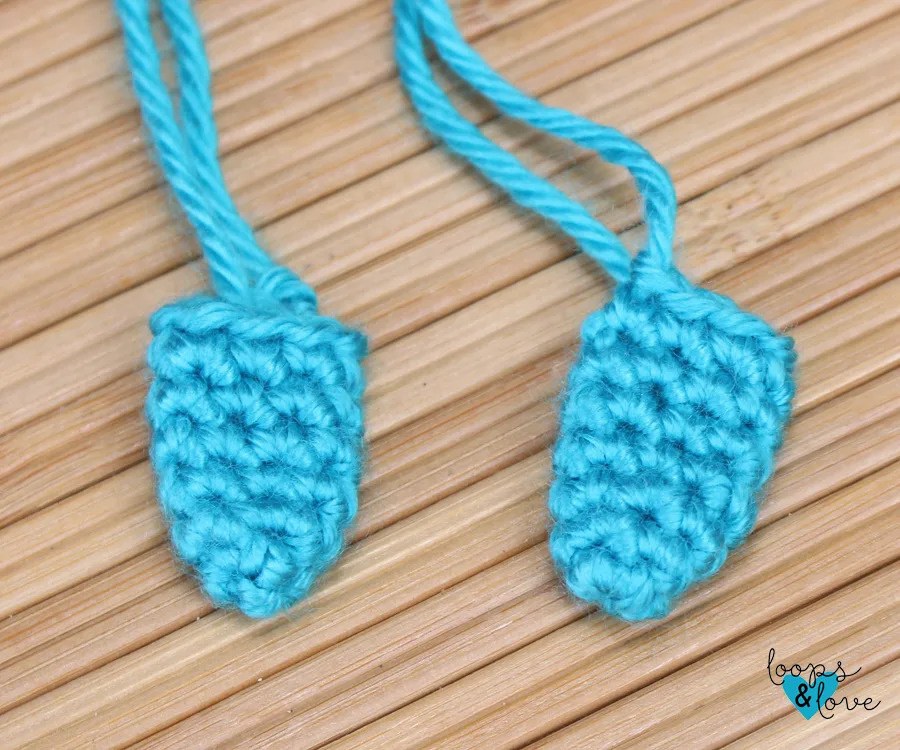
**NOTE: If you are unsure of how to join the two tail pieces together, see the photo below of the same technique being used on another pattern to help you. You will be joining the whale tail pieces together in this same way.

Stuff tail and sew onto the body using your yarn needle. Be sure to line up the tail so it is in the correct spot and then sew around each of the stitches. Weave in ends.

FINS (make 2)

In blue yarn,
Round 1: Magic circle, chain 1 and make 4 SC stitches into the ring (4)
Round 2: 2 SC in first stitch, SC in next, repeat around (6)
Round 3: 2 SC in first stitch, SC in next 2, repeat around (8)
Rounds 4-7: SC in each stitch around (8)
Fasten off, leave a tail to sew fins on to the whale.
Do not stuff fins (unless you really want to). Sew fins onto the sides of the whale’s body. I attached the fins on an angle approximately the height of the eye, 4-6 rounds behind the eye.
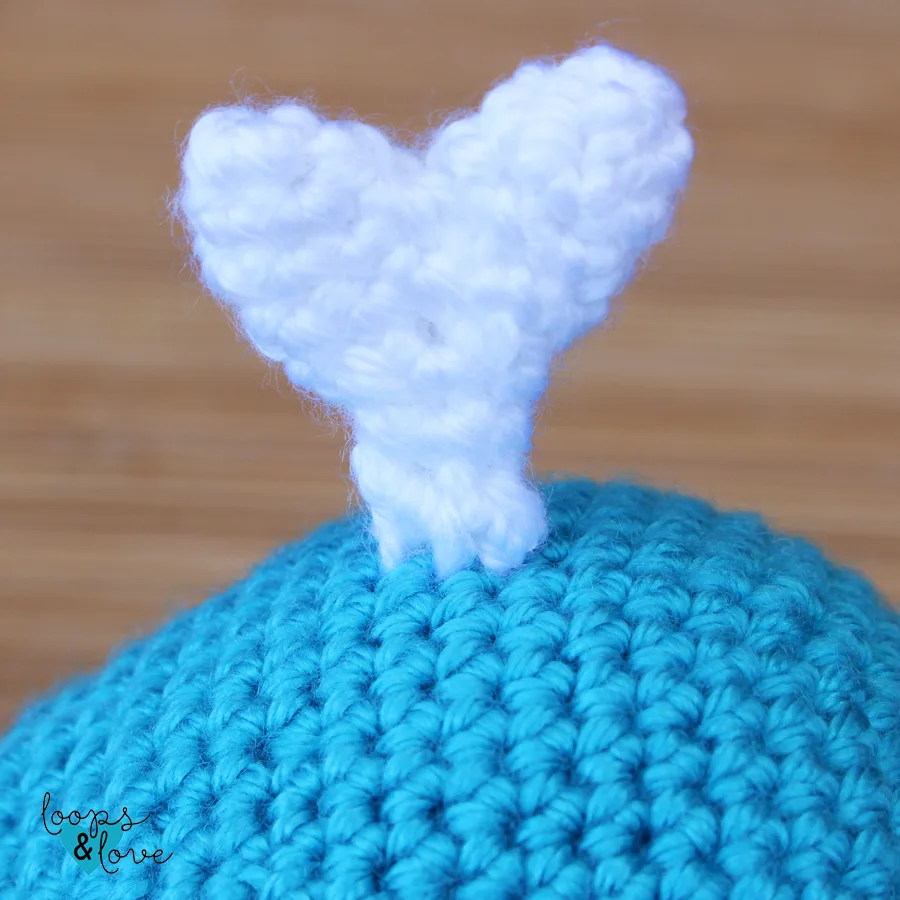
Water Spout


In the same way you made the tail, you will make two pieces for the spout and then join them together. You will not be stuffing the spout.
In white yarn,
Round 1: Magic circle, chain 1 and make 4 SC stitches into the ring (4)
Round 2: 2 SC in first stitch, SC in next, repeat around (6)
Round 3: SC in each stitch around (6)
Fasten off on one of the spout pieces only (leaving a tail of yarn). When you are finished making the second piece, do not fasten off. Continue to instructions below to crochet the two pieces together.
Round 4: Attach the first spout piece to the second piece with a SC in the next stitch on the first piece (this is the stitch after you fastened off). SC in the remainder of the stitches around the first piece (6) (you can work over the yarn tail from the first piece to secure it) and then continue to make SC stitches around the second piece (6). You should now be back to where you joined the two pieces together and have completed 12 SC stitches in total this round. (It might help to put a stitch marker or a piece of yarn at the start of this round so you can see where the round starts/ends).
Round 5: INV DEC, SC in next stitch, repeat around (8)
Round 6: INV DEC around (4)
Round 7: SC each (4)
Sew the spout on top of the whale head. The spout on my whale is lined up with the eyes, in the same round.

Belly

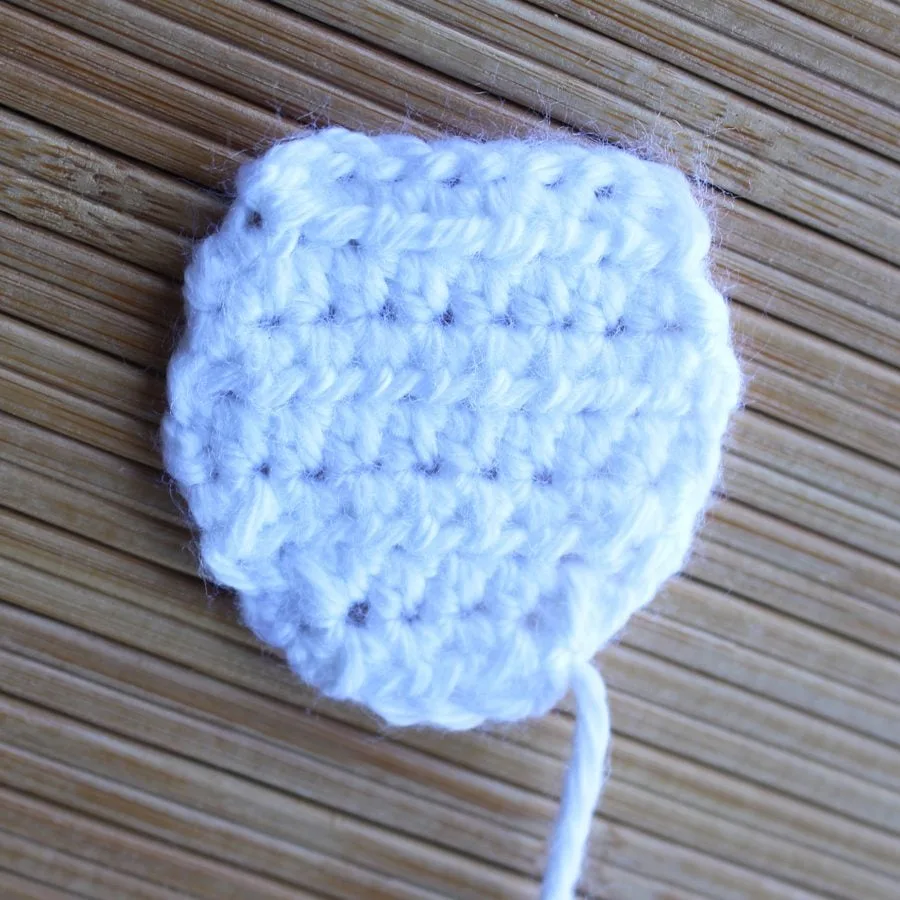
In white yarn,
Row 1: In white, chain 9, HDC in 3rd chain from hook and across, ch 2, turn (7)
Row 2: 2 HDC in first st, HDC in next 5 sts, 2 HDC in last, ch 2, turn (9)
Rows 3-4: HDC each, ch 2, turn (9)
Row 5: HDC DEC, HDC in next 5 sts, HDC DEC, ch 2, turn (7)
Row 6: HDC DEC, HDC in next 3 sts, HDC DEC, ch 2, turn (5)
Row 7: HDC DEC, HDC in next st, HDC DEC (3)
Fasten off, leave a tail to sew onto whale.
Use your yarn needle to attach the belly to the bottom of the whale. The wider end will go towards the head, the smaller end will be towards the tail end. I started attaching the belly at the head end around round 10 or 11. Sew around each stitch on the outside of the belly piece.

Sewing on the Mouth
To add a mouth – use some pink or red yarn and your yarn needle to sew a little line at the top of the white belly.


That’s it! You’re finished! I hope that you have enjoyed making this pattern and are in love with the adorable little whale amigurumi you’ve just made!


**You may make and sell any items made from my patterns, but please link back to my blog or Loops & Love Crochet as the designer. Please do not copy and post claiming it as your own. Please do not re-publish my photos as your own. Thank you!**
**Want to be kept in the loop? Be sure to like Loops and Love Crochet on Facebook and join the Loops and Love Crochet Group! Don’t forget to follow @loopsandlovecrochet on Instagram! Remember to tag Loops and Love Crochet when you post your finished projects on social media! We’d love to see them! **