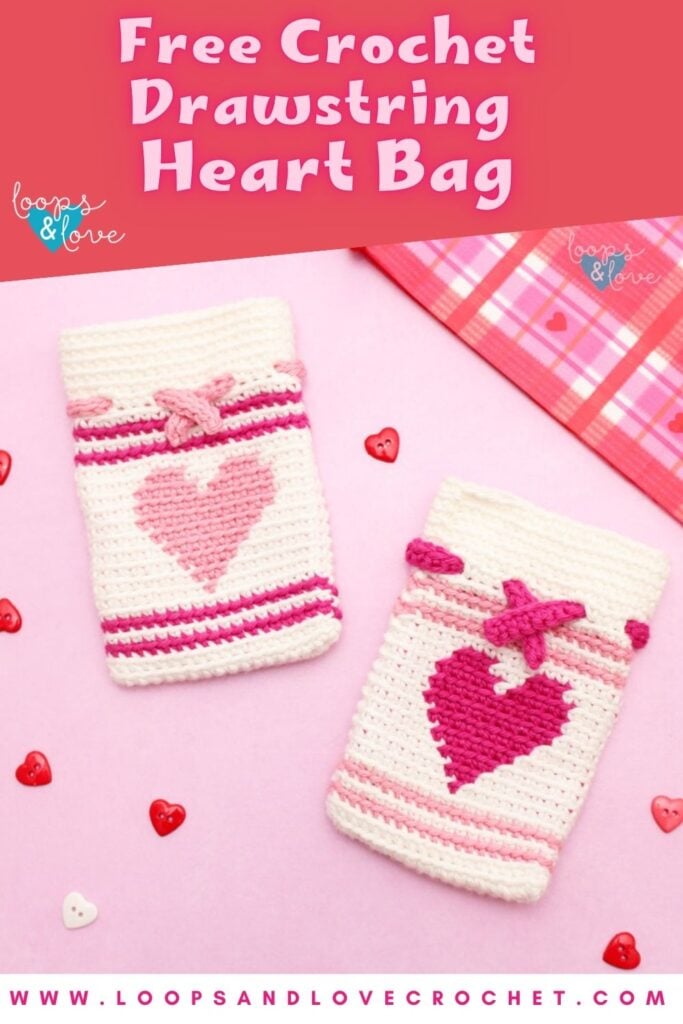
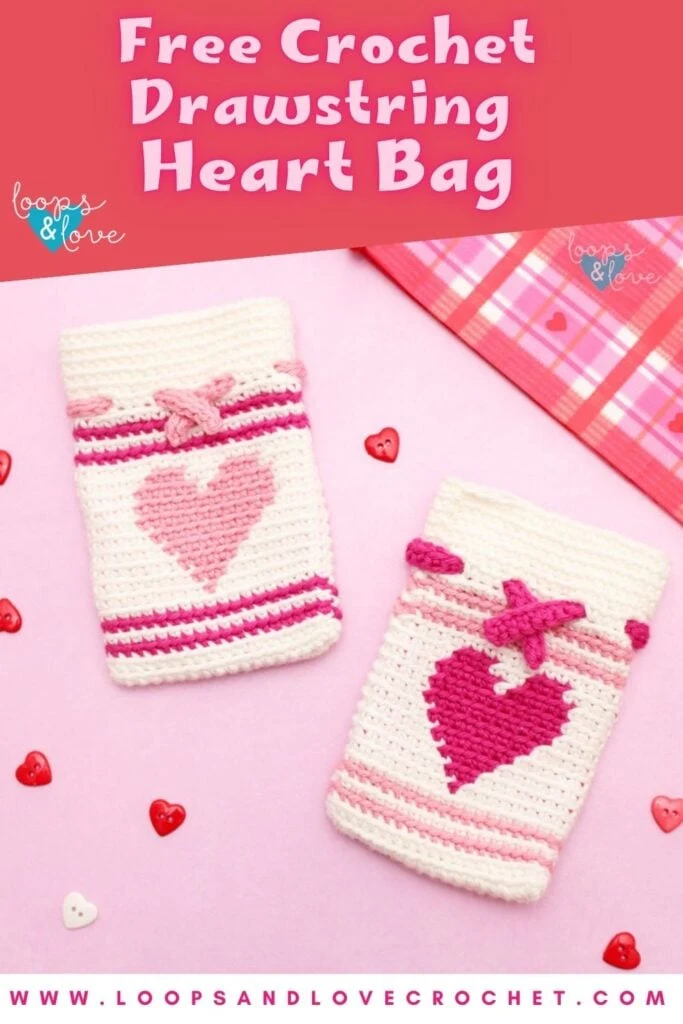
This crochet heart drawstring bag is a cheerful little crochet project that’s perfect for small gifts, treats, or special keepsakes. Whether you’re stitching it up as a sweet Valentine’s gift or a handmade pouch to enjoy all year long, this quick project is a great way to add a pop of love to your crochet.

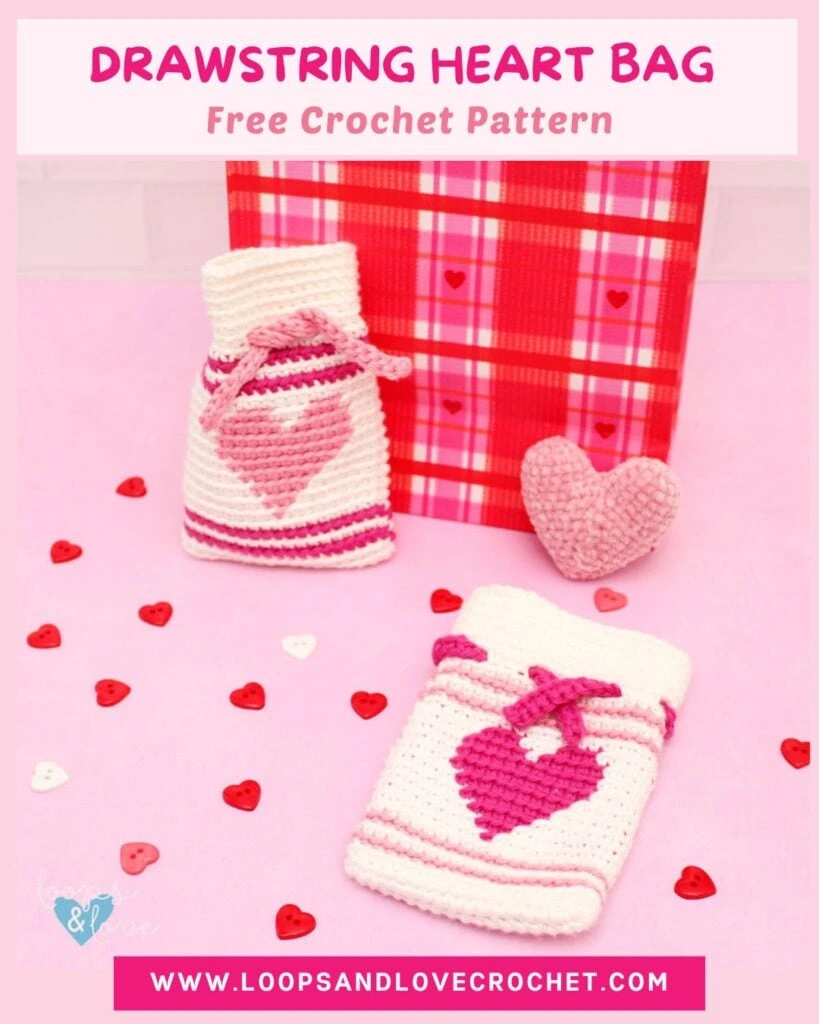
This crochet heart bag is a fun and cheerful little project that’s perfect for using up yarn scraps and adding a handmade touch to gifts, whether it’s for Valentine’s Day or any day of the year! Made using tapestry crochet, the heart design is worked right into the rounds of single crochet, giving the pouch a clean, polished look while not adding difficulty to the stitches.
If you haven’t tried tapestry crochet yet, this is a great project to try it out! With a simple graph, written instructions, and only a couple colors, this project is very beginner friendly!
At 4 inches wide and 6 inches tall, the heart bag is just the right size for small treats, gift cards, jewelry, or notes, making it a sweet choice for Valentine’s Day—but honestly, it’s cute enough to use all year round. Whether you’re making one as a quick gift or stitching up a few to stash away, this heart pouch is a fast, satisfying project you’ll want to come back to again and again.
PIN the Heart Bag crochet pattern to your favorite Pinterest board to save it for later!


Remember to like Loops and Love Crochet on Facebook and join the Loops and Love Crochet Group for sharing your finished projects! I’d also LOVE it if you followed @loopsandlovecrochet on Instagram! If you like crochet video tutorials, check out (and subscribe to) my Loops and Love Crochet YouTube Channel!
Disclosure: This post may contain affiliate links, which means I may receive a small commission if you click a link and purchase something that I have recommended. This is done at no extra cost to you. Thank you for supporting Loops & Love Crochet!
The Drawstring Heart Bag crochet pattern is available for FREE on this website. If you’d like an ad-free, printable PDF version, you may purchase it for a small fee from my Etsy or Ravelryshops. Thank you so much for supporting Loops & Love Crochet!
The Drawstring Heart Bag is only one of our drawstring bag patterns on the blog! If you are looking for similar projects, check out the Easter Bunny Bag, Candy Stripe Bag, Christmas Tree Bag, Santa Bag, or the Jack O’Lantern Bag!
Materials:
- Worsted Weight (#4) Yarn – Cotton or acrylic yarn will work for this project. The bag pictured here was made with WeCrochet/Knit Picks Shine Worsted yarn in the White, Blush, and Cosmopolitan colorways. Approx. 50-60 yds of yarn is needed. This breaks down to about 40 yds in white and 20 yds in an accent color. For the bags pictured, two accent colors were used so about 20 yards of each.
- 4 mm crochet hook
- Yarn needle to weave in ends
- Scissors for cutting yarn
Stitches Used:
- Ch – chain
- Sl St – slip stitch
- SC – single crochet
- BLO SC – single crochet in the back loops only
Finished Size:
- 4” in width by 6” in height. Measurements taken with bag laying flat.
Gauge:
- Gauge is not critical for this pattern to turn out, however, for reference, 2 inches square is approximately 9 rows of 10 SC stitches.
Important Notes:
- Joined Rounds– This bag is made in joined rounds. At the end of each round, you will be joining the last stitch of the round to the first one with a slip stitch. Then you will chain 1 and start the next round in the first stitch, which is the same stitch as the join. To keep the seam more hidden and from traveling much, be sure to pull the joining slip stitch and the chain 1 nice and tight. Chain 1 stitches do not count towards stitch count of each round.
- Back Loops Only – All of the single crochet stitches for the body of this bag are worked in the back loops only (BLO). However, slip stitch joins are worked through both loops.
- Color Changes – The bag body is worked in tapestry crochet. This means you will be changing from the main to accent color often and carrying the color you are not using along with you under/behind your stitches. To change colors, complete the last single crochet in the first color up until the last yarn over. Yarn over with the new color and pull through last step of the single crochet stitch. So, your SC will go like this: insert hook into last stitch in the first color, pull up a loop, yarn over with the new color, pull through all loops on hook. Now you will be working in the new color until you change colors again.
- Tapestry Crochet Tips – You will be carrying the inactive yarn color behind the active yarn you are using. Try to keep your tension a little on the tighter side to help keep the stitches tightly together and hide the yarn you are carrying from showing between the stitches. The pink yarn does show a little bit through the white when it is carried along, but I think it also adds a nice speckle to the stitches too and isn’t too noticeable.
- Video Tutorial – There’s a video tutorial for a similar crochet pattern on my YouTube Channel here. If you need any help with any parts of this pattern, this video shows the steps from start to finish.
Let’s Crochet a Drawstring Heart Bag!
Bag Base
Row/Round 1: In white, ch 18, 2 SC in 2nd ch from hook and in each st across, 4 SC in last ch. Continue around so you are working on the other side of the chain. SC in each st across, work 2 SC in the last st (this will be in the same stitch as your first 2 SC of the round). Join with a sl st to first SC, ch 1. (38)
Round 2: SC in each st around, change to accent color, join, ch 1. (38)
Bag Body
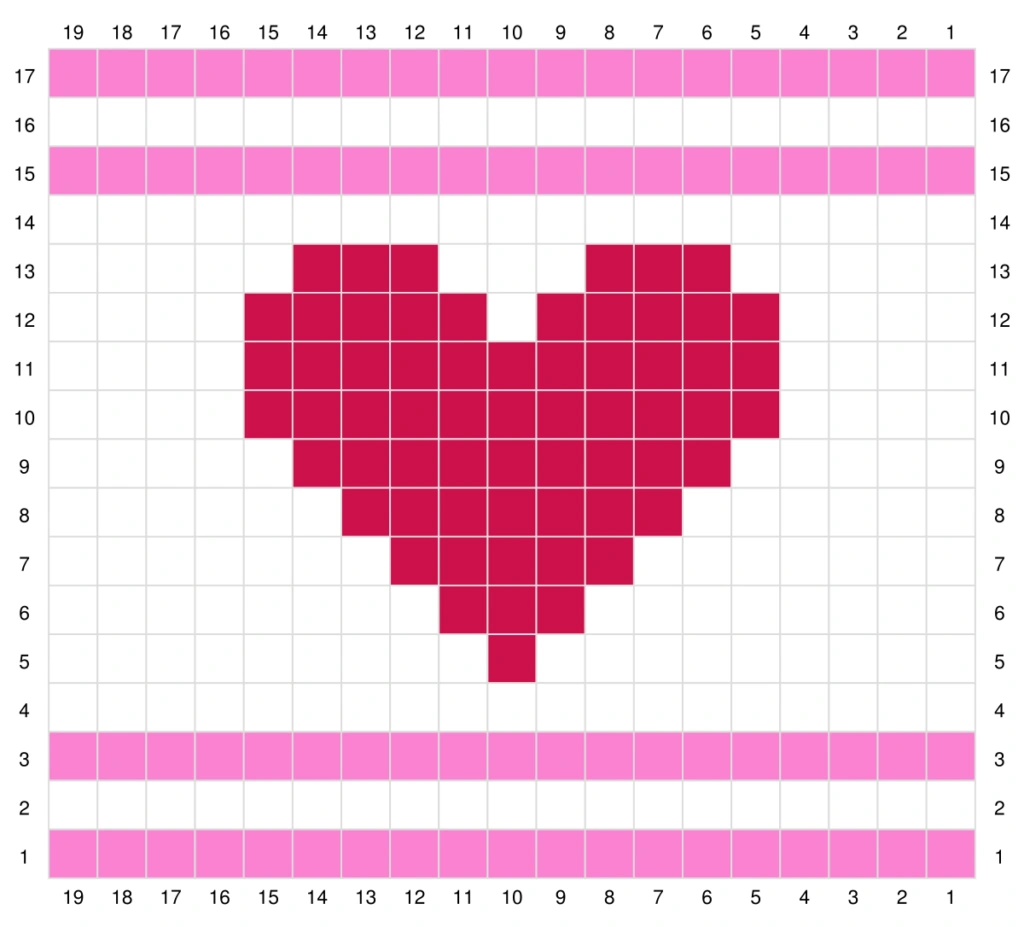
Now you will start the body (height) of the bag. For this section, you may choose to follow the written instructions or the graph.
Graph Notes:
- Each box counts as one single crochet stitch (in the back loops only).
- Graph is worked from bottom to top, either right to left or left to right.
- Repeat the graph twice to get the 38 stitches. You’ll have a heart on each side of the bag. After row 17, refer to the written instructions below for finishing the top section of the bag.
- For the pink/white sections in rows 1-3 and 15-17, you do not need to carry your yarn. When you complete the color change at the end of the round, just drop it and pick it up again when you need it again. When you finish the second pink stripe, work over the yarn tail a bit to secure it and then cut it, keeping the white yarn connected.
- To attach the red yarn, start working over it at the start of row 5 and then it’ll be secure for when you need it part way through the round. When creating the heart, carry the red/white yarn along under your stitches.

Written Instructions
- The written instructions below indicate how many stitches in each color you’ll make as you work around the bag.
- Round count starts back at 1 for the bag body so it matches the rows on the graph.
- Each stitch is a back loop only single crochet stitch. At the end of the round, join to the first SC of the round with a slip stitch through both loops. Chain 1, and then work the first SC of the round in the same stitch (back loop only).
w = white, p = pink, r = red,
Round 1: P38
Change to white yarn in the last stitch of the round. Drop the white yarn, leaving it connected.
Round 2: W38
Change back to pink yarn in the last stitch by picking up the pink yarn and dropping the white.
Round 3: P38
Change back to white yarn in the last stitch by picking up the white yarn and dropping the pink.
Round 4: W38
Work over the pink yarn for a few stitches until it’s secure and then cut it.
Attach the red yarn at the start of round 5 by working your white SC stitches over it. For rounds 5-13, alternate between white and red yarn, carrying the inactive color along under your stitches.
Round 5: *W9, R1, W9, repeat from * one more time
Round 6: * W8, R3, W8, repeat from * one more time
Round 7: * W7, R5, W7, repeat from * one more time
Round 8: * W6, R7, W6, repeat from * one more time
Round 9: * W5, R9, W5, repeat from * one more time
Round 10: * W4, R11, W4, repeat from * one more time
Round 11: * W4, R11, W4, repeat from * one more time
Round 12: * W4, R5, W1, R5, W4, repeat from * one more time
Round 13: * W5, R3, W3, R3, W5, repeat from * one more time
Carry the red yarn with you under the white stitches in round 14. Then cut the red yarn and leave the white connected.
Round 14: W38
Change to pink yarn in the last stitch of the round. Drop the white yarn, leaving it connected.
Round 15: P38
Change back to white yarn in the last stitch by picking up the white yarn and dropping the pink.
Round 16: W38
Change to pink yarn in the last stitch of the round. Drop the white yarn, leaving it connected.
Round 17: P38
Change to white yarn in the last stitch by picking up the white yarn and dropping the pink. To secure the pink yarn, work over it in the next round until it’s secure and then cut it.
Do not fasten off. This is the end of the tapestry crochet section for the body of the bag. Next, continue to the top of the bag. At this point, only your white yarn should be attached to your bag. Chain 1 and continue to top of bag instructions.

Top of Bag
Round 18: 2 SC first st, SC in next 18 sts, 2 SC in next st, SC in last 18 sts, join, ch 1 (40)
The stitches of the next round will create the holes the drawstring will pass through.
Round 19: SC first 2 sts, ch 2, skip next 2 sts, *SC next 3 sts, ch 2, skip next 2 sts, repeat from * around, SC in last st, join, ch 1 (40 sts including SC and chain sts between)
Round 20: SC in each stitch around, work 2 SC stitches into each ch 2 space, join, ch 1 (40)
Rounds 21 – 24: SC in each stitch around, join, ch 1 (40)
Do not ch 1 after round 24. Fasten off and weave in end.
Continue to drawstring instructions below.
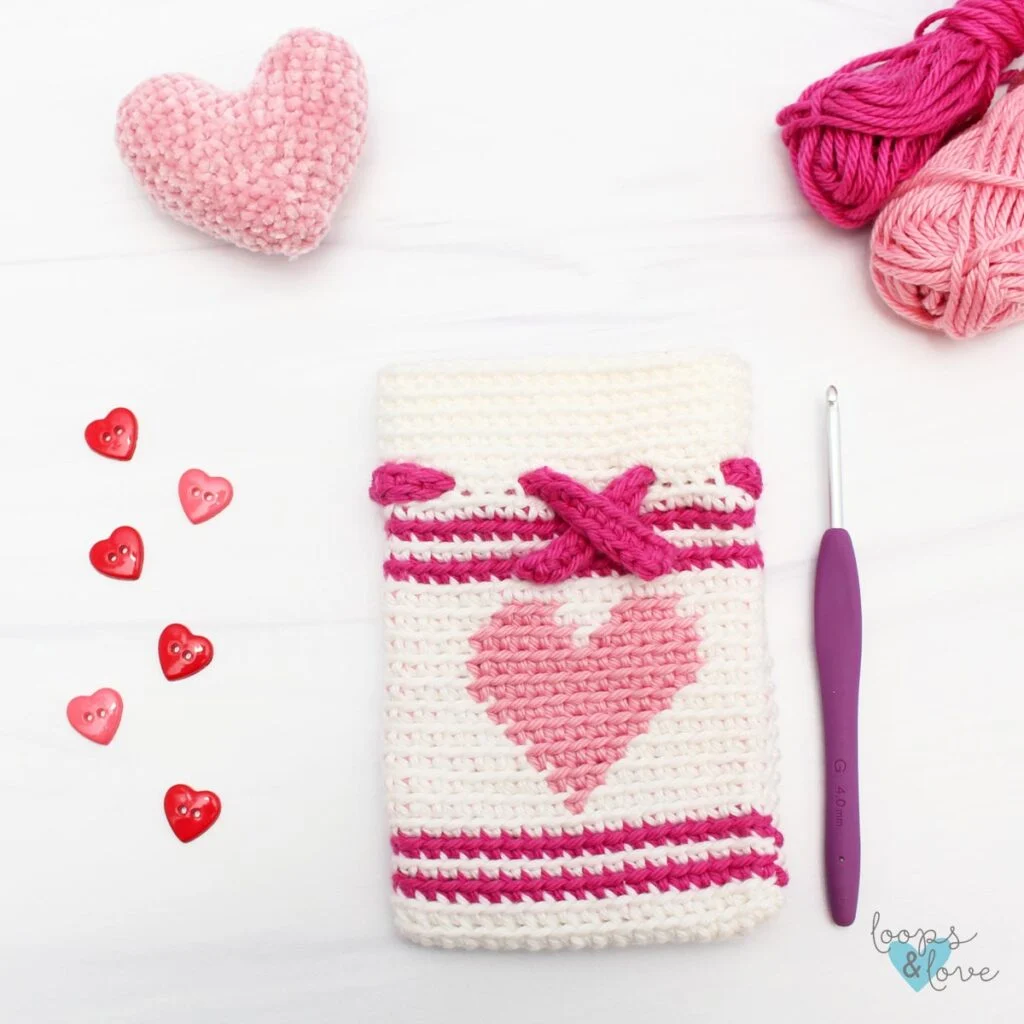
Drawstring Instructions
In color of your choice (red shown in this pattern), make a chain long enough to go around the bag with a little extra for short ends to tie into a knot. For the bag pictured, a starting chain of 46 was used. Starting in the 2nd chain from your hook, work slip stitches into the 3rd loop (back bump) of each stitch across. Fasten off, weave in ends.
Weave the drawstring in and out of the holes around the bag starting in one of the center holes. The ends may seem short to tie, but when you draw the bag closed, they’ll be long enough.
Closing your crochet heart drawstring bag
To close the top of the bag, pull the ends of the drawstring to cinch up the top of the bag. Then tie a knot at the top to secure it so the items inside don’t fall out.

That’s it! You’re all done your crochet heart drawstring bag! I hope you enjoyed working it up! Now have fun putting some gifts or treats inside!
**Want to be kept in the loop? Be sure to like Loops and Love Crochet on Facebook and join the Loops and Love Crochet Group! Don’t forget to follow @loopsandlovecrochet on Instagram! Remember to tag Loops and Love Crochet when you post your fnished projects on social media! I’d love to see them! **
*You may make and sell any items made from my patterns, but please link back to my blog or Loops & Love Crochet as the designer. Please do not copy this pattern or photos and share as your own, in part or in whole. Instead, link back to the Loops and Love Crochet blog (especially when selling items you make from my patterns). Thank you!