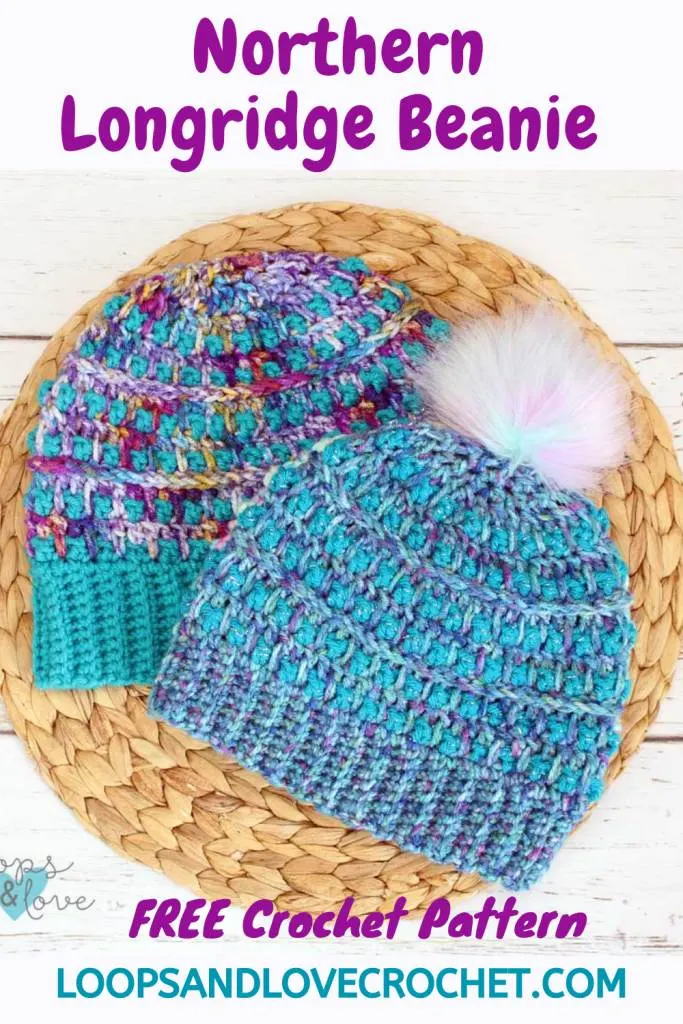
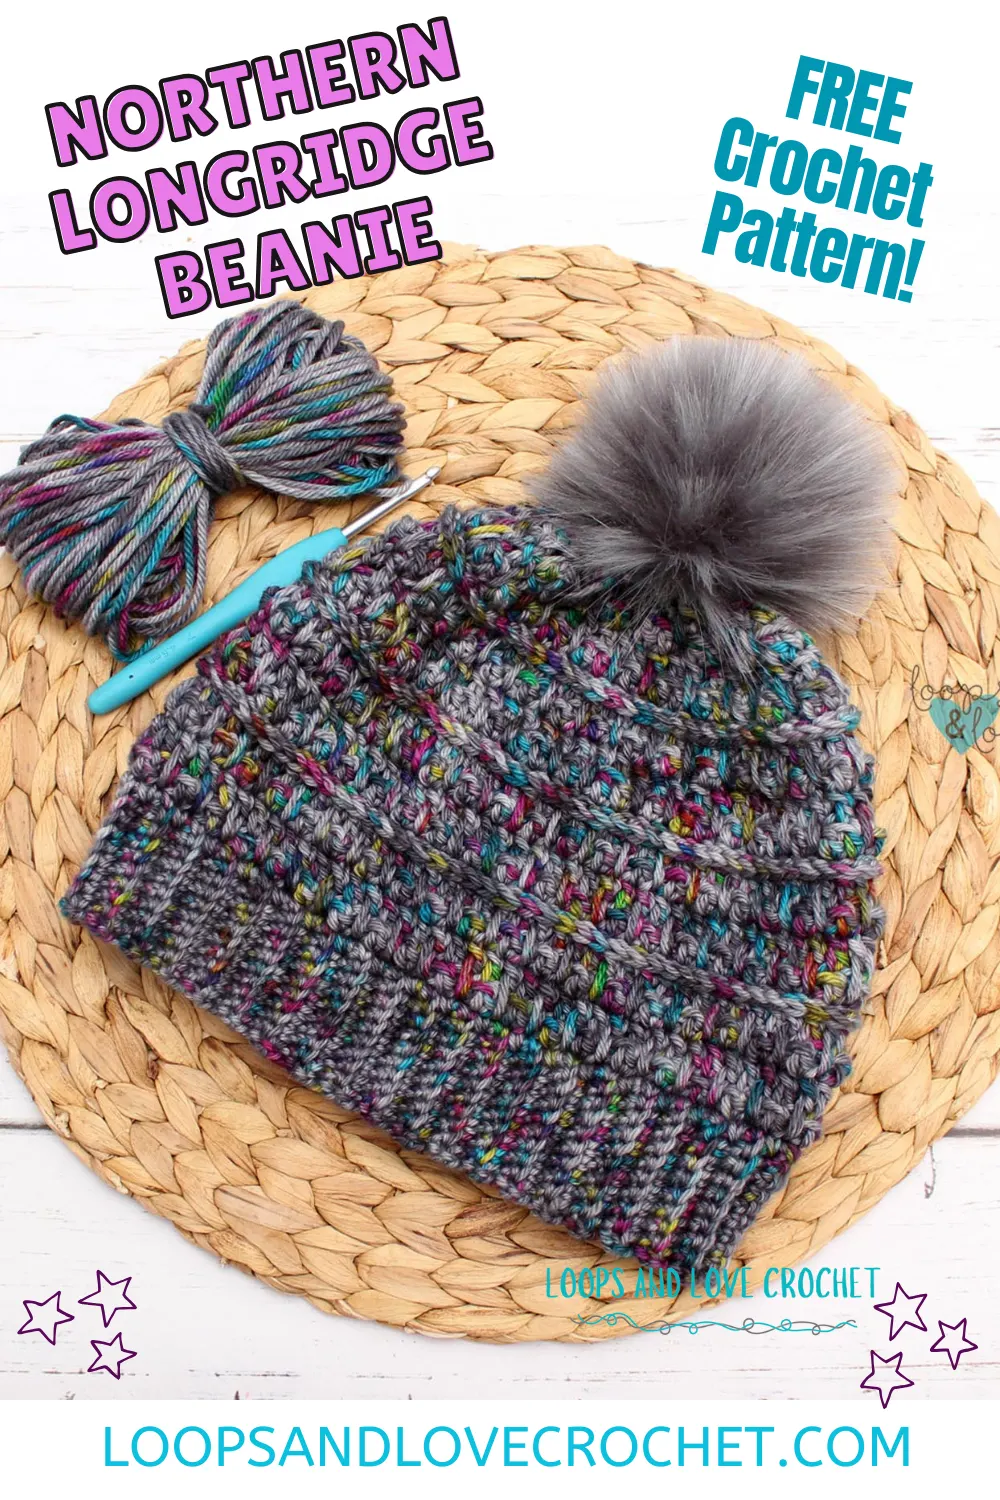
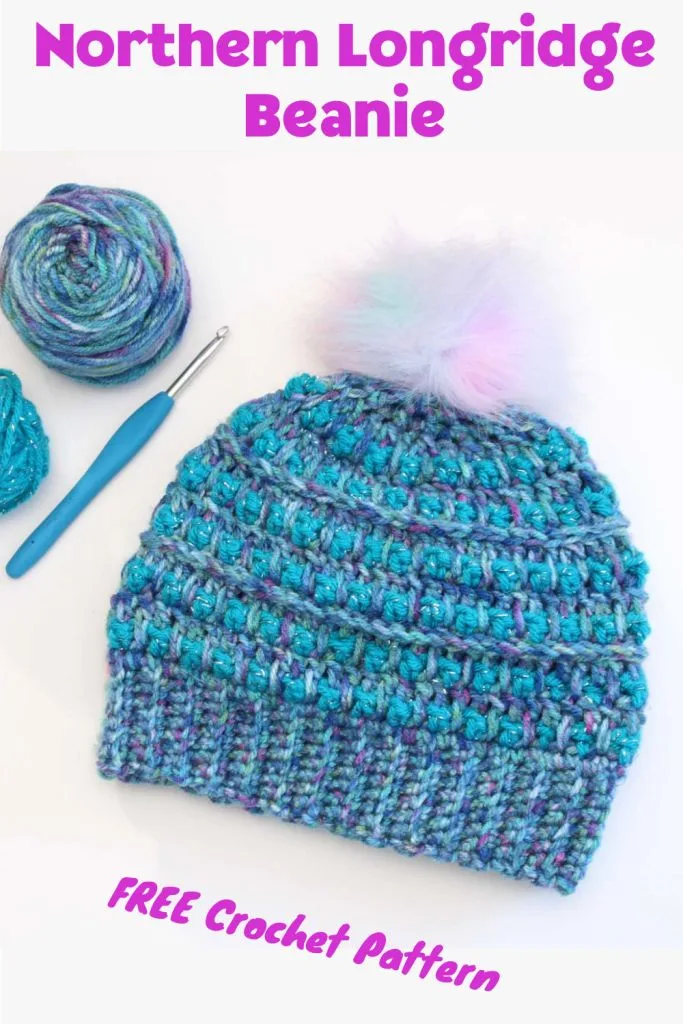
The Northern Longridge Beanie has such gorgeous, cozy texture and is a fun one to work up! Have fun crocheting them in all different color combinations.
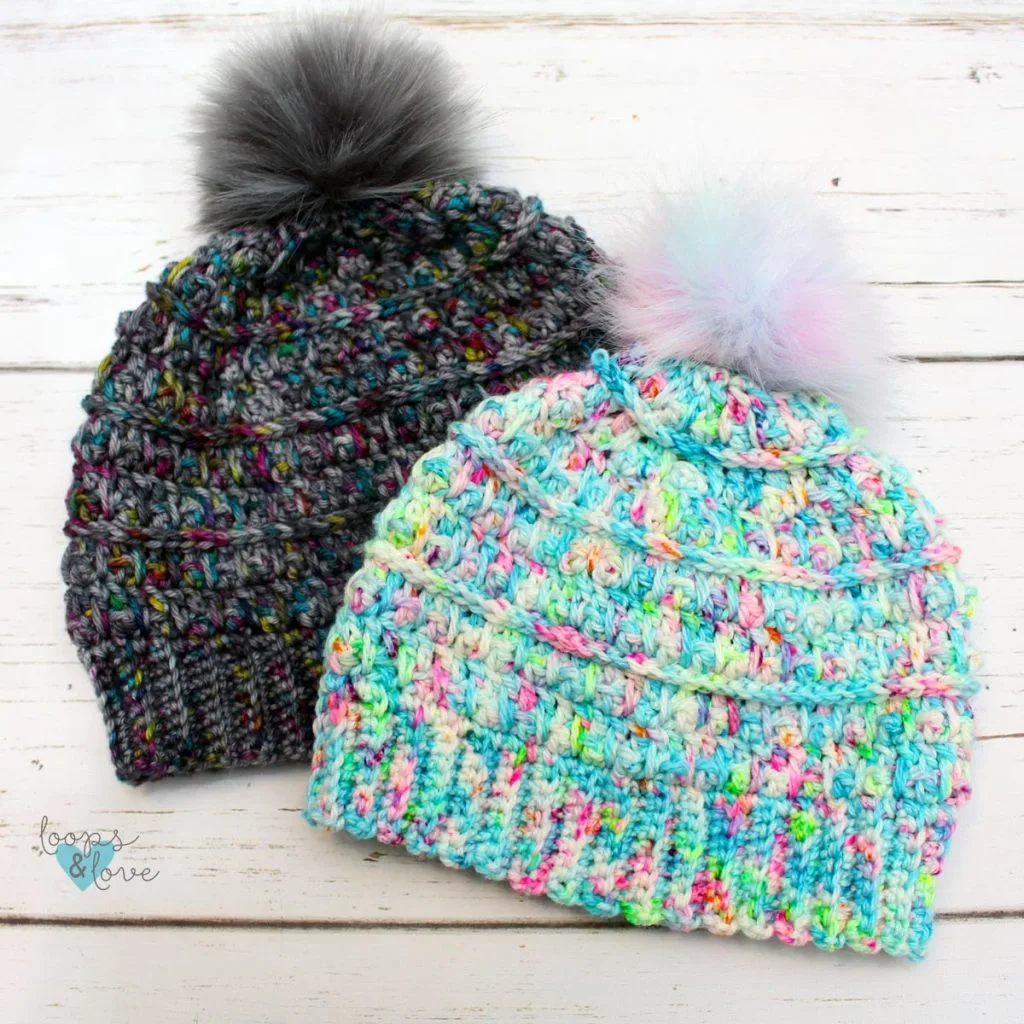
Speaking of color combinations…What colors will you choose for your beanie?! The Northern Longridge Beanie looks great whether you work it up in single solid color, variegated yarn, or give it a striping effect with two different colors (solids or a solid and variegated combo)!
This Northern Longridge Beanie crochet pattern is written in two sizes: child and adult. Following the pattern, at the end of this post, you’ll find a photo tutorial showing some of the stitches and steps for working up this beanie. This pattern also has a full video tutorial on my YouTube Channel! Be sure to check it out for a great visual on some of the stitches or steps for this beanie.

Remember to like Loops and Love Crochet on Facebook and join the Loops and Love Crochet Group for sharing your finished projects! I’d also LOVE it if you followed @loopsandlovecrochet on Instagram! If you like crochet video tutorials, check out (and subscribe to) my Loops and Love Crochet YouTube Channel!
Northern Longridge Beanie in Hand-Dyed or Lighter Weight Yarn?
Do you have hand-dyed or light weight yarn in your stash? For the beanies pictured in this pattern, I used I Love This Yarn, which is a medium #4 worsted-weight acrylic yarn and a 5mm crochet hook. However, I also had some gorgeous hand dyed yarn in my stash that I was dying to use too so I worked up some beanies in that too! Because hand-dyed worsted-weight/Aran yarn is usually a little lighter or thinner, the pattern needed to be adjusted a little bit to get the beanie fit just right.
In this blog post, you’ll find two versions of the Northern Longridge Beanie crochet pattern. The first one is written for your average, medium, #4 worsted-weight yarn. Then, if you scroll further down the page past the photo tutorial, you’ll find a second version of this pattern written for yarn that is a little on the lighter/thinner end of the worsted weight scale, such as a hand-dyed Aran yarn, #3 weight yarn, or any #4 weight yarn that feels a little on the lighter side.
If you are using a #4, medium, worsted-weight yarn, keep on following the pattern from here. If you have a lighter weight yarn that you’d like to use for this pattern, scroll past the first version of the pattern to the adapted pattern just past the photo tutorial. Whichever pattern you follow, please be sure to check the gauge in your chosen version of the pattern as you are working it up and make sure your measurements match closely so your beanie turns out the right size.


More crochet beanie patterns?!
If you’re looking for more crochet beanie patterns, we have a few on the blog to choose from! Check out the Jelly Beanie, Criss Cross Beanie, or the Peek-a-Boo beanie!
The Northern Longridge Beanie crochet pattern is available for FREE on this website. If you’d like an ad-free, printable PDF version, you may purchase it for a small fee from my Etsy or Ravelry shops. Thank you so much for supporting Loops & Love Crochet!
Let’s get to the pattern!
Disclosure: This post may contain affiliate links, which means I may receive a small commission if you click a link and purchase something that I have recommended. This is done at no extra cost to you. Thank you for supporting Loops & Love Crochet!
Materials:
- Worsted Weight yarn – Any #4, medium, worsted-weight/Aran yarn can be used for the Northern Longridge Beanie pattern. You will need approx. 120-160 yards. The beanie pictured was worked up in I Love This Yarn in the Sea Muse (print/variegated) and Peacock (metallic) colorways. If you’re using a worsted-weight yarn that is a lighter weight (such as #3 or hand-dyed worsted that is a little on the lighter side) you may
- 5 mm crochet hook (or size needed to for the pattern gauge below)
- Yarn needle (for weaving in ends)
- Scissors (for cutting yarn)
- Pom Pom (optional) – this beanie looks great with or without a pompom!
Stitches Used
- Ch – chain
- Sl St – slip stitch
- SC – single crochet
- DC – double crochet
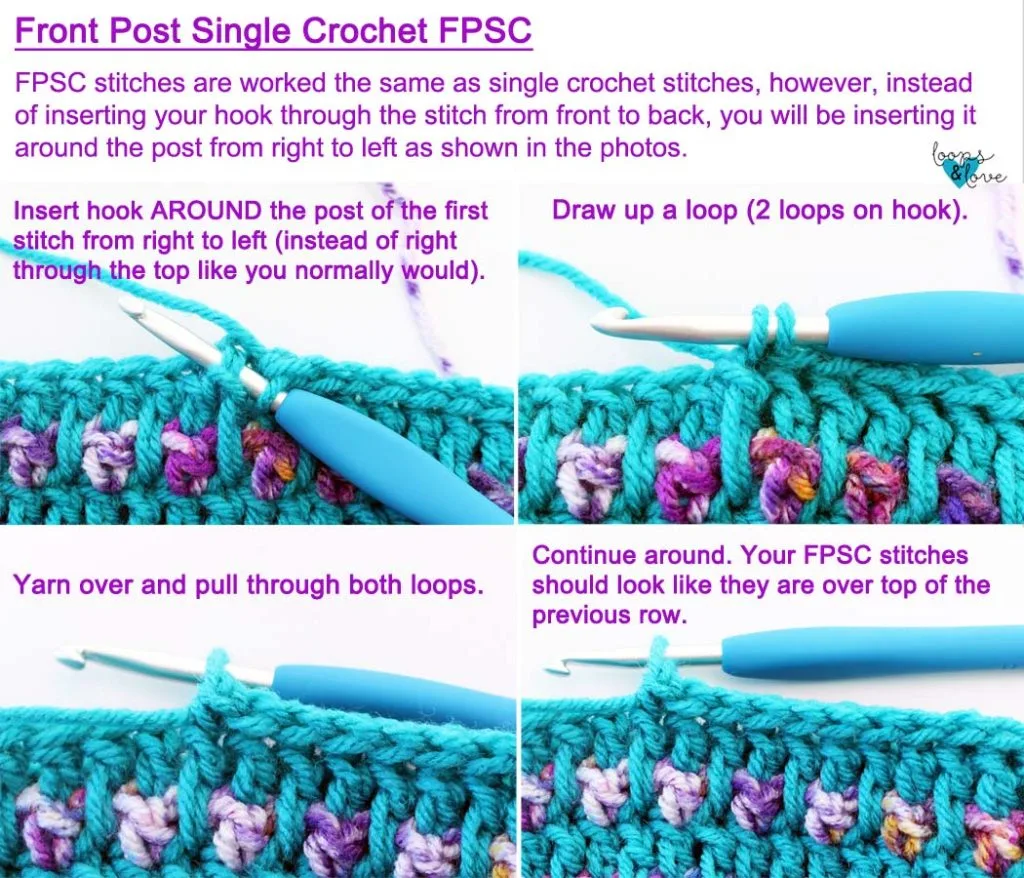
- FPSC – font post single crochet
- SC DEC (or Sc2tog) – single crochet decrease
- DC DEC (or Dc2tog) – double crochet decrease
- Long DC – DC stitch worked down into the previous round
Gauge
- 2” square = 8 rows of 10 BLO SC sts
- 10 rows of ribbing = approx. 2.5” in length(before being stretched)
- When you finish the ribbing for the size of beanie you are making, make sure it is the approx. the same length as what it states in the pattern for that size. This is so your beanie will fit the desired size when complete.
Important Notes
- Always start the first stitch of the round in the same space as the chain 1 or chain 2.
- Chain stitches at the start of each round do not count towards stitch count. However, ch stitches within the round are counted (such as the ch 1 sts worked between DC sts).
- The body of the hat is worked in joined rounds. When you finish the stitches of one round, you will be joining to the first stitch of the round with a slip stitch, chaining 1 (or 2) and then starting the next round of the pattern, starting in same stitch as chain.
- The ribbing length is smaller than head circumference because it has made to stretch. When starting to work the beanie height, make sure that first round of SC stitches is worked with a loose enough tension. If you work this round too tightly, your ribbing will not be able to stretch as it is designed to.
- If you crochet quite loosely or more tightly, you may need to go up or down a hook size to get the desired hat size. Check the gauge of the pattern. If you are unsure about size, you can start with crocheting some of the ribbing and then measure it to check that your gauge matches closely.
- Video Tutorial – Check out this video on my YouTube Channel for a tutorial on how to work up all the stitches in the Northern Longridge Beanie
Child-Sized Beanie
Approx. 4-10 years
Head circumference: 19-21”
Hat height: approx. 7.5”
Ribbed Band:
Row 1: Ch 9, SC in 2nd ch from hook and in each chain across, ch 1, turn. (8)
Row 2: SC in back loops only across, ch 1, turn. (8)
After 10 rows of ribbing, measure the length and compare to pattern gauge so your hat turns out the correct size. Do not stretch the ribbing until you have the final measurement when it is completed.
Rows 3-60: Repeat row 2. (8)
Do not fasten off after completing row 60. At this point, the ribbing should measure about 14.5-15 inches long when laid flat without stretching it. (If you have already stretched it to fit around a head, it will be a longer than the measurement here).
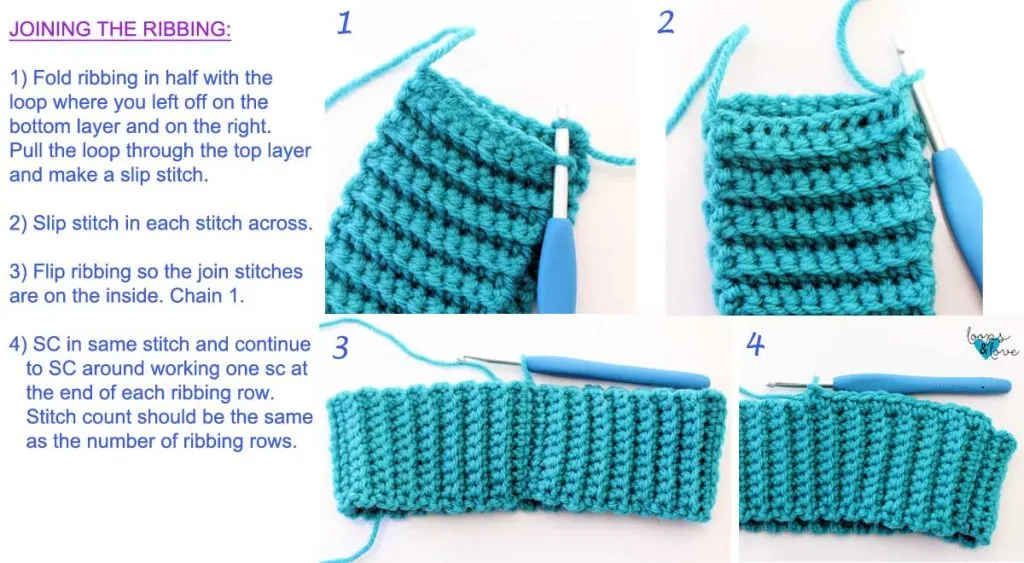
Fold ribbing in half and join at the corner with a slip stitch. Then slip stitch in each stitch across to fully connect the ribbing. When you get to the end, flip the ribbing so the stitches are on the inside and your loop is at the top. Chain 1 and start the instructions below for the hat body. Your first SC stitch will be in the same stitch as the chain 1.
Hat body:
Round 1: SC in first st (same stitch as chain 1) and in each st around. Join with a sl st to first stitch, chain 2. (60) Make sure this round of SC stitches is not worked too tightly so that the ribbing can stretch as much as needed.
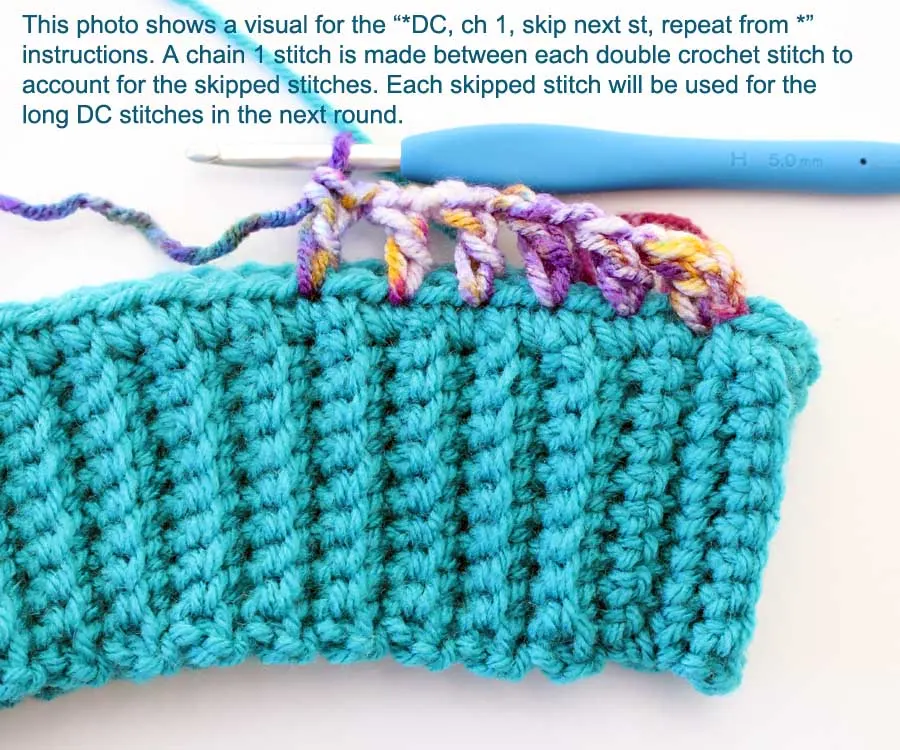
Round 2: DC in first st, ch 1, skip next st, *DC in next st, ch 1, skip next st, repeat from * around, join, ch 2. (60)
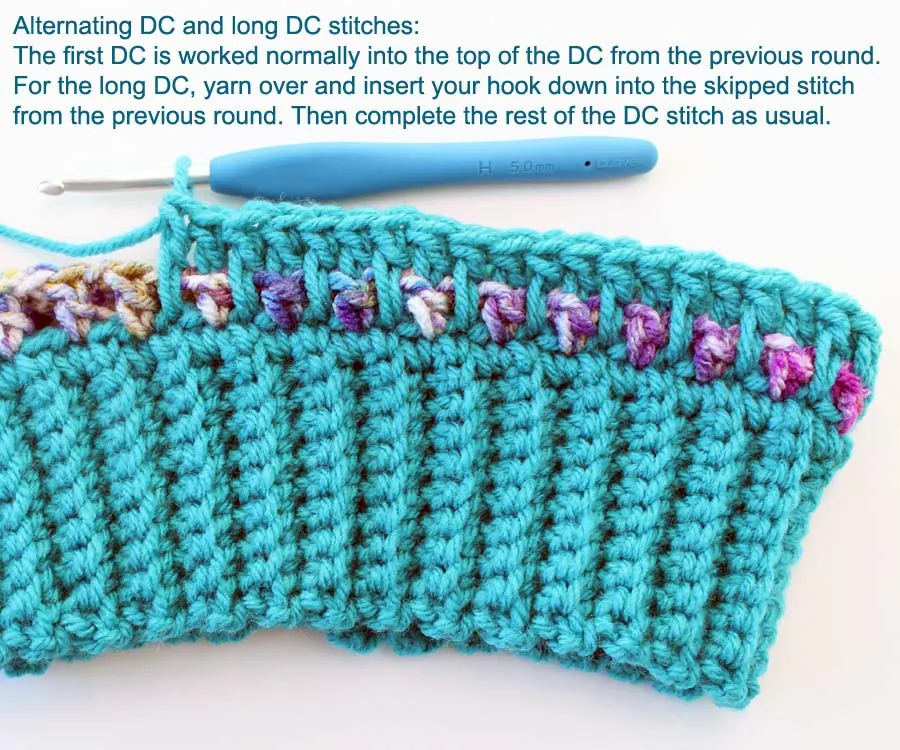
Round 3: DC in first st, long DC into skipped st from previous round, *DC in next st, long DC into skipped st from previous round, repeat from * around, join, ch 2. (60)
Round 4: DC in first st, ch 1, skip next st, *DC in next st, ch 1, skip next st, repeat from * around, join, ch 2. (60)
Round 5: DC in first st, long DC into skipped st from previous round, *DC in next st, long DC into skipped st from previous round, repeat from * around, join, ch 1. (60)
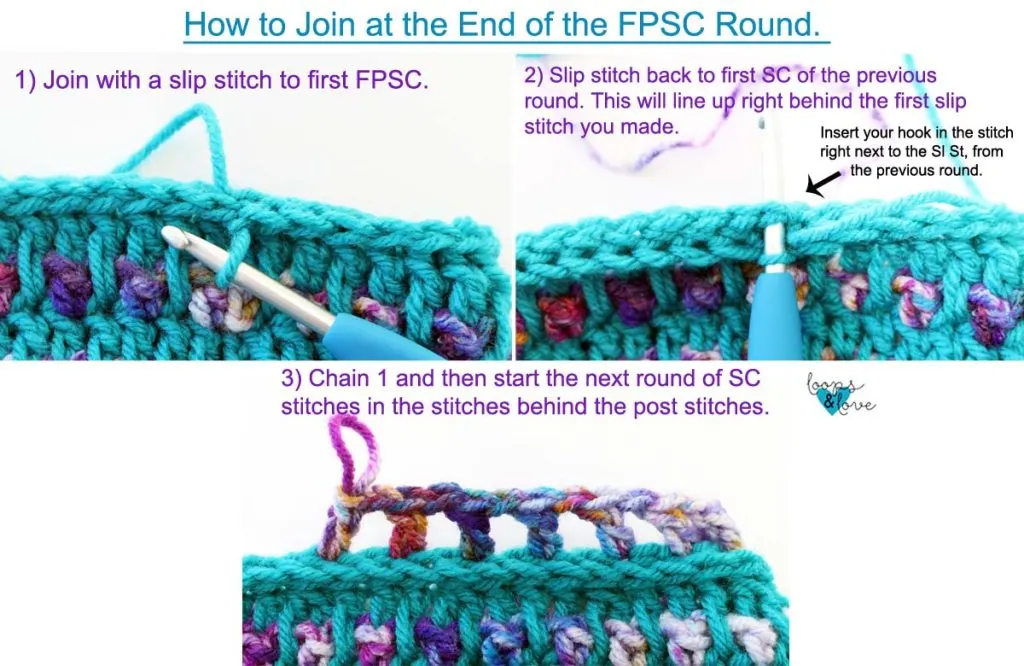
Round 6: FPSC in each stitch around. Join with a sl st to first FPSC. Then sl st to the first SC of the previous round (behind the FPSC round). This is so your next round is not worked in the post stitches, ch 2. (60) For all FPSC rounds, make sure you go around each of the stitches from the previous round (even the last one that can be a little hard to get into sometimes). See video tutorial for help with the FPSC stitches.
Round 7: DC in first st, ch 1, skip next st, *DC in next st, ch 1, skip next st, repeat from * around, join, ch 2. (60) *Make sure this round is not worked in the post stitches.
Round 8: DC in first st, long DC into skipped st from previous round, *DC in next st, long DC into skipped st from previous round, repeat from * around, join, ch 2. (60)
Round 9: DC in first st, ch 1, skip next st, *DC in next st, ch 1, skip next st, repeat from * around, join, ch 2. (60)
Round 10: *DC DEC, alternate DC and long DC sts for next 3 sts, repeat from * around, join, ch 1. (48) Note that DC DEC sts will be combining a DC and long DC st, either starting with the DC or the long DC. After each decrease, alternating DC and long DC sts may start with a DC or a long DC depending on the last decrease worked. See photo tutorial at end of pattern or watch the video tutorial for a visual of the decreases are worked.
Round 11: FPSC in each stitch around. Join with a sl st to first FPSC. Then sl st back to the first SC of the previous round (behind the FPSC round). This is so your next round is not worked in the post stitches, ch 2. (48)
Round 12: DC in first st, ch 1, skip next st, *DC in next st, ch 1, skip next st, repeat from * around, join, ch 2. (48)
Round 13: *DC DEC, DC, long DC, repeat from * around, join, ch 1. (36)
Round 14: DC in first st, ch 1, skip next st, *DC in next st, ch 1, skip next st, repeat from * around, join, ch 2. (36)
Round 15: *DC DEC, DC, DC DEC, long DC, repeat from * around, join, ch 1. (24)
Round 16: *SC DEC, SC next st, repeat from * around, join, ch 1 (16)
Round 17: SC DEC around, join. (8)
Fasten off. Leave a long tail to sew the top closed, cut yarn.
Closing the top of the hat: Use your yarn needle to pass yarn under the front loops of each SC stitch around. When you are through all the front loops, pull tight to close the hole. Sew around the stitches in the circle one or two more times and then weave in ends before cutting yarn.
You’re all done your child-sized Northern Longridge Beanie! I hope you had fun making it!
Adult-Sized Beanie
Head circumference: 22-24”
Hat height: approx. 8.5”
Ribbed Band:
Row 1: In main color, ch 11. SC in 2nd ch from hook and in each ch across, ch 1, turn. (10)
Row 2: SC in back loops only across, ch 1, turn. (10)
After 10 rows of ribbing, measure the length and compare to pattern gauge so your hat turns out the correct size.
Rows 3-66: Repeat row 2.
Do not fasten off after completing row 66. At this point, the ribbing should measure about 16-16.5 inches long, without stretching it. (If you have already stretched it to fit around a head, it will be few inches longer than the measurement here).
Fold ribbing in half and join at the corner with a slip stitch. Then slip stitch in each stitch across to fully connect the ribbing. When you get to the end, flip the ribbing so the stitches are on the inside and your loop is at the top. Chain 1 and start the instructions below for the hat body. Your first SC stitch will be in the same stitch as the chain 1.
Hat body:
Round 1: SC in first st (same stitch as chain 1) and in each st around. Join with a sl st to first stitch, chain 2. (66) Make sure this round of SC stitches is not worked too tightly so that the ribbing can stretch as much as needed.
Round 2: DC in first st, ch 1, skip next st, *DC in next st, ch 1, skip next st, repeat from * around, join, ch 2. (66)
Round 3: DC in first st, long DC into skipped st from previous round, *DC in next st, long DC into skipped st from previous round, repeat from * around, join, ch 2. (66)
Round 4: DC in first st, ch 1, skip next st, *DC in next st, ch 1, skip next st, repeat from * around, join, ch 2. (66)
Round 5: DC in first st, long DC into skipped st from previous round, *DC in next st, long DC into skipped st from previous round, repeat from * around, join, ch 1. (66)
Round 6: FPSC in each stitch around. Join with a sl st to first FPSC. Then sl st to the first SC of the previous round (behind the FPSC round). This is so your next round is not worked in the post stitches, ch 2. (66)
For all FPSC rounds, make sure you go around each of the stitches from the previous round (even the last one that can be a little hard to get into sometimes). See video tutorial for help with the FPSC stitches.
Round 7: DC in first st, ch 1, skip next st, *DC in next st, ch 1, skip next st, repeat from * around, join, ch 2. (66) *Make sure this round is not worked in the post stitches.
Round 8: DC in first st, long DC into skipped st from previous round, *DC in next st, long DC into skipped st from previous round, repeat from * around, join, ch 2. (66)
Round 9: DC in first st, ch 1, skip next st, *DC in next st, ch 1, skip next st, repeat from * around, join, ch 2. (66)
Round 10: *DC DEC, alternate DC and long DC sts for next 3 sts, DC DEC, alternate DC and long DC sts for next 4 sts, repeat from * around, join, ch 1. (54)
DC DEC sts will be combining a DC and long DC st, either starting with the DC or the long DC. After each decrease, alternating DC and long DC sts may start with a DC or a long DC depending on the last decrease worked. See photo tutorial at end of pattern or watch the video tutorial for a visual of the decreases are worked.
Round 11: FPSC in each stitch around. Join with a sl st to first FPSC. Then sl st back to the first SC of the previous round (behind the FPSC round). This is so your next round is not worked in the post stitches, ch 2. (54)
Round 12: DC in first st, ch 1, skip next st, *DC in next st, ch 1, skip next st, repeat from * around, join, ch 2. (54)
Round 13: *DC DEC, alternate DC and long DC sts for next 3 sts, DC DEC, alternate DC and long DC sts for next 2 sts, repeat from * around, join, ch 1. (42)
Round 14: DC in first st, ch 1, skip next st, *DC in next st, ch 1, skip next st, repeat from * around, join, ch 2. (42)
Round 15: *DC DEC, DC, DC DEC, long DC, repeat from * around, join, ch 2. (28)
Round 16: *DC DEC in each st around, join ch 1. (14)
Round 17: SC DEC around, join. (7)
Fasten off. Leave a long tail to sew the top closed, cut yarn.
Closing the top of the hat: Use your yarn needle to pass yarn under the front loops of each SC stitch around. When you are through all the front loops, pull tight to close the hole. Sew around the stitches in the circle one or two more times and then weave in ends before cutting yarn.
That’s it! You’re all done your Northern Longridge Beanie! I hope you enjoyed working it up!
**Continue to the next page for the photo tutorial showing various steps of this pattern.
Photo Tutorial
In this section, you will find some step by step “how to” photos to help you with working up your Northern Longridge Beanie. For more step-by-step visuals, please see the video tutorial here!


Northern Longridge Beanie Pattern – adapted for lighter worsted-weight yarn!
This version of this pattern has all the same beautiful texture as the original pattern, but it’s written for a yarn that is a little on the lighter/thinner end of the worsted weight scale, such as a hand-dyed Aran yarn, #3 weight yarn, or any #4 weight yarn that feels a little on the lighter side.
This pattern also has a full video tutorial on my YouTube Channel! Be sure to check it out for a great visual on some of the stitches or steps for this beanie.

Materials:
- Worsted Weight yarn – Any lighter weight #4 Worsted-Weight/Aran yarn can be used for this version of the Northern Longridge Beanie pattern. You’ll need approx. 150-175 yards. The beanies pictured in this pattern were made with hand-dyed yarn from Woolly Mama Yarns.
- 4.5 mm crochet hook (or size needed to for the pattern gauge below)
- Yarn needle (for weaving in ends)
- Scissors (for cutting yarn)
- Pom Pom (optional) – this beanie looks great with or without a pompom!
Stitches Used
- Ch – chain
- Sl St – slip stitch
- SC – single crochet
- DC – double crochet
- FPSC – font post single crochet
- SC DEC (or Sc2tog) – single crochet decrease
- DC DEC (or Dc2tog) – double crochet decrease
- Long DC – DC stitch worked down into the previous round
Gauge
- 2” square = 7 rows of 9 BLO SC sts
- 10 rows of ribbing = approx. 2-2.25” in length
- When you finish the ribbing for the size of beanie you are making, make sure it is approximately the same length as what it states in the pattern for that size. This is so your beanie will fit the desired size when complete.
Important Notes
- Always start the first stitch of the round in the same space as the chain 1 or chain 2.
- Chain stitches at the start of each round do not count towards stitch count. However, ch stitches within the round are counted (such as the ch 1 sts worked between DC sts).
- The body of the hat is worked in joined rounds. When you finish the stitches of one round, you will be joining to the first stitch of the round with a slip stitch, chaining 1 (or 2) and then starting the next round of the pattern, starting in same stitch as chain.
- The ribbing length is smaller than head circumference because it’s made to stretch. When starting to work the beanie height, make sure that first round of SC stitches are worked with a loose enough tension. If you work this round too tightly, your ribbing will not be able to stretch as it is designed to.
- If you crochet quite loosely or more tightly, you may need to go up or down a hook size to get the desired hat size. Check the gauge of the pattern. If you are unsure about size, you can start with crocheting some of the ribbing and then measure it to check that your gauge matches closely.
- Video Tutorial – Check out this video on my YouTube Channel for a tutorial on how to work up all the stitches in the Northern Longridge Beanie
Child-Sized Beanie
Approx. 4-10 years
Head circumference: 19-21”
Hat height: approx. 7.5”
Ribbed Band:
Row 1: Ch 9, SC in 2nd ch from hook and in each chain across, ch 1, turn. (8)
Row 2: SC in back loops only across, ch 1, turn. (8)
After 10 rows of ribbing, measure the length and compare to pattern gauge so your hat turns out the correct size.
Rows 3-72: Repeat row 2. (8)
Do not fasten off after completing row 72. At this point, the ribbing should measure about 15-15.5 inches long, without stretching it. (If you’ve already stretched it to fit around a head, it will be longer than the measurement here).
Fold ribbing in half and join at the corner with a slip stitch. Then slip stitch in each stitch across to fully connect the ribbing. When you get to the end, flip the ribbing so the stitches are on the inside and your loop is at the top. Chain 1 and start the instructions below for the hat body. Your first SC stitch will be in the same stitch as the chain 1.
Hat body:
Round 1: SC in first st (same stitch as chain 1) and in each st around. Join with a sl st to first stitch, chain 2. (72) Make sure this round of SC stitches is not worked too tightly so that the ribbing can stretch as much as needed.
Round 2: DC in first st, ch 1, skip next st, *DC in next st, ch 1, skip next st, repeat from * around, join, ch 2. (72)
Round 3: DC in first st, long DC into skipped st from previous round, *DC in next st, long DC into skipped st from previous round, repeat from * around, join, ch 2. (72)
Round 4: DC in first st, ch 1, skip next st, *DC in next st, ch 1, skip next st, repeat from * around, join, ch 2. (72)
Round 5: DC in first st, long DC into skipped st from previous round, *DC in next st, long DC into skipped st from previous round, repeat from * around, join, ch 1. (72)
Round 6: FPSC in each stitch around. Join with a sl st to first FPSC. Then sl st back to the first SC of the previous round (behind the FPSC round). This is so your next round is not worked in the post stitches, ch 2. (72) For all FPSC rounds, make sure you go around each of the stitches from the previous round (even the last one that can be a little hard to get into sometimes). See video tutorial for help with the FPSC stitches.
Round 7: DC in first st, ch 1, skip next st, *DC in next st, ch 1, skip next st, repeat from * around, join, ch 2. (72) Make sure this round is not worked in the post stitches.
Round 8: DC in first st, long DC into skipped st from previous round, *DC in next st, long DC into skipped st from previous round, repeat from * around, join, ch 2. (72)
Round 9: DC in first st, ch 1, skip next st, *DC in next st, ch 1, skip next st, repeat from * around, join, ch 2. (72)
Round 10: DC in first st, long DC into skipped st from previous round, *DC in next st, long DC into skipped st from previous round, repeat from * around, join, ch 1. (72)
Round 11: FPSC in each stitch around. Join with a sl st to first FPSC. Then sl st back to the first SC of the previous round (behind the FPSC round). This is so your next round is not worked in the post stitches, ch 2.
Round 12: *DC DEC, ch 1, skip next st, [DC, ch 1, skip next st] 3 times, then repeat from * around, join, chain 2. (64) Make sure this round is not worked in the post stitches.
Round 13: *DC DEC, DC in next st, long DC in next st (into skipped st from previous round), repeat from * around, join, ch 2. (48) The DC DEC sts in this round will combine a DC and long DC stitch. See photos at end of pattern. See photo tutorial at end of pattern or watch the video tutorial.
Round 14: *[DC DEC, ch 1, skip next st] 2 times, DC, ch 1, skip next st, repeat from *around, join, ch 2. (36)
Round 15: DC in first st, long DC into skipped st from previous round, *DC in next st, long DC into skipped st from previous round, repeat from * around, join, ch 2. (36)
Round 16: FPSC in each stitch around. Join with a sl st to first FPSC. Then sl st back to the first SC of the previous round (behind the FPSC round). This is so your next round is not worked in the post stitches, ch 2. (36)
Round 17: *DC DEC, ch 1, skip next st, [DC in next st, ch 1, skip next st] 3 times, repeat from *around, join, ch 2. (32)
Round 18: DC DEC in each stitch around, join, ch 1. (16) The DC DEC sts this round will combine a DC and long DC st.
Round 19: SC DEC in each stitch around, join. (8) Fasten off. Leave a long tail to sew the top closed, cut yarn.
Closing the top of the hat: Use your yarn needle to pass yarn under the front loops of each SC stitch around. When you are through all the front loops, pull tight to close the hole. Sew around the stitches in the circle one more time and then weave in ends before cutting yarn.
You’re all done your child-sized Northern Longridge Beanie! I hope you are happy with how it turned out and it fits great!

Adult-Sized Beanie
Head circumference: 22-24”
Hat height: approx. 8.5”
Ribbed Band:
Row 1: In main color, ch 11. SC in 2nd ch from hook and in each ch across, ch 1, turn. (10)
Row 2: SC in back loops only across, ch 1, turn. (10)
After 10 rows of ribbing, measure the length and compare to pattern gauge so your hat turns out the correct size.
Rows 3-80: Repeat row 2.
Do not fasten off after completing row 80. At this point, the ribbing should measure about 16-16.5 inches long, without stretching it. (If you’ve already stretched it to fit around a head, it might be a little longer than the measurement here).
Fold ribbing in half and join at the corner with a slip stitch. Then slip stitch in each stitch across to fully connect the ribbing. When you get to the end, flip the ribbing so the stitches are on the inside and your loop is at the top. Chain 1 and start the instructions below for the hat body. Your first SC stitch will be in the same stitch as the chain 1.
Hat body:
Round 1: SC in first stitch (same stitch as chain 1) and in each stitch around. Join with a sl st to first stitch, chain 2. (80) Make sure this round of SC stitches is not worked too tightly so that the ribbing can stretch as much as needed.
Round 2: DC in first st, ch 1, skip next st, *DC in next st, ch 1, skip next st, repeat from * around, join, ch 2. (80)
Round 3: DC in first st, long DC into skipped st from previous round, *DC in next st, long DC into skipped st from previous round, repeat from * around, join, ch 2. (80)
Round 4: DC in first st, ch 1, skip next st, *DC in next st, ch 1, skip next st, repeat from * around, join, ch 2. (80)
Round 5: DC in first st, long DC into skipped st from previous round, *DC in next st, long DC into skipped st from previous round, repeat from * around, join, ch 1. (80)
Round 6: FPSC in each stitch around. Join with a sl st to first FPSC. Then sl st back to the first SC of the previous round (behind the FPSC round). This is so your next round is not worked in the post stitches, ch 2. (80) For all FPSC rounds, make sure you go around each of the stitches from the previous round (even the last one that can be a little hard to get into sometimes). See video tutorial for help with the FPSC stitches.
Round 7: DC in first st, ch 1, skip next st, *DC in next st, ch 1, skip next st, repeat from * around, join, ch 2. (80) Make sure this round is not worked in the post stitches.
Round 8: DC in first st, long DC into skipped st from previous round, *DC in next st, long DC into skipped st from previous round, repeat from * around, join, ch 2. (80)
Round 9: DC in first st, ch 1, skip next st, *DC in next st, ch 1, skip next st, repeat from * around, join, ch 2. (80)
Round 10: DC in first st, long DC into skipped st from previous round, *DC in next st, long DC into skipped st from previous round, repeat from * around, join, ch 1. (80)
Round 11: FPSC in each stitch around. Make sure you go around each of the stitches from the previous round (even the last one that can be a little hard to get into). Join with a sl st to first FPSC. Then sl st back to the first SC of the previous round (behind the FPSC round). This is so your next round is not worked in the post stitches, ch 2. (80)
Round 12: *DC DEC, ch 1, skip next st, DC in next st, ch 1, skip next, repeat from * around (making sure you are working in the stitches behind the post stitches), join, chain 2. (64)
Round 13: DC in first st, long DC into skipped st from previous round, *DC in next st, long DC into skipped st from previous round, repeat from * around, join, ch 2. (64) Note that DC DEC sts will be combining a DC and long DC st, either starting with the DC or the long DC. After each decrease, alternating DC and long DC sts may start with a DC or a long DC depending on the last decrease worked. See photo tutorial at end of pattern or watch the video tutorial for a visual of the decreases are worked or watch the video tutorial.
Round 14: DC in first st, ch 1, skip next st, *DC in next st, ch 1, skip next st, repeat from * around, join, ch 2. (64)
Round 15: DC in first st, long DC into skipped st from previous round, *DC in next st, long DC into skipped st from previous round, repeat from * around, join, ch 1. (64)
Round 16: FPSC in each stitch around. Make sure you go around each of the stitches from the previous round (even the last one that can be a little hard to get into). Join with a sl st to first FPSC. Then sl st back to the first SC of the previous round (behind the FPSC round). This is so your next round is not worked in the post stitches, ch 2. (64)
Round 17: *[DC DEC, ch 1, skip next st] 2 times, DC, ch 1, skip next st, repeat from *around, join, ch 2. (48)
Round 18: DC in first st, long DC into skipped st from previous round, *DC in next st, long DC into skipped st from previous round, repeat from * around, join, ch 2. (48)
Round 19: *DC DEC, ch 1, skip next st, repeat from * around, join, ch 2. (32)
Round 20: DC DEC in each stitch around, join, ch 1. (16) The DC DEC sts this round will combine a DC and long DC st.
Round 21: *SC DEC, SC next 2 sts, repeat from * around, join, ch 1. (12)
Round 22: SC DEC in each stitch around, join. (6) Fasten off. Leave a long tail to sew the top closed, cut yarn.
Closing the top of the hat: Use your yarn needle to pass yarn under the front loops of each SC stitch around. When you are through all the front loops, pull tight to close the hole. Sew around the stitches in the circle one more time and then weave in ends before cutting yarn.
Your beanie is all done! I hope you love how it turned out! Have fun making more Northern Longridge Beanies in all different colors!

**Want to be kept in the loop? Be sure to like Loops and Love Crochet on Facebook and join the Loops and Love Crochet Group! Don’t forget to follow @loopsandlovecrochet on Instagram! Remember to tag Loops and Love Crochet when you post your fnished projects on social media! I’d love to see them! **
*You may make and sell any items made from my patterns, but please link back to my blog or Loops & Love Crochet as the designer. Please do not copy this pattern or photos and share as your own, in part or in whole. Instead, link back to the Loops and Love Crochet blog (especially when selling items you make from my patterns). Thank you!