Halloween Wall Hanging - Free Crochet Pattern
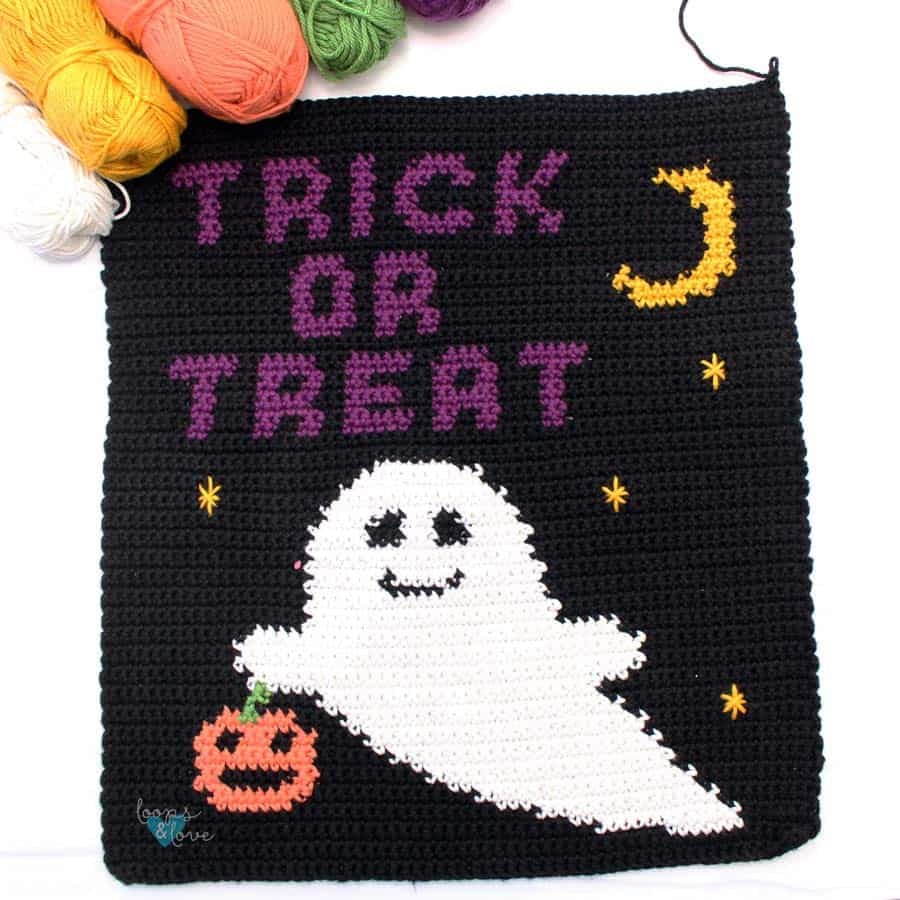
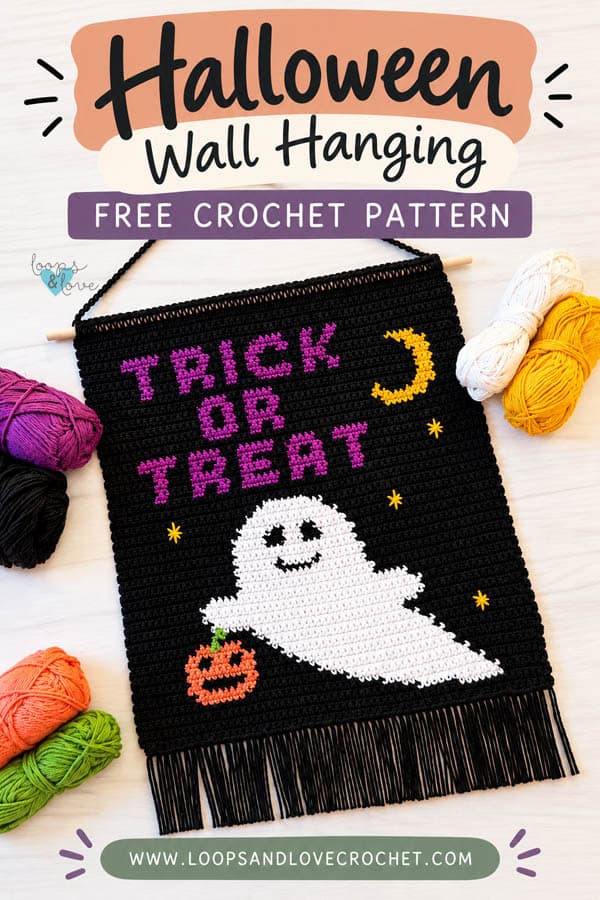
Get your home ready for Halloween with this fun and colorful Halloween Wall Hanging crochet pattern! Featuring a friendly little ghost carrying a jack-o'-lantern, this wall hanging is a cute addition to your Halloween decorations.
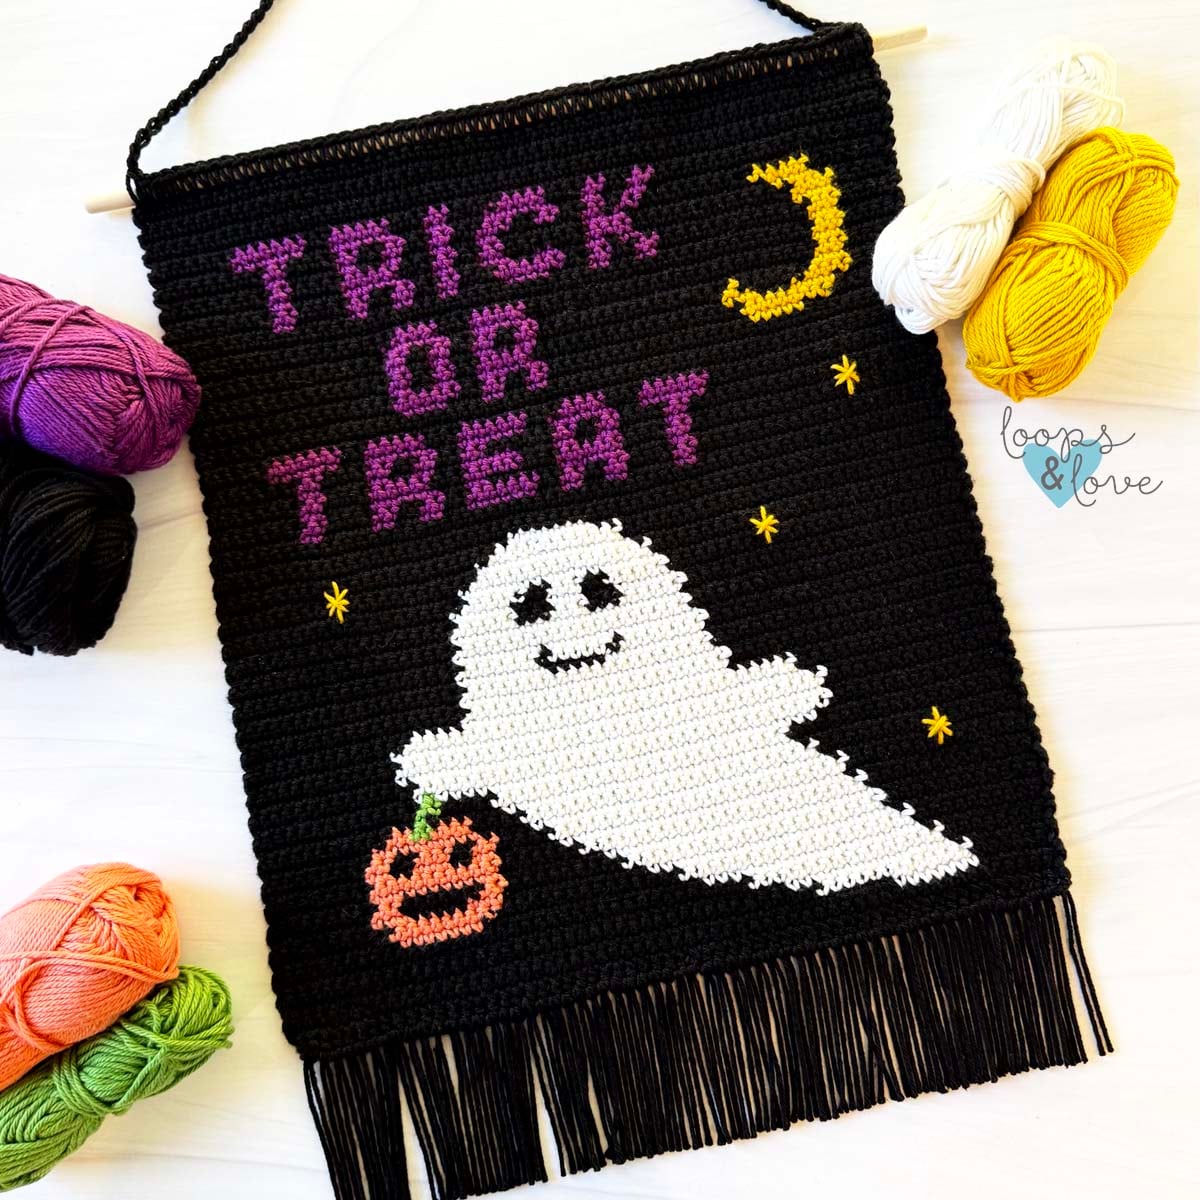
This crochet Halloween wall hanging is made using single crochet stitches and the intarsia crochet technique to create the design. This technique is explained further in the pattern, but basically you'll be following a graph (or written instructions) and making color changes to crochet this project.
The pattern includes a graph to follow along with, plus instructions for adding fringe and attaching the finished piece to a wooden dowel. Hang it on a wall or door to add a little handmade Halloween fun to your home!
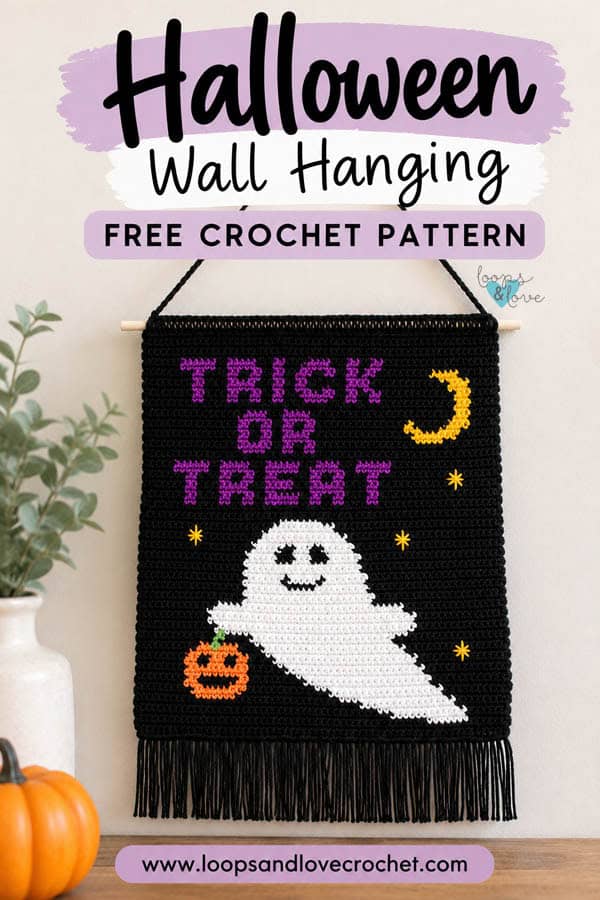
Pin this post to come back to it later!
Remember to like Loops and Love Crochet on Facebook and join the Loops and Love Crochet Group for sharing your finished projects! I'd also LOVE it if you followed @loopsandlovecrochet on Instagram! If you like crochet video tutorials, check out (and subscribe to) my Loops and Love Crochet YouTube Channel!
Check out our other Halloween patterns on the blog, like our jack-o'-lantern treat bag, trick or treat bags, or our friendly witch amigurumi!

Disclosure: This post may contain affiliate links, which means I may receive a small commission if you click a link and purchase something that I have recommended. This is done at no extra cost to you. Thank you for supporting Loops & Love Crochet!
The Halloween Wall Hanging crochet pattern is available for FREE on this website. If you'd like an ad-free, printable PDF version, you may purchase it for a small fee from my Etsy or Ravelry shops. Thank you so much for supporting Loops & Love Crochet!
Materials
- Worsted weight #4 yarn – The wall-hanging pictured in this pattern was made with WeCrochet/Knit Picks Comfy yarn which is 75% cotton and 25% acrylic. Either cotton or acrylic yarn (or a blend) can be used for this project. This yarn is a little on the lighter side for a worsted-weight yarn. If you are substituting with another yarn, please refer to the gauge as your wall hanging may turn out larger or smaller, depending on yarn thickness. A total of approximately 260 yds will be needed for this project. The colorways and yardages used are 180 yds of Black (includes yardage for fringe), 30 yds of White, 10 yds of Carrot (orange), 5 yds of Peapod (green), 25 yds of Lilac (purple), and 5 yards of Honey (yellow).
- Crochet Hook – 4 mm size crochet hook
- Wooden Dowel (or similar material) – a 5/16” thick dowel was used for the wall hanging pictured. The dowel was cut to approx. 1-1.5 inches wider than the panel. You can also use a pre-cut 18” dowel and trim it down a touch or leave it long on the sides.
- Yarn needle for weaving in ends.
- Scissors for cutting ends.
Stitches Used
- Ch – Chain
- Sl St – Slip stitch
- SC – Single crochet
Gauge
- 2” square = approximately 10 rows of 9 SC stitches.
Finished Size
- When finished, the wall hanging panel (just the rectangular crocheted piece) measures approximately 13.5” wide x 14.5” tall. This panel was blocked to make it even on all sides and flat. Finished measurements for the Halloween Wall Hanging from the top of dowel to bottom of fringe is 13.5” wide x 18.5” tall.
Important Notes
- Turned Rows– Each panel is worked in turned rows of SC stitches. At the end of each row, chain 1 and turn. Chain 1 stitches do not count towards stitch count.
- Color Changes – You will be changing colors often in this pattern. To change colors, complete the last SC in the first color up until the last yarn over. Yarn over with the new color and pull through last step of the SC stitch. Now you will be working in the new color until you change colors again.
- Intarsia Crochet Tips – For this project, you will be using the intarsia crochet technique. When you change colors, you will not be carrying the unused colors along under your stitches. Instead, you will be dropping the color that you are finished with (leaving it attached) and picking up the next color, pulling it over to where you are working the stitches. There will be a right side (RS) and wrong side (WS) of this project. A further explanation on this is in the Graph Notes below.
- Video Tutorial – There is not a full start-to-finish video for this pattern, however, there is a video tutorial for this pattern showing how to read the graph and change colors, crochet to the dowel, and add the fringe.
Graph Instructions
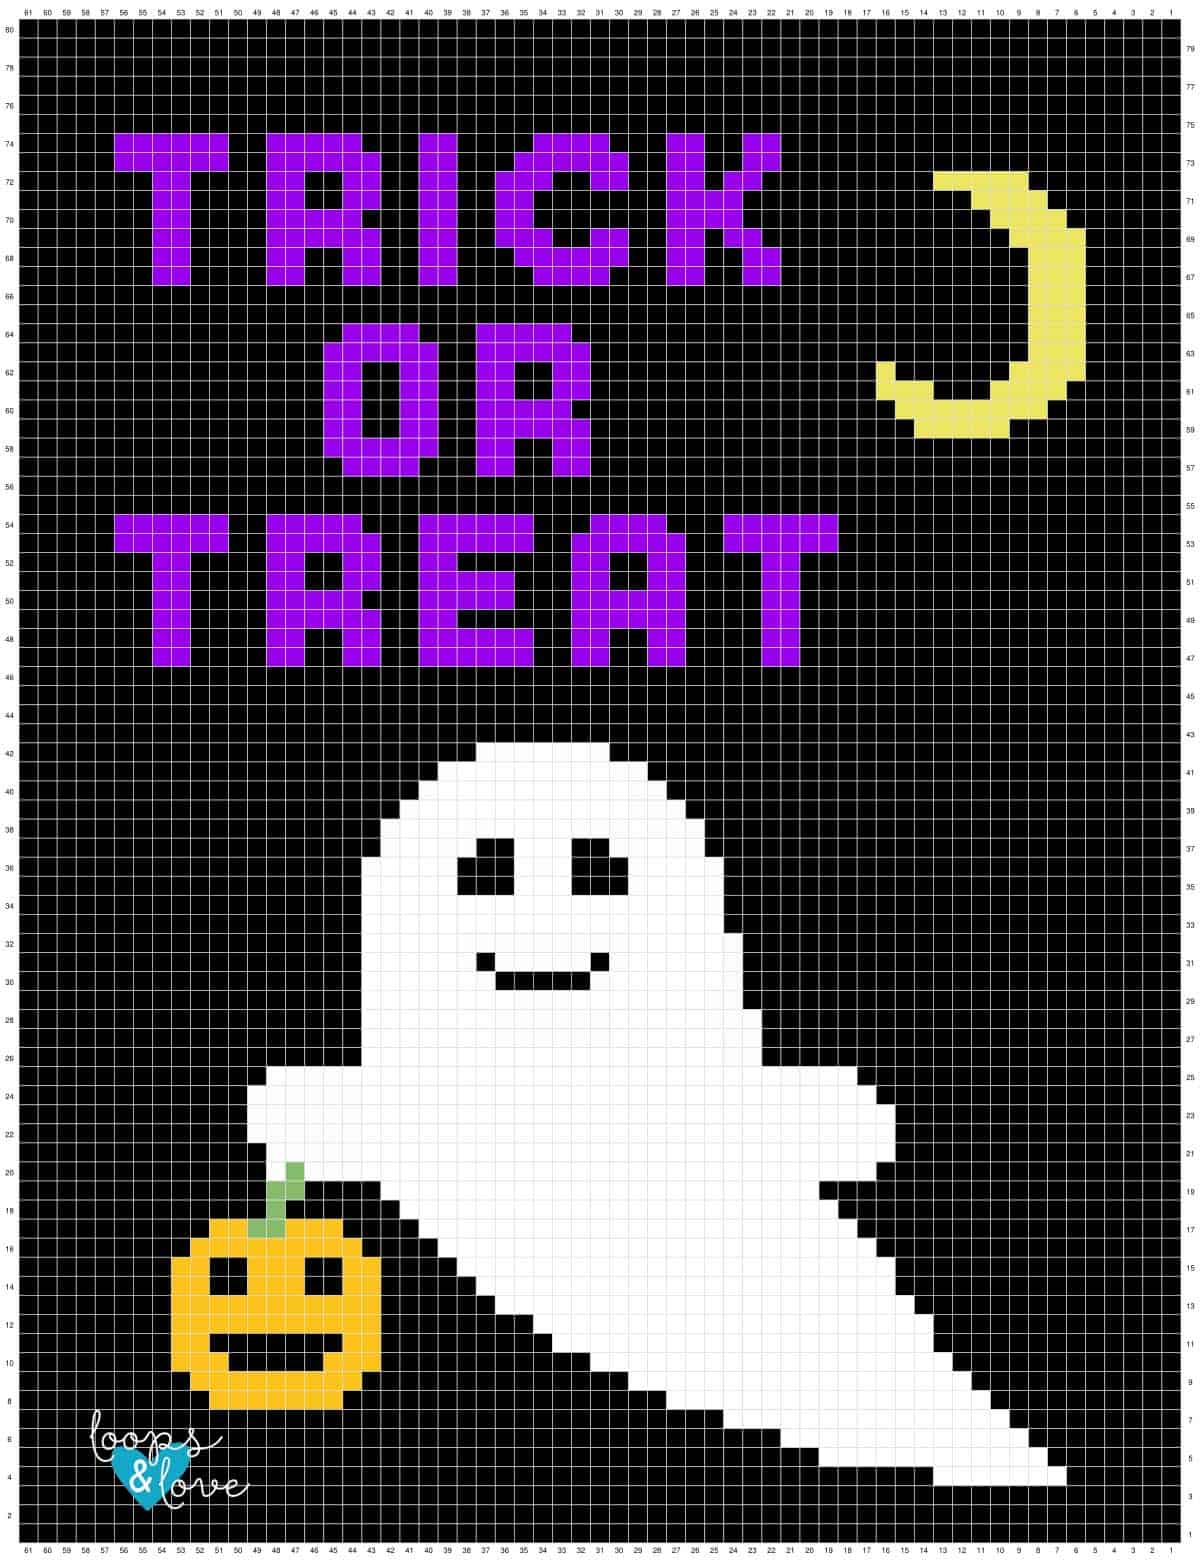
Below, you will see the graph for this project. Each box in the graph counts as one SC stitch. This means you will be working 80 rows of 61 stitches, following the color changes in the graph.
To read this graph, you will be starting at the bottom right (or left if left-handed) and working your way across in back-and-forth rows. All ODD numbered rows will have the right side of the project facing you, EVEN numbered rows will have the wrong side facing you. When you are working on a right side (RS) row, make sure you are dropping the yarn to the back (away from you) for the color changes. When you are working on a wrong side (WS) row, make sure you are dropping the yarn on the front (towards you) for the color changes. This will ensure that the front of the wall hanging does not show any of the color changes since all the yarn is carried on the back (wrong side).
On the wrong side, you will start to see where you drop and pick up each color, pulling it over to where you need it. Yes, it will be messy looking with all the ends and yarn carried across, but it is the back so you will not see it once it is hanging on the wall. Ends can be worked over or woven in after the panel is finished.
To help keep your yarn floats across the back of your project shorter, it is helpful to use two to bobbins of some colors, when the sections of the same color are far apart. For example, having two bobbins of black is helpful when working the ghost. One can be for the left and oe can be for the right so that you are not pulling the black yarn across the width of the ghost each row. As an alternative, you can also carry your yarn under your stitches at times when the colors are further apart to reduce the length of the floated yarn on the back. If you are carrying yarn, be sure to keep it towards the back of the project and bottom of the stitches so the carried color will not show through between your stitches when looking at the front of your project.
Remember to keep consistent tension, even when working all the color changes. This is so your panel comes out nice and even on the sides. However, if it is a little off at the end, blocking it will even it out.
The Pattern: Make your own Halloween Wall Hanging
Row 1: In color A (black), chain 62, SC in 2nd ch from hook and in each stitch across, ch 1 turn (61) *This first row counts as row 1 on the chart.
Rows 2-80: SC in each st across (following the written instructions below or the graph for the color changes), ch 1 turn (61)
Continue to the instructions for attaching your project to the dowel for hanging.
Written Instructions for the Graph
You may choose to either use the written notes below for the color changes or follow the graph. In the written notes below, the row number, number of SC stitches in each color, RS/WS rows, and the direction you are traveling (relating to the graph) are included. Note that if you are left-handed, the directional arrows will be opposite.
Color Key: B = Black, W = White, O = Orange, G = Green, P = Purple, Y = Yellow
← Row 1 [RS]: (B) 61
→ Row 2 [WS]: (B) 61
← Row 3 [RS]: (B) 61
→ Row 4 [WS]: (B) 48, (W) 7, (B) 6
← Row 5 [RS]: (B) 7, (W) 12, (B) 42
→ Row 6 [WS]: (B) 40, (W) 13, (B) 8
← Row 7 [RS]: (B) 9, (W) 15, (B) 37
→ Row 8 [WS]: (B) 10, (O) 7, (B) 17, (W) 17, (B) 10
← Row 9 [RS]: (B) 11, (W) 18, (B) 14, (O) 9, (B) 9
→ Row 10 [WS]: (B) 8, (O) 3, (B) 5, (O) 3, (B) 11, (W) 19, (B) 12
← Row 11 [RS]: (B) 13, (W) 20, (B) 9, (O) 2, (B) 7, (O) 2, (B) 8
→ Row 12 [WS]: (B) 8, (O) 11, (B) 8, (W) 21, (B) 13
← Row 13 [RS]: (B) 14, (W) 22, (B) 6, (O) 11, (B) 8
→ Row 14 [WS]: (B) 8, (O) 2, (B) 2, (O) 3, (B) 2, (O) 2, (B) 5, (W) 22, (B) 15
← Row 15 [RS]: (B) 15, (W) 23, (B) 4, (O) 2, (B) 2, (O) 3, (B) 2, (O) 2, (B) 8
→ Row 16 [WS]: (B) 9, (O) 9, (B) 4, (W) 23, (B) 16
← Row 17 [RS]: (B) 17, (W) 23, (B) 4, (O) 3, (G) 2, (O) 2, (B) 10
→ Row 18 [WS]: (B) 13, (G), (B) 6, (W) 23, (B) 18
← Row 19 [RS]: (B) 19, (W) 23, (B) 4, (G) 2, (B) 13
→ Row 20 [WS]: (B) 13, (W), (G), (W) 30, (B) 16
← Row 21 [RS]: (B) 15, (W) 33, (B) 13
→ Row 22 [WS]: (B) 12, (W) 34, (B) 15
← Row 23 [RS]: (B) 15, (W) 34, (B) 12
→ Row 24 [WS]: (B) 12, (W) 33, (B) 16
← Row 25 [RS]: (B) 17, (W) 31, (B) 13
→ Row 26 [WS]: (B) 18, (W) 21, (B) 22
← Row 27 [RS]: (B) 22, (W) 21, (B) 18
→ Row 28 [WS]: (B) 18, (W) 21, (B) 22
← Row 29 [RS]: (B) 23, (W) 20, (B) 18
→ Row 30 [WS]: (B) 18, (W) 7, (B) 5, (W) 8, (B) 23
← Row 31 [RS]: (B) 23, (W) 7, (B), (W) 5, (B), (W) 6, (B) 18
→ Row 32 [WS]: (B) 18, (W) 20, (B) 23
← Row 33 [RS]: (B) 24, (W) 19, (B) 18
→ Row 34 [WS]: (B) 18, (W) 19, (B) 24
← Row 35 [RS]: (B) 24, (W) 5, (B) 3, (W) 3, (B) 3, (W) 5, (B) 18
→ Row 36 [WS]: (B) 18, (W) 5, (B) 3, (W) 3, (B) 3, (W) 5, (B) 24
← Row 37 [RS]: (B) 25, (W) 5, (B) 2, (W) 3, (B) 2, (W) 5, (B) 19
→ Row 38 [WS]: (B) 19, (W) 17, (B) 25
← Row 39 [RS]: (B) 26, (W) 15, (B) 20
→ Row 40 [WS]: (B) 21, (W) 13, (B) 27
← Row 41 [RS]: (B) 28, (W) 11, (B) 22
→ Row 42 [WS]: (B) 24, (W) 7, (B) 30
← Row 43 [RS]: (B) 61
→ Row 44 [WS]: (B) 61
← Row 45 [RS]: (B) 61
→ Row 46 [WS]: (B) 61
← Row 47 [RS]: (B) 20, (P) 2, (B) 4, (P) 2, (B) 2, (P) 2, (B) 2, (P) 6, (B) 2, (P) 2, (B) 2, (P) 2, (B) 4, (P) 2, (B) 7
→ Row 48 [WS]: (B) 7, (P) 2, (B) 4, (P) 2, (B) 2, (P) 2, (B) 2, (P) 6, (B) 2, (P) 2, (B) 2, (P) 2, (B) 4, (P) 2, (B) 20
← Row 49 [RS]: (B) 20, (P) 2, (B) 4, (P) 6, (B) 6, (P) 2, (B) 2, (P) 6, (B) 4, (P) 2, (B) 7
→ Row 50 [WS]: (B) 7, (P) 2, (B) 4, (P) 5, (B) 3, (P) 5, (B) 3, (P) 6, (B) 4, (P) 2, (B) 20
← Row 51 [RS]: (B) 20, (P) 2, (B) 4, (P) 2, (B) 2, (P) 2, (B) 3, (P) 5, (B) 2, (P) 2, (B) 2, (P) 2, (B) 4, (P) 2, (B) 7
→ Row 52 [WS]: (B) 7, (P) 2, (B) 4, (P) 2, (B) 2, (P) 2, (B) 2, (P) 2, (B) 6, (P) 2, (B) 2, (P) 2, (B) 4, (P) 2, (B) 20
← Row 53 [RS]: (B) 18, (P) 6, (B) 2, (P) 6, (B) 2, (P) 6, (B) 2, (P) 6, (B) 2, (P) 6, (B) 5
→ Row 54 [WS]: (B) 5, (P) 6, (B) 2, (P) 5, (B) 3, (P) 6, (B) 3, (P) 4, (B) 3, (P) 6, (B) 18
← Row 55 [RS]: (B) 61
→ Row 56 [WS]: (B) 61
← Row 57 [RS]: (B) 31, (P) 2, (B) 2, (P) 2, (B) 3, (P) 4, (B) 17
→ Row 58 [WS]: (B) 16, (P) 6, (B) 2, (P) 2, (B) 2, (P) 2, (B) 31
← Row 59 [RS]: (B) 9, (Y) 5, (B) 17, (P) 6, (B) 2, (P) 2, (B) 2, (P) 2, (B) 16
→ Row 60 [WS]: (B) 16, (P) 2, (B) 2, (P) 2, (B) 2, (P) 5, (B) 17, (Y) 8, (B) 7
← Row 61 [RS]: (B) 6, (Y) 4, (B) 3, (Y) 3, (B) 15, (P) 2, (B) 2, (P) 2, (B) 2, (P) 2, (B) 2, (P) 2, (B) 16
→ Row 62 [WS]: (B) 16, (P) 2, (B) 2, (P) 2, (B) 2, (P) 2, (B) 2, (P) 2, (B) 15, (Y), (B) 6, (Y) 4, (B) 5
← Row 63 [RS]: (B) 5, (Y) 3, (B) 23, (P) 6, (B) 2, (P) 6, (B) 16
→ Row 64 [WS]: (B) 17, (P) 4, (B) 3, (P) 5, (B) 24, (Y) 3, (B) 5
← Row 65 [RS]: (B) 5, (Y) 3, (B) 53
→ Row 66 [WS]: (B) 53, (Y) 3, (B) 5
← Row 67 [RS]: (B) 5, (Y) 3, (B) 13, (P) 2, (B) 2, (P) 2, (B) 3, (P) 4, (B) 4, (P) 2, (B) 2, (P) 2, (B) 2, (P) 2, (B) 4, (P) 2, (B) 7
→ Row 68 [WS]: (B) 7, (P) 2, (B) 4, (P) 2, (B) 2, (P) 2, (B) 2, (P) 2, (B) 3, (P) 6, (B) 2, (P) 2, (B) 2, (P) 2, (B) 13, (Y) 3, (B) 5
← Row 69 [RS]: (B) 5, (Y) 4, (B) 13, (P) 2, (B), (P) 2, (B) 2, (P) 2, (B) 2, (P) 3, (B) 2, (P) 2, (B) 2, (P) 6, (B) 4, (P) 2, (B) 7
→ Row 70 [WS]: (B) 7, (P) 2, (B) 4, (P) 5, (B) 3, (P) 2, (B) 2, (P) 2, (B) 7, (P) 4, (B) 13, (Y) 4, (B) 6
← Row 71 [RS]: (B) 7, (Y) 4, (B) 12, (P) 4, (B) 7, (P) 2, (B) 2, (P) 2, (B) 2, (P) 2, (B) 2, (P) 2, (B) 4, (P) 2, (B) 7
→ Row 72 [WS]: (B) 7, (P) 2, (B) 4, (P) 2, (B) 2, (P) 2, (B) 2, (P) 2, (B) 2, (P) 3, (B) 2, (P) 2, (B) 2, (P) 2, (B), (P) 2, (B) 9, (Y) 5, (B) 8
← Row 73 [RS]: (B) 21, (P) 2, (B) 2, (P) 2, (B) 2, (P) 6, (B) 3, (P) 2, (B) 2, (P) 6, (B) 2, (P) 6, (B) 5
→ Row 74 [WS]: (B) 5, (P) 6, (B) 2, (P) 5, (B) 3, (P) 2, (B) 4, (P) 4, (B) 3, (P) 2, (B) 2, (P) 2, (B) 21
← Row 75 [RS]: (B) 61
→ Row 76 [WS]: (B) 61
← Row 77 [RS]: (B) 61
→ Row 78 [WS]: (B) 61
← Row 79 [RS]: (B) 61
→ Row 80 [WS]: (B) 61
Do not fasten off. Continue to next set of instructions below to finish the top to get your project ready for hanging.
Note - If you are making your Halloween Wall Hanging into a pillow, go back and work up a second panel matching the first one. This one can be in a solid color or thick stripes in the colors used on the front would look neat too! Once you've made both panels, place them on top of each other (right sides facing out) and single crochet around all four sides to join them together. Add stuffing (or a pillow form) as you are crocheting together the last side.
Stitching on the Stars
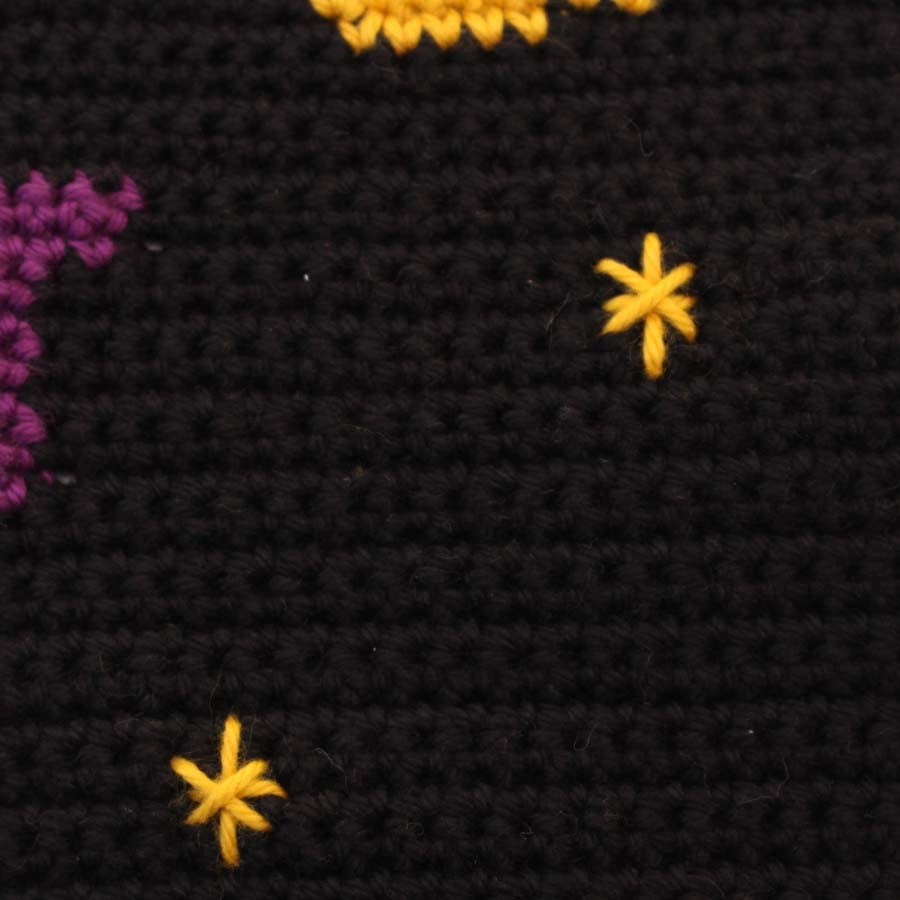
Stitch on the stars using yellow yarn and a yarn needle. To make a star, start by making a vertical stitch that is 4 stitches tall, then make a horizontal stitch halfway up that is 3 stitches wide. Finish by making two diagonal stitches in the shape of an X. Tie the ends off on the back of your project.
Attaching to the Dowel and Adding the Chain
After completing row 80, chain 1 and turn your work so the right side (RS) is facing you. Line up your dowel along the top of your project. Now, you will work one last row of single crochet stitches, however, you will be working these stitches over the dowel. To make your SC stitches, insert your hook into the stitch, passing under the dowel. Yarn over on the other side of the dowel and pull up a loop, yarn over and pull through both loops on your hook. Continue working SC stitches all the way across (61 sts in total). When you get to the other end, do not fasten off. Next, you’ll be making the long chain for hanging your project.
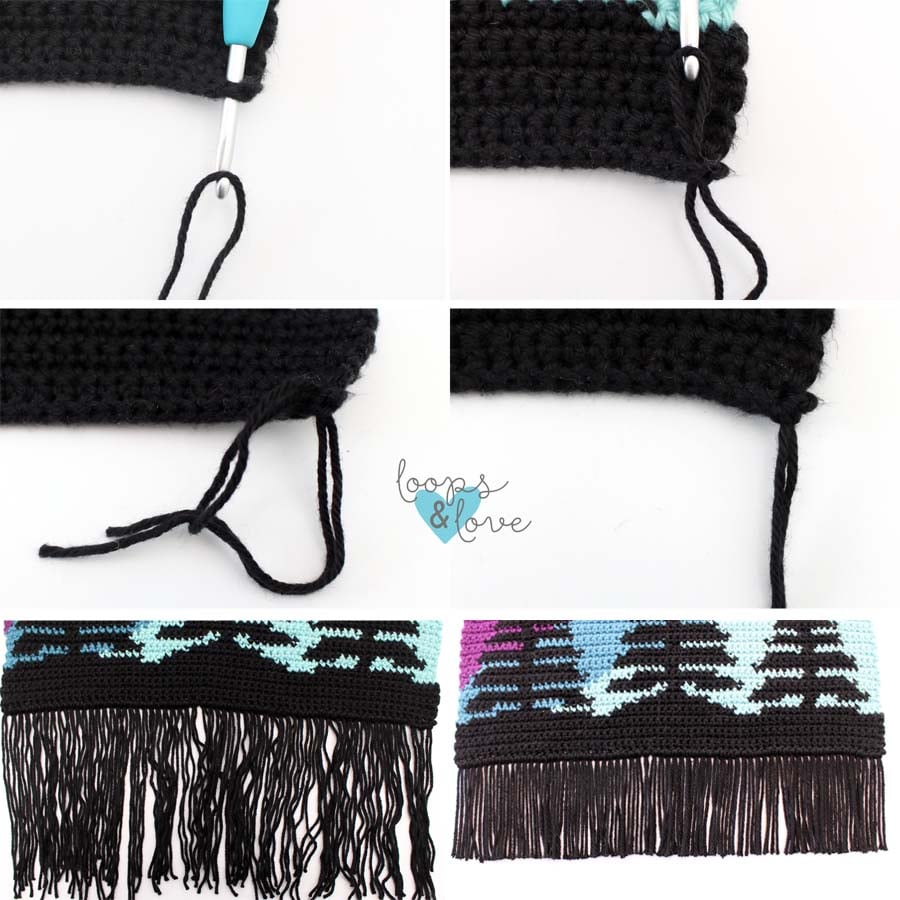
For a visual on attaching the dowel and adding the chain, see the video for this pattern or there are helpful photos below from another one of our wall hanging patterns.
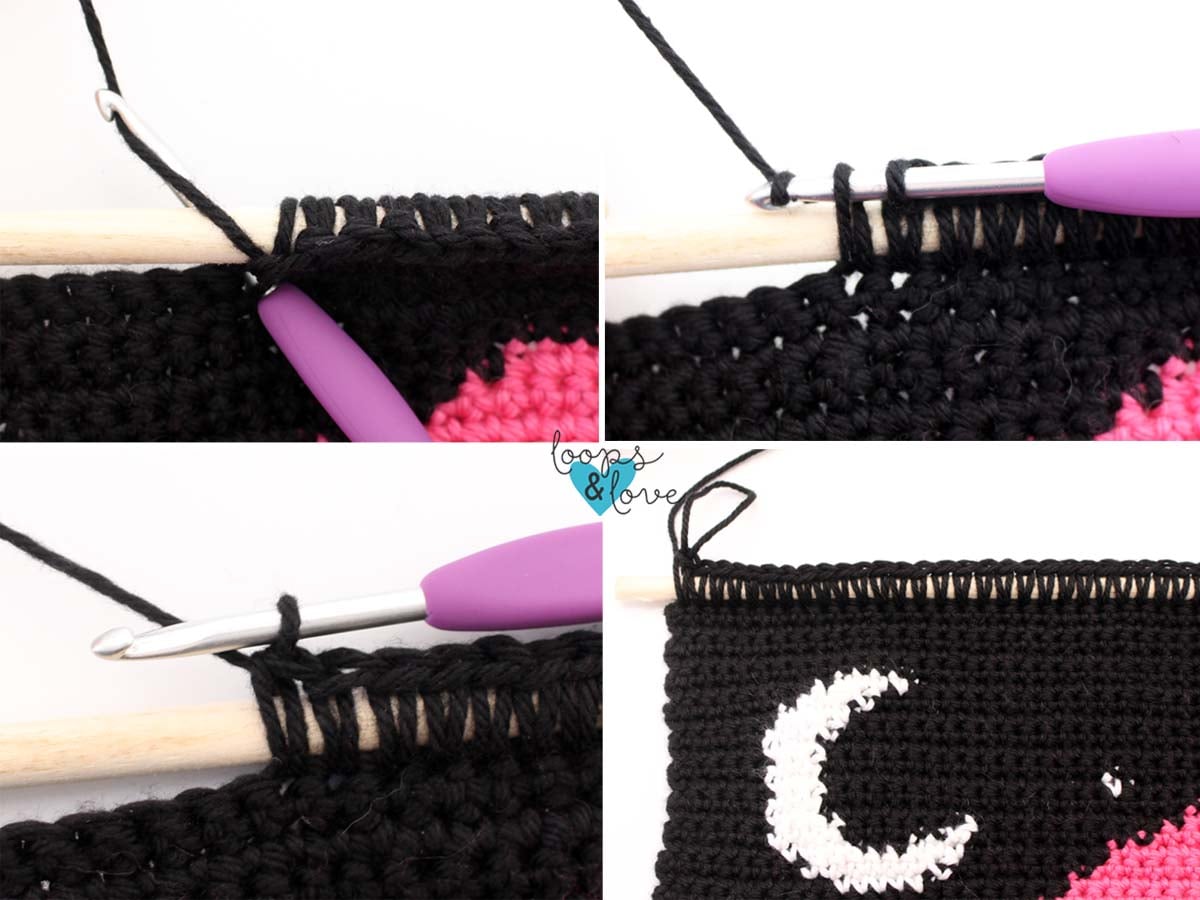
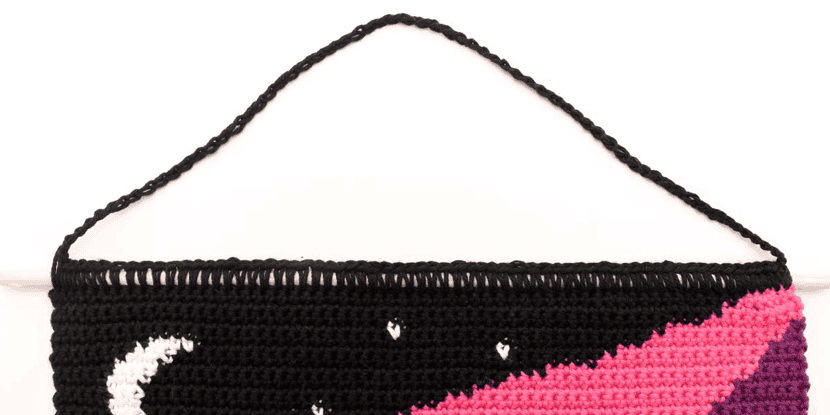
To add the chain for hanging, chain 70 (or your desired length for the hanging chain), join with a slip stitch to the top of the first SC stitch on the other side of the project. Fasten off. Weave in all ends on the back of the project.
Adding the Knotted Fringe (Optional)
For the knotted fringe, you will need a bunch of strands of black (or your chosen fringe color) cut into approximately 9 inches each. Wrapping your yarn around an object like a book and then cutting the ends is an easy way to keep the strands even in length. Take one strand, fold it in half, and pull it part way through one of the stitches on the bottom of the wall hanging. Loop the ends through the loop created and pull down on the ends to secure the knot (see photos below. Repeat for all 61 stitches across bottom of wall hanging.
When you have added all the strands of fringe and knotted them, trim the strands evenly to your desired length. It might be helpful to block your project before trimming the strands if they are not sitting quite flat. For the Halloween Wall Hanging, the fringe was trimmed to approximately 3” in length. For a visual on adding the fringe, see the video for this pattern or there are helpful photos below from another one of our wall hanging patterns.
You are now finished your Halloween Wall Hanging! I hope you love how it turned out! Have fun adding it to your spooky (or not so spooky) décor this Halloween season!
**Want to be kept in the loop? Be sure to like Loops and Love Crochet on Facebook and join the Loops and Love Crochet Group! Don't forget to follow @loopsandlovecrochet on Instagram! Remember to tag Loops and Love Crochet when you post your finished projects on social media! I'd love to see them! **
*You may make and sell any items made from my patterns, but please link back to my blog or Loops & Love Crochet as the designer. Please do not copy this pattern or photos and share as your own, in part or in whole. Instead, link back to the Loops and Love Crochet blog (especially when selling items you make from my patterns). Thank you!